

Common Garment Measurement Errors That Cause Fit Problems
A garment measurement error is not always an incorrect reading on a measuring tape. The number may be recorded accurately while the garment is positioned incorrectly, the wrong measurement method is used, or the value is compared against an outdated specification.
This is why measurement disputes can be difficult to resolve.
A factory may report that a shirt chest measures 54 centimeters, while the brand’s technical team records 52.5 centimeters on the same sample. Both readings may be internally consistent if one person measures directly below the armhole and the other measures five centimeters below it. The disagreement is not necessarily caused by poor measuring skill. It may originate from an incomplete point-of-measure instruction.
Similar problems occur when one operator follows a seam curve while another measures straight, when knitwear is checked before it has relaxed, or when post-wash measurements are compared with a pre-wash specification.
These errors can lead teams in the wrong direction. A pattern may be revised unnecessarily. A supplier may remake a sample that was already dimensionally correct. Production garments may be rejected against the wrong document revision. Fit problems may remain unresolved because the team changes isolated measurements without understanding how the pattern, material, and construction interact.
Reliable measurement control therefore depends on more than precise tools. It requires a shared method, stable garment condition, controlled specification data, and informed technical interpretation.
Quick Answer
Common garment measurement errors include using unclear points of measure, starting or ending at the wrong reference point, confusing flat widths with full circumferences, measuring curves as straight lines, stretching the garment or tape, checking garments before they have relaxed, mixing pre-wash and post-wash specifications, using outdated document revisions, applying incorrect grade rules, and treating tolerance as extra fit allowance.
These mistakes can create two different problems. First, the recorded measurement may not accurately represent the garment. Second, teams may act on technically correct measurements without understanding why the garment still fits poorly.
Measurement errors can affect pattern corrections, sample approvals, marker preparation, fabric consumption, size grading, quality inspection, and customer fit consistency. A small mistake may also be multiplied across the size range or repeated through an entire production order.
The best response is not simply to measure again. Teams should verify the point-of-measure method, garment condition, measuring equipment, specification revision, unit of measurement, sample stage, and relationship between the disputed dimension and nearby pattern areas.
When the method is repeatable and the data are controlled, measurements become useful diagnostic evidence rather than another source of disagreement.
What Counts as a Garment Measurement Error?
A garment measurement error is any problem that causes a recorded dimension, specification value, or technical interpretation to misrepresent the approved garment requirement.
Some errors occur while the garment is being measured. Others are created earlier when the specification is written or later when the result is interpreted.
The main error categories are:
|
Error category |
What goes wrong |
Typical consequence |
|
Method error |
The wrong start point, route, garment position, or measuring technique is used |
Different operators obtain different results |
|
Garment-condition error |
The product is stretched, wrinkled, wet, freshly pressed, or insufficiently relaxed |
The measurement does not represent its stable condition |
|
Specification error |
The target value, grade, tolerance, or POM description is incorrect |
A correctly made garment may be altered or rejected |
|
Data-control error |
The wrong revision, size, unit, colorway, or sample stage is used |
Teams compare unrelated information |
|
Interpretation error |
A dimensional result is treated as the complete explanation for a fit problem |
Pattern changes fail to correct the underlying issue |
|
Production-process error |
Cutting, sewing, pressing, washing, or finishing changes the garment dimension |
Bulk garments deviate from the approved sample |
ISO 18890:2018 defines principal garment measurement points and methods intended to support measurement tables, prototype development, sample approval, production control, garment inspection, and dimensional-change testing. ISO also recognizes that additional measurement points may need to be agreed between the parties because individual garments can require product-specific methods.
The ISO 18890 standard method of garment measurement provides a shared technical reference, but it does not remove the need for clear brand instructions, diagrams, and product-specific points of measure.

Why Small Measurement Errors Can Create Large Production Problems
A difference of one centimeter may be insignificant in one area and commercially serious in another.
On a loose skirt sweep, a small variation may have little effect on fit. On a close neckline, cuff opening, fitted waist, armhole, collar stand, or front rise, the same numerical difference may change comfort, appearance, or functionality.
The impact also depends on whether the recorded value is a flat measurement or a circumference. A one-centimeter difference in a flat half-chest measurement may represent approximately two centimeters around a simple symmetrical garment.
More importantly, an error may be repeated.
If an incorrect base-size measurement is used to create a graded specification, the problem can spread across every size. If an inaccurate shrinkage assumption is built into the pattern, every production garment may finish too short after washing. If an outdated document reaches the inspection team, otherwise acceptable garments may be classified as defective.
The cost is not limited to rejected units. Measurement problems can cause:
- Additional sample rounds.
- Pattern corrections and repeated grading.
- Delayed approvals.
- Revised markers and consumption calculations.
- Extra cutting, sewing, washing, or finishing trials.
- Production rework.
- Supplier disputes.
- Inconsistent fit across colorways or production orders.
- Incorrect customer size guidance.
- Higher return or alteration risk.
The most expensive mistake is often not the initial deviation. It is taking corrective action before identifying where the deviation originated.
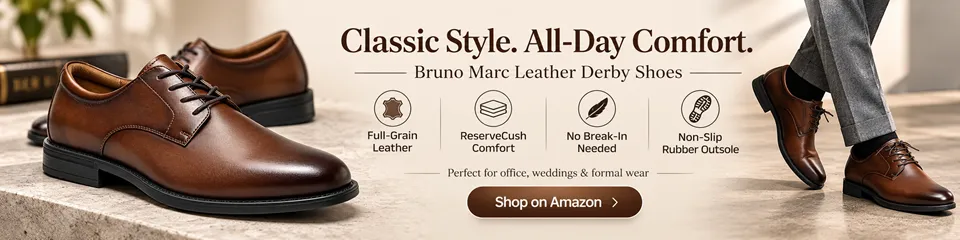
Error 1: Using an Ambiguous Point of Measure
A point of measure, or POM, should define the exact garment location and route used to obtain a dimension. A label such as “chest,” “body length,” “hip,” or “sleeve length” is rarely sufficient by itself.
Consider chest width on a shirt. It could be measured:
- Directly below the armhole.
- A fixed distance below the armhole.
- Between side seams at a specified level.
- Across the widest visible part of the body.
- Along a curved seam rather than straight across.
- As a flat half measurement or full circumference.
Each method may produce a different result.
Ambiguity commonly persists because the technical designer believes the terminology is universally understood. In reality, suppliers and brands often maintain different measurement conventions.
The operational consequence is repeatability failure. The first sample may be approved using one method, the size set checked using another, and bulk production inspected using a third.
The stronger approach is to provide:
- A stable POM code.
- A specific measurement name.
- A written instruction.
- A visual diagram.
- A clearly defined start and end point.
- The garment position and fastening condition.
- Whether the route is straight, curved, flat, doubled, relaxed, or extended.
The objective is not to write a long instruction for every row. It is to remove the decisions that should not be left to the operator.
Error 2: Starting or Ending at the Wrong Reference Point
Even when the measurement name is correct, the operator may use the wrong landmark.
Body length is a common example. It may begin at the side neck point, high point shoulder, shoulder seam, center-back neckline, or top edge of the collar. It may end at the bottom edge, hem seam, or longest point of an asymmetric hem.
A difference of only a few millimeters at the starting point can become larger when the tape follows a long or angled path.
Reference-point errors are especially common when:
- The garment has a collar, hood, binding, facing, or rib trim.
- The shoulder seam is dropped or shifted.
- The neckline is asymmetric.
- A sleeve has raglan or saddle construction.
- The waistband is curved.
- The crotch point is difficult to identify.
- The garment contains overlapping panels.
The better method is to define structural landmarks rather than relying on visual estimation. When a landmark is hidden by construction, the diagram should indicate the intended intersection or seam reference.
This is also where training with real garments matters. A flat technical drawing can look unambiguous until the operator encounters padding, bulky seams, pleats, or soft knitted construction.
Error 3: Confusing Flat Measurements and Full Circumferences
Many apparel specifications record width measurements with the garment laid flat. Chest, waist, hip, thigh, knee, and hem values may therefore represent only one side of the garment.
If a flat half-chest specification is 52 centimeters, a technician might describe the corresponding simple circumference as approximately 104 centimeters. That relationship is not universal.
Doubling can become misleading when the garment includes:
- Front overlaps or plackets.
- Pleats or gathers.
- Elastic.
- Asymmetric panels.
- Wrap construction.
- Tucks or darts.
- Three-dimensional shaping.
- Side seams that are not positioned at the true half-circumference.
A more serious error occurs when one document lists flat values and another party interprets them as full circumference. The resulting pattern or inspection discrepancy can be extremely large.
Every relevant column or POM should state whether it represents:
- Flat half width.
- Full circumference.
- Doubled flat value.
- Opening circumference.
- Single-component measurement.
- Relaxed or extended width.
Units and measurement types should not be inferred from earlier styles.
Error 4: Measuring a Curve as a Straight Line—or the Reverse
Curved and straight measurements answer different questions.
A straight-line measurement records the direct distance between two points. A contoured measurement follows the garment edge, seam, or shape. The difference is particularly relevant for:
- Armholes.
- Neck openings.
- Front and back rise.
- Princess seams.
- Curved waistbands.
- Lapel edges.
- Hood openings.
- Shaped hems.
- Raglan seams.
If a curved armhole is measured straight from shoulder to underarm, the value cannot be compared with an armhole measurement taken along the seam line.
The tape itself can introduce error. A flexible tape should follow the curve without lifting above the surface, twisting, or cutting across the contour. For some technical checks, a pattern ruler or other controlled method may be more appropriate than a loosely handled tape.
The specification should explicitly say “measure straight” or “measure along curve.” A diagram should show the route rather than merely pointing at the garment area.
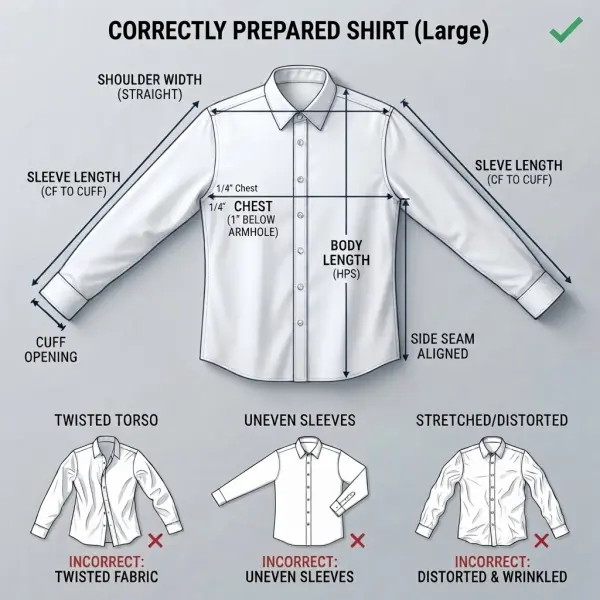
Error 5: Measuring the Garment in the Wrong Position
A garment should be positioned consistently before it is measured.
Common positioning errors include:
- Side seams are not aligned.
- The garment is twisted.
- The back body extends beyond the front unintentionally.
- Sleeves are angled differently between measurements.
- Waistbands are curved or folded.
- Closures are left open when they should be fastened.
- Pleats are expanded rather than set in their intended position.
- Pockets, linings, or internal layers distort the garment.
- The product is hanging when the method requires flat measurement.
Operators sometimes smooth a garment so aggressively that they stretch it. Others leave wrinkles that shorten the reading. The goal is normally to remove loose wrinkles without applying tension, unless the method specifies an extended measurement.
Measurement tables should therefore be supported by preparation instructions. For frequently inspected products, a photo of the correct garment position can be more useful than several paragraphs of text.
Error 6: Stretching the Garment or Measuring Tape
Textiles are deformable. A small amount of tension can change a measurement, especially in lightweight knits, rib fabrics, bias-cut garments, elasticated components, and loosely constructed textiles.
The measuring tape can also introduce tension. Pulling it tightly across a soft garment may compress or extend the material. Allowing it to sag or twist may increase the route length.
A relaxed measurement should normally be taken without intentional extension. An extended measurement should use a defined procedure.
Elastic waistbands illustrate the problem clearly. A specification might require:
- Relaxed waist width.
- Waist stretched to a stated force.
- Maximum functional extension.
- Waist after recovery.
- Waist after laundering.
These are not interchangeable values.
When an extended measurement matters commercially or functionally, “stretch fully” is often too subjective. The brand and supplier should agree on the extension method, maximum limit, and recovery expectation.
Error 7: Measuring Before the Garment Has Stabilized
A garment may not have stable dimensions immediately after sewing, pressing, steaming, washing, drying, or removal from a hanger.
Knitted products can relax after handling. Pressing may temporarily flatten or extend an area. Elastic can remain extended after being tested. Washed garments may continue changing as moisture and tension equalize.
If the specification assumes a relaxed garment but inspection occurs immediately after finishing, the result may not be comparable.
The appropriate stabilization period depends on the product, material, finishing process, and testing protocol. The business should not invent a universal waiting time without technical validation, but it should define when measurements are taken relative to production and conditioning.
For controlled dimensional-change testing, ISO 3759 specifies preparation, marking, and measuring procedures for fabrics and garments, while ISO 5077 specifies determination of dimensional change after appropriate washing and drying procedures. Both standards distinguish controlled testing from casual before-and-after comparison.
Relevant references include:
- ISO 3759 preparation and measurement for dimensional-change testing
- ISO 5077 determination of dimensional change in washing and drying
The practical lesson is simple: record the garment condition and measurement stage. “Body length: 68 cm” does not mean enough if one party treats it as a before-wash value and another treats it as the required after-wash result.
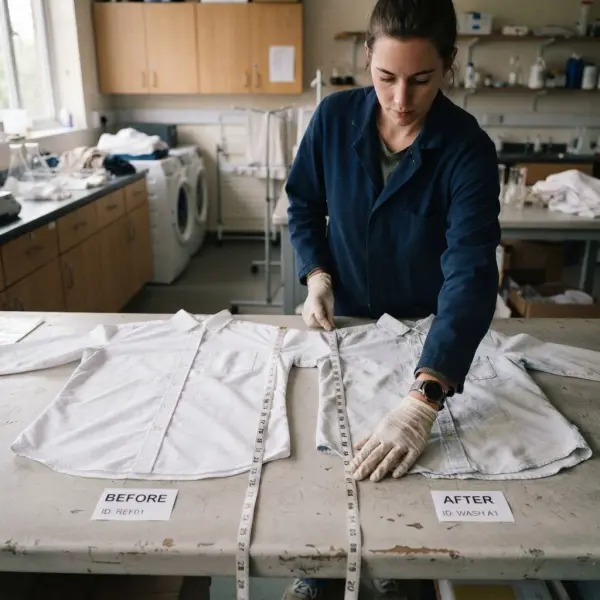
Error 8: Mixing Pre-Wash and Post-Wash Measurements
Some products are measured before washing, some after washing, and some at both stages.
Garment-dyed products, washed denim, pigment-treated apparel, and other finished garments may undergo dimensional change during processing. Home laundering can also affect fabric and garment dimensions depending on material, construction, finishing, and care procedure.
ISO 5077 describes a method for determining dimensional change after specified washing and drying combinations and cautions that results for deformable textile articles require careful interpretation.
A common specification error is to show one set of values without identifying the measurement condition. This can produce several failures:
- The pattern includes shrinkage allowance but inspection uses the pre-wash target.
- The factory measures before wash while the brand expects post-wash dimensions.
- Different wash treatments use the same finished specification despite different behavior.
- A sample is approved after steaming while bulk is checked after relaxation.
- Customer garment measurements are published using pre-treatment values.
The better approach is to define distinct columns or documents when both stages matter:
|
Measurement stage |
Purpose |
|
Before treatment |
Control sewing output and expected treatment allowance |
|
Immediately after treatment |
Monitor finishing-process results |
|
After defined relaxation or conditioning |
Establish stable production measurement |
|
After care testing |
Evaluate dimensional performance during intended use |
Shrinkage percentages should not be copied from a general fabric description without testing the actual fabric, color, construction, and process combination.
Error 9: Using the Wrong Size, Unit, or Product Variant
Some measurement failures are data-selection errors rather than measuring errors.
An operator may use:
- The medium specification for a large garment.
- Inches while the document is in centimeters.
- A men’s block for a women’s style.
- The specification for another fabric color.
- A pre-wash specification for a post-wash sample.
- A standard-length chart for a petite or tall version.
- A previous season’s product with a similar style code.
- A sample-stage chart instead of the production specification.
Centimeter and inch mistakes can be obvious, but subtler conversion problems also occur. Rounded values may produce inconsistent increments when one team develops in inches and another manufactures in centimeters.
The measurement unit should be displayed prominently. Converted specifications should be generated from one controlled source rather than manually converted in several documents.
Product variants also require attention. A black garment and a light garment may use the same pattern but behave differently after dyeing or finishing. Different fabric suppliers may produce different shrinkage or relaxation outcomes. The specification system should show whether all variants share one validated target or require separate process control.
Error 10: Working From an Outdated Specification Revision
Revision-control errors can make technically correct garments appear incorrect.
During sampling, measurements often change after fit reviews. The chest may be increased, the sleeve shortened, the waist position moved, or a POM relocated. If the pattern maker receives the new values but the quality inspector retains the old sheet, both parties can perform their jobs correctly and still reach opposite conclusions.
Version problems typically arise when specifications are distributed through multiple email attachments, messaging applications, local folders, and supplier spreadsheets.
File names such as these are especially risky:
- final-spec.xlsx
- final-spec-new.xlsx
- final-spec-corrected.xlsx
- final-spec-use-this.xlsx
- final-spec-revised-last.xlsx
A controlled revision should identify:
- Style and product code.
- Version or revision number.
- Revision date.
- Changed POMs.
- Previous and current values.
- Reason for change.
- Approver.
- Effective sample or production stage.
Obsolete files should be clearly withdrawn or archived. The team needs one active source of truth.
This process is examined more fully in why size specification sheets matter in garment development.
Error 11: Applying Incorrect Grade Rules
A correct base-size measurement can still produce a poor size range when the grade is wrong.
Grade errors include:
- Adding the same amount to every POM.
- Applying a circumference increment to a flat half measurement.
- Grading placement dimensions that should remain constant.
- Failing to grade a measurement that affects function.
- Reversing positive and negative increments.
- Using equal increments where the size range requires variable grades.
- Updating the base size without recalculating adjacent sizes.
- Rounding each size independently and creating uneven progression.
Suppose the medium half-chest is increased by one centimeter after fitting. If small and large remain unchanged, the grade into medium becomes narrower while the grade out of medium becomes wider. That may be intentional, but it should not happen accidentally.
Grading also involves more than adding width. Shoulder, armhole, sleeve, rise, length, neckline, and placement measurements interact. Uniform enlargement can distort proportions at the ends of the range.
A graded specification should therefore be reviewed for progression as well as individual values. Size-set samples can help confirm whether the measurement changes produce the intended three-dimensional result.
Error 12: Treating Tolerance as Extra Ease
Tolerance and ease solve different problems.
Ease is intentionally built into the garment to support movement, layering, comfort, compression, or design volume. Tolerance is the permitted manufacturing variation around the approved garment target.
A shirt that requires sufficient movement should contain that room in its target measurements and pattern shape. It should not depend on garments finishing at the upper edge of tolerance.
This confusion becomes risky when the lower tolerance limit creates a garment that is technically acceptable but functionally too tight. The issue may be that:
- The target measurement is too small.
- The tolerance is too wide.
- The selected POM does not control the real fit problem.
- The material has less stretch than expected.
- Ease is distributed poorly across the pattern.
Tolerances should be chosen according to fit sensitivity, construction complexity, material stability, measurement repeatability, and production capability. A single tolerance copied across every measurement is easy to administer but rarely reflects the risk of every POM.
Error 13: Treating Every Out-of-Tolerance Result as a Factory Defect
A measurement outside tolerance deserves investigation. It does not automatically prove poor workmanship.
The deviation may originate from:
- An incorrect measurement method.
- An unstable garment condition.
- A pattern that does not match the specification.
- An unrealistic target.
- Material shrinkage or growth.
- Pressing or finishing.
- A wrong document revision.
- A transcription or formula error.
- Normal production variation beyond the factory’s current capability.
- Cutting or sewing inconsistency.
The response should depend on the source.
A factory correction is appropriate when production fails to follow an achievable, approved requirement. A specification correction may be appropriate when the approved sample fits well but the documented target does not represent it. A process correction may be needed when washing or pressing causes inconsistent results.
Assigning responsibility before checking the evidence usually creates conflict without improving the garment.
Error 14: Correcting a Number Without Diagnosing the Fit
Perhaps the most important measurement mistake is assuming that every fit problem can be solved by changing the most obvious dimension.
A customer says a shirt feels tight at the chest. The team increases the chest circumference. Yet the real restriction may come from:
- Insufficient across-back width.
- A narrow upper arm.
- A high or tight armhole.
- Incorrect sleeve pitch.
- Poor shoulder slope.
- Inadequate front-body shaping.
- A stiff fabric with limited movement.
- Seam construction that reduces extension.
Similarly, trousers that feel tight when sitting may not need only a larger hip. The problem could involve front rise, back rise, crotch shape, thigh width, waistband position, or fabric stretch.
Individual measurements interact with pattern geometry.
A garment can meet every listed measurement and still fit poorly because the specification does not capture balance, contour, shaping, posture, or volume distribution. That is why measurement review should support fit evaluation rather than replace it.
For a broader explanation of these relationships, see why garment fit matters in fashion.
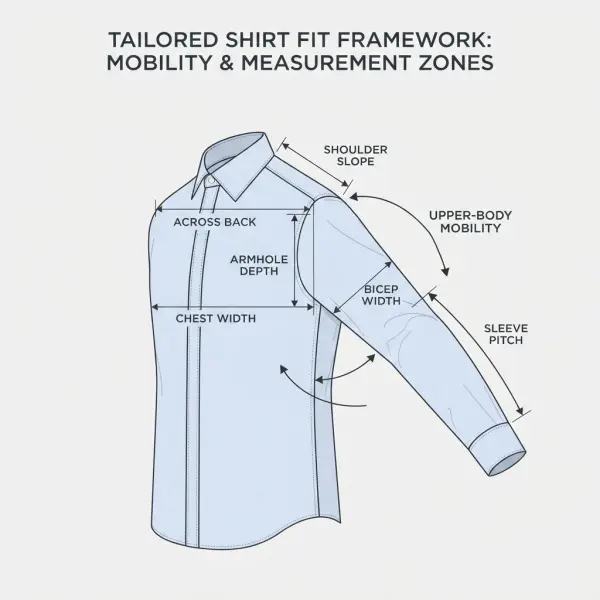
How Measurement Errors Become Fit Problems
A fit problem occurs when the garment does not provide the intended appearance, comfort, movement, or relationship to the target body.
Measurement errors can create fit problems directly. A waistband made too small may feel tight. An inseam made too long may create excess stacking. An armhole made too low may reduce the intended silhouette or affect movement.
They can also create fit problems indirectly.
An incorrect neckline measurement may change binding tension. A wrong shoulder measurement may alter sleeve position. An inaccurate front-body length may cause the hem to rise even when total garment length appears correct.
The table below illustrates several common relationships:
|
Observed fit problem |
Possible measurement-related cause |
Other issues to investigate |
|
Shirt pulls across upper body |
Chest, across-back, bicep, or armhole measurement too small |
Sleeve pitch, shoulder slope, fabric mobility |
|
Neck opening feels tight |
Neck width, neck drop, circumference, or trim length too small |
Binding stretch ratio, seam construction |
|
Trousers pull at crotch |
Rise, hip, or thigh dimension unsuitable |
Crotch shape, body posture, fabric stretch |
|
Front hem rises |
Front length or bust accommodation insufficient |
Pattern balance, body shape, fabric drape |
|
Sleeve twists |
Sleeve measurements or cap balance inconsistent |
Sleeve pitch, grain alignment, sewing |
|
Waistband gaps at back |
Waist and hip relationship unsuitable |
Waistband shape, back-rise shape, body contour |
|
Garment becomes short after care |
Post-wash target or shrinkage allowance incorrect |
Fabric testing, drying procedure, finishing |
|
Sizes feel inconsistent |
Grade rules, tolerances, or measurement methods vary |
Different patterns, factories, or materials |
These are diagnostic possibilities, not automatic conclusions. Fit evaluation should consider the target wearer, pattern, material, construction, and measurement evidence together.
How Measurement Errors Become Production Problems
In production, the same error is no longer limited to one sample.
Once patterns, markers, cutting instructions, and inspection documents are released, mistakes can be multiplied across hundreds or thousands of units.
Cutting Problems
Incorrect pattern dimensions or shrinkage allowances can affect marker planning and material consumption. Correcting a pattern after fabric has been cut may require recutting components or accepting an altered fit.
Sewing Variability
Seam allowances, feeding, stretching, easing, and operator handling can change finished dimensions. A knit neckline may grow during sewing. A waistband may be attached under inconsistent tension. Multiple panels may accumulate small seam differences.
Pressing and Finishing Effects
Pressing can shape, flatten, shrink, or temporarily extend a garment. Washing, dyeing, coating, bonding, and drying may further change dimensions.
Inspection Disputes
If the inspector and factory use different methods, results may conflict even when they measure the same garments. Rechecking without aligning the method usually reproduces the disagreement.
Size Assortment Risk
A grade or labeling error may place the wrong measurements under the wrong size. The total production quantity may be correct while the commercial size distribution becomes unusable.
The strongest production response is to detect deviations early. In-line measurement checks can reveal process drift before the entire order is completed.
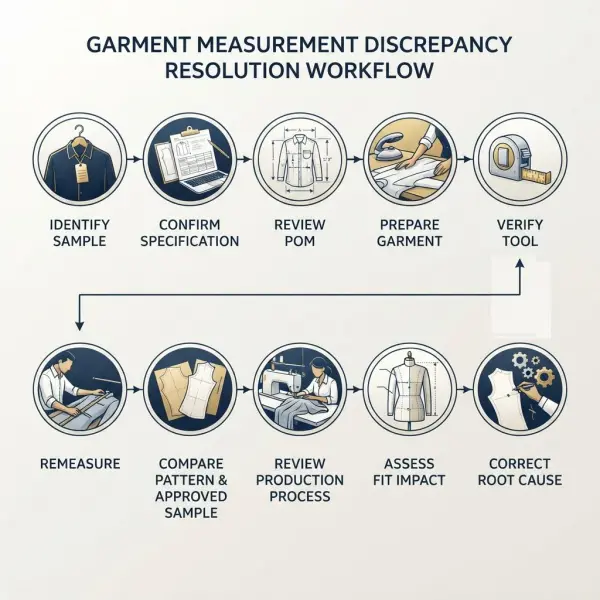
A Practical Diagnostic Workflow for Measurement Disputes
When two teams obtain different measurements, avoid beginning with “Who measured incorrectly?”
Start with the process.
Step 1: Quarantine the Disputed Sample
Identify the exact garment, size, color, batch, sample stage, and treatment condition. Do not substitute another garment unless the purpose is to evaluate production variation.
Step 2: Confirm the Active Specification
Check the style number, size, unit, revision, date, and measurement condition. Verify that both teams are using the same document.
Step 3: Review the POM Instruction
Compare the code, description, diagram, start point, end point, route, and garment position.
If the method still allows several interpretations, the specification needs improvement regardless of who obtained the expected result.
Step 4: Prepare the Garment Consistently
Fasten closures, align seams, position components, remove loose wrinkles, and allow the garment to reach the agreed condition. Do not stretch it unless the POM requires extension.
Step 5: Verify the Measuring Tool
Check that the tape or instrument is undamaged, legible, and suitable for the required measurement. Compare tools if repeated differences suggest equipment variation.
Step 6: Measure Independently
Have trained operators measure the same garment using the same method without first seeing each other’s result. This helps distinguish reproducibility problems from confirmation bias.
Step 7: Compare With the Approved Sample and Pattern
Determine whether the disputed garment differs from the approved sample, final pattern, or both.
Pattern measurements must be interpreted carefully because seam allowances, darts, easing, and construction can prevent a direct one-to-one comparison with finished-garment dimensions.
Step 8: Review Material and Process History
Check cutting direction, fabric roll, relaxation, sewing, pressing, wash treatment, drying, and conditioning. A dimension that changes across production stages may indicate process variation rather than an incorrect specification.
Step 9: Evaluate Fit and Function
Decide whether the deviation affects the wearer, visual proportion, functionality, assembly, or customer expectation.
A statistically visible difference is not always commercially significant. Conversely, a measurement inside tolerance may still create an unacceptable fit.
Step 10: Correct the Source, Not Only the Sample
The final action may involve:
- Revising the POM instruction.
- Correcting the specification.
- Updating grade rules.
- Changing the pattern.
- Adjusting sewing or finishing.
- Retraining operators.
- Revising tolerances.
- Separating specifications by material or treatment.
- Withdrawing an obsolete document.
The correction should prevent recurrence, not merely resolve the current disagreement.
How Fashion Businesses Can Reduce Measurement Risk
Measurement control should match the scale and complexity of the business.
A small brand does not need an enterprise system to begin improving. It does need consistent documentation and clear ownership.
For Fashion Brands and Product Teams
Build a controlled POM library by product category. Use stable codes, diagrams, and garment-preparation instructions.
Record actual measurements for approved samples. When a sample is approved outside the original specification, revise the document rather than leaving the contradiction unresolved.
Identify the dimensions that most strongly affect fit, function, and silhouette. These critical POMs deserve closer review than low-risk decorative dimensions.
For Manufacturers
Confirm ambiguous POMs before cutting or sampling. Do not rely only on the factory’s internal method when the buyer has supplied a different definition.
Measure at relevant production stages. If a garment changes after sewing, pressing, or finishing, record where the variation first appears.
Use the approved sample, specification, and pattern together rather than treating any one source as complete.
For Sourcing Teams
Include measurement capability in supplier evaluation. A factory may sew well but lack disciplined specification control, grading review, or dimensional testing.
During onboarding, compare how the brand and supplier define common measurements. Resolve differences before the first fit sample.
For washed, bonded, knitted, elasticated, or technically complex products, confirm which measurements require process trials.
For Quality Control Teams
Inspection should use the current approved document and stated measuring method.
When repeated results differ between inspectors, conduct a measurement-correlation exercise. Have operators measure the same garments and compare methods before judging product consistency.
Record the garment condition, size, result, variance, and inspection stage. A number without context is difficult to investigate later.
For Retail and Customer-Service Teams
Fit feedback should be connected to style, size, production batch, and customer context where practical.
Comments such as “runs small” are useful signals but not technical diagnoses. The product team should compare complaint patterns with actual production measurements, material behavior, customer size guidance, and intended fit.
This creates a more reliable feedback loop than changing the next production order based on isolated comments.





Comments 0
Leave a CommentSend Comment
Anda harus Login terlebih dahulu untuk dapat memberikan komentar.