

Common Garment Closure Problems and How to Prevent Them
Garment closure problems rarely begin with a completely defective button, zipper, hook, or snap. More often, the component is incompatible with the fabric, installed with the wrong settings, positioned inaccurately, or insufficiently supported by the surrounding construction.
A zipper may wave because the fabric stretched during sewing or because the zipper tape and garment shrink differently after washing. A snap may detach because the fabric is too thin, the reinforcement is misplaced, or the setting die does not match the component. A button can remain intact while its thread attachment or buttonhole fails.
These problems affect more than appearance. A closure defect can make dressing difficult, distort garment fit, damage the fabric, create a safety concern, or cause a product to be rejected before shipment.
Prevention requires coordinated decisions across design, pattern development, trim sourcing, sample making, production engineering, sewing, finishing, and quality control.
Quick Answer
Common garment closure construction problems include wavy or misaligned zippers, sliders that catch fabric, loose or broken buttons, incorrectly sized buttonholes, snaps that rotate or pull out, and hooks that do not align with their eyes or bars.
Most of these problems are caused by one or more of five conditions: an unsuitable component, an unstable or insufficiently reinforced fabric, inaccurate placement, incorrect machine or setting conditions, and inadequate testing of the complete garment.
Prevention starts before bulk sewing. Fashion teams should specify the complete closure system, test it on the actual fabric and reinforcement, confirm the pattern allowance, approve installation methods, and establish measurable quality checks. Operators also need suitable machines, presser feet, dies, needles, thread, guides, and handling instructions.
The closure should be evaluated as part of the finished garment. A component that performs well on a supplier’s sample card may still fail after sewing, repeated operation, laundering, pressing, or wear.
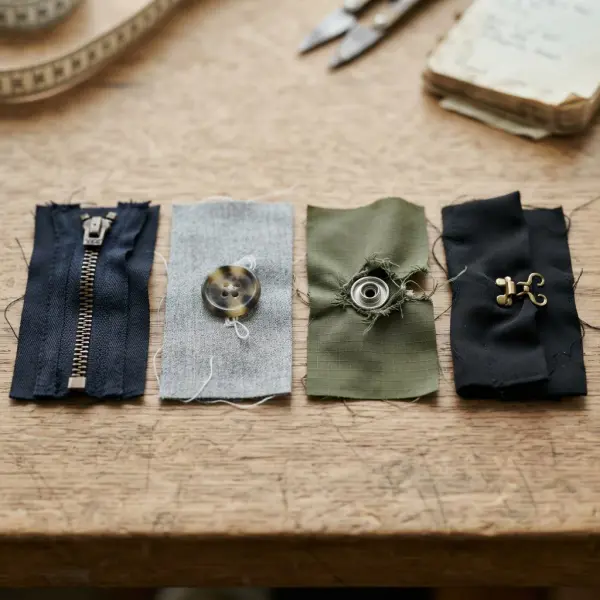
Why Closure Problems Are Usually System Problems
A closure does not perform independently. The finished system includes the fastening component, its mating part, outer fabric, interfacing or reinforcement, lining, thread or mechanical attachment, opening construction, and the forces applied during use.
If one part of that system is unsuitable, failure may occur somewhere other than the component itself. A strong snap can tear weak fabric. A button may survive while the thread breaks. A zipper chain may remain functional while the seam around it puckers or the lining becomes trapped in the slider.
This is why basic knowledge of buttons, zippers, hooks, and snap fasteners is only the starting point. Production teams must also understand how each closure interacts with garment fit, fabric behavior, manufacturing operations, and care.
The main sources of failure are usually:
- Incorrect closure type, size, or construction
- Incompatible fabric thickness or extensibility
- Insufficient or excessive reinforcement
- Inaccurate placement or pattern allowance
- Wrong sewing, pressing, or setting conditions
- Mismatched component parts or tooling
- Variation between approved samples and bulk production
- Failure to test the installed closure after care
Identifying the visible defect is not enough. Teams need to trace it back to the stage where the variation was introduced.
Common Zipper Construction Problems
Zippers require two garment edges, two tapes, the element chain, stops, and slider to remain aligned while still allowing enough clearance for smooth operation. This makes zipper defects particularly sensitive to fabric handling and sewing accuracy.
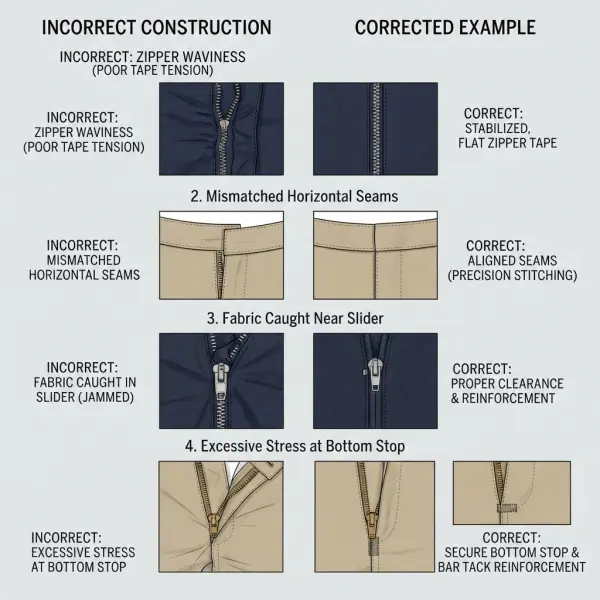
Wavy or Puckered Zippers
A zipper appears wavy when its installed length and stability do not match the surrounding garment opening. The defect may be visible immediately after sewing or emerge after pressing, laundering, or garment relaxation.
Common causes include stretching the garment fabric during installation, feeding the zipper and fabric at different rates, excessive thread tension, an unsuitable presser foot, inconsistent seam allowance, or incompatible shrinkage between the zipper tape and garment.
The problem is common on knits, lightweight woven fabrics, bias-cut pieces, and long zipper openings because these constructions can stretch or shift during handling.
Prevention begins with a realistic sewing trial:
- Stabilize the garment opening when the fabric requires support.
- Allow fabric pieces to relax before installation if they have been stretched during cutting or handling.
- Avoid stretching either the zipper tape or garment edge while sewing.
- Use an appropriate zipper foot, needle, thread, and stitch setting.
- Control feed so both layers advance consistently.
- Test pressing and the complete care process before approval.
Reinforcement should control the opening without making it noticeably stiffer than the rest of the garment. Excessively rigid interfacing can replace waviness with another problem: a hard, board-like zipper area that no longer follows the intended silhouette.
Uneven Top Edges or Misaligned Seams
A zipper can operate correctly while the neckline, waistband, seam line, or pattern feature is visibly offset when the zipper is closed. This usually happens when alignment points are not transferred accurately, one side is stretched, or the second zipper tape is sewn without matching the first side.
The defect is especially obvious where horizontal seams, waistlines, stripes, checks, or top edges meet across the closure.
Operators need clear reference notches or chalk marks at critical positions. After attaching the first side, corresponding points should be matched to the second zipper tape before final sewing. Temporary basting or controlled tacking may be justified on high-value, slippery, or highly visible products.
Final inspection should evaluate the zipper closed. Inspecting only the separate open sides can miss alignment differences that become obvious once the slider joins them.
Slider Catches Fabric, Lining, or Loose Threads
A zipper slider needs sufficient clearance. If stitching is too close to the element chain, the slider may rub against or catch the garment fabric. Loose seam allowances, linings, pocket bags, threads, or long-pile materials can also enter the slider path.
YKK’s sewing guidance notes that sewing too close to the elements can leave insufficient space for the slider and increase the risk of fabric becoming caught. It also recommends additional care with linings and long-pile materials. See the YKK guidance on sewing zippers with adequate slider clearance.
Prevention requires more than trimming loose threads at final inspection. The opening should be designed so that adjacent layers remain outside the slider path throughout wear. Lining edges may need understitching, topstitching, binding, or anchoring. Long fibers or fur-like surfaces may need a protective strip beside the zipper.
If a slider already catches, forcing it can worsen the jam or damage the elements. The obstruction should be released carefully while the slider is moved back rather than pulled harder.

Difficult or Uneven Zipper Operation
A zipper that feels heavy, sticks at one point, or requires the slider to be pulled at an angle may have misaligned tapes, insufficient clearance, damaged elements, an unsuitable slider, or excessive tension across the garment.
Operation can also become difficult when the garment is too tight. In that case, the zipper is being asked to close an opening whose two sides cannot meet without substantial force. Replacing the zipper with a “stronger” version may hide the fit problem temporarily while increasing stress on the tape, seam, or stops.
The zipper should be tested both flat and on the body. If it works smoothly on a table but becomes difficult when worn, the team should evaluate garment ease, opening length, reinforcement, and closure position before changing the component.
Stress or Failure at the Bottom Stop
The bottom stop area carries concentrated force when a closed-end zipper reaches the end of its travel. Short fly zippers and close-fitting garments may subject this area to additional stress during dressing and movement.
YKK’s installation guidance recommends reinforcement around the bottom stop when sewing zippers into trousers, particularly for short zippers or close-fitting styles. Suitable reinforcement may include backstitching, bartacking, or another construction established during sampling.
The sewing line must not damage the stop or elements. A needle striking metal or hard plastic can break, deflect, damage the component, or create an unsafe fragment. Zipper length and stop position should therefore be resolved before production rather than improvised during sewing.
Separating Zipper Will Not Engage Correctly
Open-end zippers depend on the insertion pin entering the retainer box fully and evenly. Misalignment, damaged components, fabric obstruction, or excessive tension at the lower opening can prevent engagement.
The bottom ends should remain accessible and parallel. A bulky facing or poorly finished seam can interfere with insertion. If the garment must be pulled together forcefully before the pin can enter, fit or opening construction may be contributing to the problem.
During inspection, the zipper should be separated completely and reconnected several times. Merely moving the slider up and down after someone else has inserted the pin does not test the wearer’s full interaction.
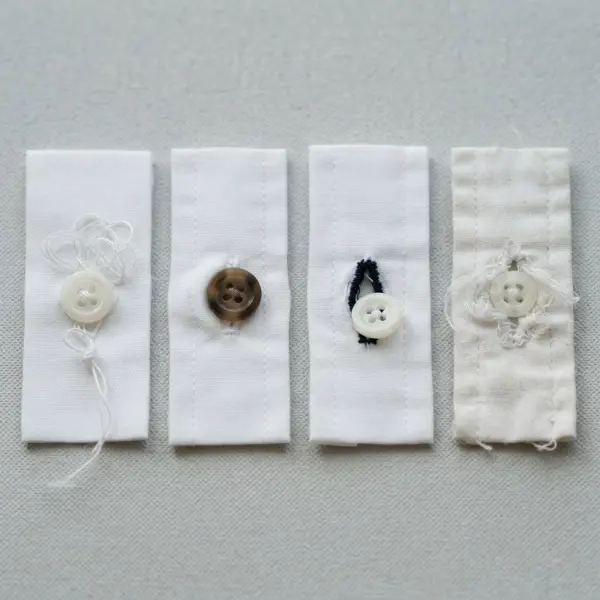
Common Button and Buttonhole Problems
Button performance depends on the button, attachment thread, stitch formation, buttonhole, spacing, fabric support, and how much room is provided beneath the button for the garment layers.
Loose Buttons
Buttons become loose when the attachment has too few stitches, unsuitable thread, poor stitch formation, incorrect machine settings, inadequate finishing, or insufficient allowance for fabric thickness.
A button can also feel loose when a thread shank is intentionally provided. The difference is whether the shank is stable and appropriate for the fabric or whether the button moves because its attachment is failing.
For machine-sewn buttons, factories should control stitch count, thread type, button clamp position, knotting or securing method, and shank height. Checks should be conducted throughout the production run because thread tension and machine settings can drift.
Testing may need to distinguish between the button’s own strength and its attachment. ASTM D6644, for example, measures the resistance of the bridge of a sew-through button to increasing strain. That does not by itself evaluate every possible failure in the thread, fabric, or finished attachment. See the ASTM method for sew-through button tension strength.
Broken Button Attachment Thread
Thread can fail because it lacks suitable strength or abrasion resistance, is damaged during sewing, or rubs against sharp button-hole edges. Frequent fastening, industrial laundering, or high tension at the opening can accelerate wear.
The solution is not simply to use the heaviest available thread. Thread diameter must remain compatible with the button holes, needle, machine, garment appearance, and desired flexibility.
Teams should examine the exact failure point. Thread breaking at the same location across multiple garments may indicate abrasion against the button rather than insufficient stitch count. Broken filaments immediately after sewing may suggest needle damage, excessive tension, or a machine issue.
Buttonholes Are Too Large or Too Small
An oversized buttonhole can release the button unintentionally. An undersized buttonhole is difficult to operate and may stretch, fray, or distort during use.
Buttonhole length should be established using the button’s diameter and thickness, not diameter alone. Thick domed buttons need more passage space than flat buttons of the same face diameter.
The completed buttonhole should be tested with the approved production button on the actual garment layers. Machine settings may need adjustment when moving from a lightweight single layer to a reinforced placket, waistband, or coat front.
Fraying or Broken Buttonholes
Buttonholes may fray when their stitch density, thread, cutting method, fabric support, or finishing is unsuitable. Fabric yarns can also be damaged before the buttonhole stitching secures the opening.
The prevention method depends on the buttonhole type and garment material. Woven shirt plackets, stretch knits, denim waistbands, and tailored jacket fronts do not need identical settings.
Production teams should confirm:
- Stitch density and width
- Buttonhole type and orientation
- Cutting quality
- Thread compatibility
- Interfacing position
- Reinforcement of start and end points
- Performance after the intended care process
A visually dense buttonhole is not automatically stronger. Excessive needle penetration can perforate delicate or coated material and weaken the area.
Buttons and Buttonholes Do Not Align
When buttons are placed inaccurately, the garment may twist, overlap unevenly, or fail to match at the collar, hem, cuff, or waistband. Small placement errors accumulate when there are many buttons along one opening.
Button positions are best marked relative to the finished buttonholes or from a controlled template after the garment opening has reached its final dimensions. If both sides are marked independently from raw edges, sewing and pressing variation may cause them to diverge.
Operators and inspectors should fasten the complete opening and place the garment in a natural position. Alignment cannot be judged reliably with the garment unbuttoned.
Gaping Between Buttons
Gapping can be a construction problem, but it may also reflect inadequate fit. Possible causes include wide button spacing, insufficient overlap, weak placket support, unstable fabric, or excessive tension across the body.
Adding more buttons may reduce the distance between holding points. It does not correct an undersized pattern or unsuitable ease distribution.
The effects of these decisions on silhouette and tension are covered more fully in how closure choice affects garment function, fit, and durability. During defect analysis, teams should separate genuine fastening faults from pattern and fit problems.
Common Snap and Tack-Button Problems
Mechanically applied snaps and tack buttons require compatible components, correct dies, suitable setting pressure, and a material stack with the appropriate thickness and stability. Small deviations can create attachments that look acceptable from the outside but are poorly engaged internally.
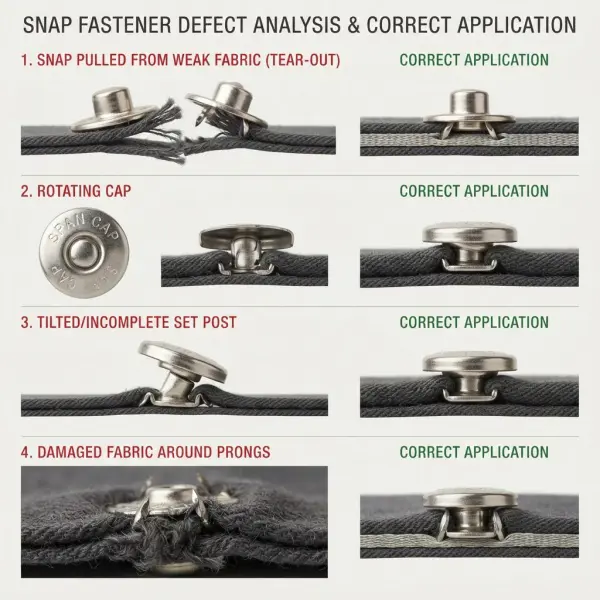
Snap Pulls Out of the Fabric
A snap may detach because the fabric is too weak, the reinforcement is absent or misplaced, the prongs have not engaged correctly, or the post length does not suit the material thickness.
The location of failure provides useful evidence. If the hardware separates while the fabric remains intact, component engagement or setting may be inadequate. If the complete snap pulls out with torn fabric around it, the textile assembly may lack sufficient support.
ASTM D7142 covers the holding strength of prong-ring snap components and notes that compatibility between snap fasteners and apparel fabrics can be evaluated by attaching the fasteners to the fabric as they will be used and testing the combined units. See the ASTM method for prong-ring snap holding strength.
That installed-assembly approach is important. Testing the hardware without the production fabric cannot reveal whether the fabric will tear around it.
Snap Rotates After Attachment
Rotation can indicate insufficient clamping, incompatible component geometry, excessive fabric softness, or inadequate reinforcement. It may also occur when a decorative cap is handled repeatedly from one side.
A rotating snap can abrade the fabric, change logo orientation, and loosen further over time. Prevention may involve a different attachment system, better reinforcement, corrected setting pressure, or an anti-rotation design appropriate to the application.
Increasing pressure without diagnosis can damage the cap, deform the socket, or cut the fabric. A setting trial should establish an acceptable window rather than relying on maximum pressure.
Snap Is Too Hard or Too Easy to Open
Opening resistance depends on the snap design, size, spring mechanism, component tolerances, setting quality, and fabric assembly. A snap that is too loose can open unintentionally. One that is too firm may be difficult for the wearer and can place damaging force on the fabric.
The team should evaluate both opening force and attachment security. These are different properties: a securely attached snap can still have unsuitable operating force.
Wearer behavior also matters. If users are likely to pull the placket fabric instead of gripping the snap, high opening resistance creates greater risk around the attachment points.
Crushed, Tilted, or Incompletely Set Components
A cap may dent, a post may bend, or prongs may fail to engage evenly when the die is worn, misaligned, contaminated, or incompatible with the component. Incorrect garment placement under the setting machine can produce a tilted assembly.
The setting process should use the tooling specified for the exact snap or button system. Similar-looking components from another supplier or product line should not automatically be used with the same die.
Operators need a stable placement method, sufficient lighting, and clear orientation standards. Periodic destructive checks can reveal incomplete internal engagement that is not visible during routine surface inspection.
Fabric Is Cut, Laddered, or Distorted Around the Snap
Prongs and posts penetrate or compress the fabric. On knits, lightweight materials, coated fabrics, or constructions with open structures, this can break yarns, create runs, delaminate layers, or produce visible distortion.
Reinforcement can improve support, but its dimensions and position must be consistent. A reinforcement patch that is smaller than the snap or shifted away from the attachment does little to distribute force.
Pre-punching should only be used when specified for that component and material. An oversized hole removes the fabric the fastener needs to grip. Conversely, forcing a system through material beyond its intended thickness can damage the post, prongs, fabric, or cap.
Tack Button Separates From Its Tack
Jeans buttons and similar mechanically attached buttons depend on secure engagement between the button and tack. Separation may result from component mismatch, incorrect tack length, unsuitable material thickness, poor alignment, or insufficient setting.
ASTM D7842/D7842M applies to the holding strength of tack- and prong-fastener-attached buttons in garments or fabrics intended for apparel. See the ASTM test method for attached tack and prong buttons.
Factories should not mix caps, buttons, posts, or tacks from different systems unless the combination has been explicitly approved. Physical compatibility cannot be assumed from nominal size alone.
Common Hook-and-Eye Construction Problems
Hooks and eyes are small, but their position is often critical. A hook placed a few millimeters incorrectly can shift a waistband edge, expose the closure, or make a zipper difficult to operate.
Hook and Eye Do Not Meet
Misalignment occurs when the components are positioned independently, seam allowances change during assembly, or the opening is under more tension than expected.
The hook and receiving component should be marked with the garment in its finished configuration. On fitted garments, testing on the body or form helps reveal whether the opening remains aligned during wear.
The hook should engage without forcing the two garment edges into an unnatural position. If significant force is needed, fit, overlap, or reinforcement may need correction.
Hook Becomes Loose or Opens Out
A sew-on hook can loosen when too few stitches are used, thread is unsuitable, or the attachment holes are not secured evenly. The hook itself may also deform if it is too light for the load or repeatedly pulled sideways.
Stitching should anchor the hook firmly while keeping excess thread away from the engaging area. High-stress waistband closures may need a more substantial hook-and-bar system or secondary internal closure rather than a delicate dress hook.
Hook or Eye Becomes Visible
A concealed hook can show at the neckline or waistband when it is installed too near the edge, attached on the wrong side, or pulled outward by tension. Thick thread buildup can also prevent the closure from lying flat.
The closure position should account for the garment overlap and how the edge rolls when worn. A visually hidden closure may still require enough distance from the edge to remain stable.
The Closure Feels Uncomfortable
Hooks, bars, and their stitching can press against the skin if they are poorly positioned or insufficiently covered. Sharp edges, exposed thread ends, or bulky reinforcement can increase irritation.
Linings, facings, protective fabric tabs, or different component profiles may improve comfort. The garment should be tested during sitting and movement because a closure that feels acceptable on a flat sample may press into the body when the waistband bends.
Problems Created During Pressing, Finishing, and Care
Closures can be damaged after they have been installed correctly. High heat, direct pressure, aggressive chemical treatment, abrasion, or improper garment handling may deform components or impair operation.
Pressing directly over a zipper slider can damage the puller or compress the slider body. Excessive heat can deform some polymer elements, stops, or snap components. Metal finishes may change during washing, bleaching, enzyme treatment, stonewashing, or dry cleaning.
YKK advises that zippers should be closed and protected with a press cloth during ironing, with temperature limits depending on the specific construction. Its guidance also warns that direct heat or pressure can deform zipper parts and affect slider performance. See the YKK precautions for ironing and pressing fastening products.
Factories should establish closure-specific finishing instructions rather than relying on general garment settings. A denim wash trial, for example, should evaluate the installed zipper, tack button, snap, coating, and surrounding fabric after the complete process—not only the denim appearance.
Defect, Likely Cause, and Preventive Control
|
Visible problem |
Likely causes |
Preventive control |
|
Zipper waves or puckers |
Uneven feeding, stretched fabric, incompatible shrinkage |
Stabilize opening, control feed, conduct care trial |
|
Zipper catches fabric |
Stitching too close, loose lining, insufficient clearance |
Protect slider path and secure adjacent layers |
|
Zipper edges do not align |
Inaccurate matching points or uneven attachment |
Mark critical positions and inspect while closed |
|
Button becomes loose |
Inadequate stitches, unsuitable thread, poor securing |
Standardize attachment settings and perform in-line checks |
|
Buttonhole frays |
Wrong density, cutting damage, weak support |
Trial the full buttonhole construction on actual fabric |
|
Snap pulls out |
Weak fabric, poor reinforcement, incomplete setting |
Test installed assembly and control reinforcement position |
|
Snap rotates |
Insufficient engagement or unstable material |
Confirm component, die, pressure, and fabric compatibility |
|
Hook does not meet eye |
Incorrect placement or excessive opening tension |
Mark in finished position and verify on the garment |
|
Closure finish changes |
Heat, chemicals, abrasion, or care incompatibility |
Test complete finishing and care processes before bulk |
The table is useful for initial diagnosis, but several causes can produce the same symptom. Corrective action should be based on inspection of the failed assembly rather than the visible defect alone.
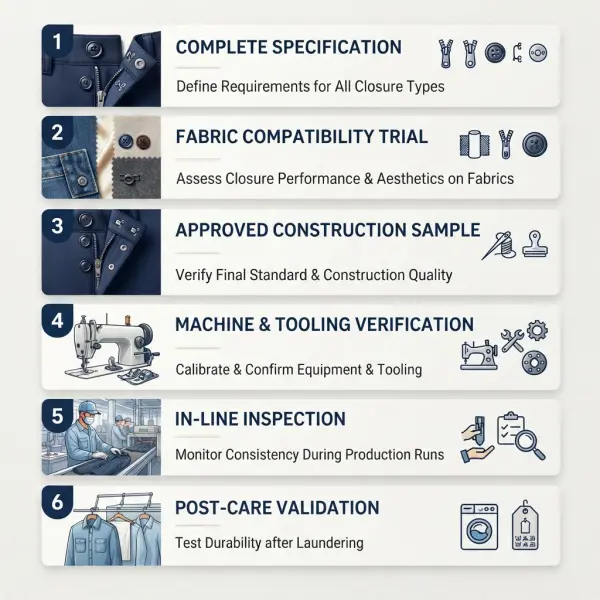
A Practical Prevention System for Fashion Businesses
Specify the Complete Closure Assembly
Technical documents should identify every component required to create the fastening system. For a snap, this means the complete mating set rather than “15 mm silver snap.” For a zipper, it includes element type, size, tape, slider, puller, stops, length, end configuration, color, finish, and installation style.
The specification should also identify reinforcement, attachment thread, buttonhole type, setting die, placement measurements, and approved supplier codes where relevant.
Conduct a Pre-Production Installation Trial
The factory should install the approved closure on the actual bulk fabric, interfacing, lining, and number of layers. This trial should use intended machinery and production settings.
The sample should then be checked for alignment, opening force, attachment security, fabric damage, bulk, and appearance. When washing, pressing, garment dyeing, or another finishing process is planned, the trial must continue through that process.
Establish an Approved Standard
A signed physical sample or trim card helps control color, finish, orientation, and basic appearance. A finished garment sample is still needed to show positioning and installation quality.
For defects that are difficult to describe, a visual standard can include acceptable and unacceptable examples. Close-up photographs should show problems such as zipper waviness, tilted snap caps, loose button threads, or exposed hooks.
Control Machinery and Tooling
Factories should verify that machines, guides, presser feet, button clamps, dies, anvils, needles, and thread match the approved construction.
Tool wear deserves attention. A worn snap die may gradually produce incomplete or distorted settings even though the original approval sample was correct. Maintenance and replacement intervals should reflect actual use and inspection results.
Inspect During Production, Not Only at the End
Closure faults are often repetitive. If the wrong die or setting is used, hundreds of garments can be affected before final inspection.
In-line control should check early output and samples at defined intervals. Relevant checks may include:
- Placement and alignment
- Opening and closing operation
- Button stitch security
- Buttonhole size and appearance
- Snap or tack orientation
- Surface damage
- Attachment integrity
- Zipper top and bottom finishing
The frequency should reflect product risk, order size, process stability, and buyer requirements.
Investigate Failure Mode Before Reworking
A loose snap should not automatically be pressed again. Additional pressure may deform it or further damage the fabric. A wavy zipper should not be hidden with heavier pressing if incompatible feed or shrinkage caused the problem.
A basic root-cause review should ask where the failure occurred, whether it is isolated or systematic, and what changed between the approved sample and production. Component lot, operator, machine, die, setting, reinforcement, and finishing batch may all be relevant.
Common Prevention Mistakes
Approving the Loose Component Instead of the Installed Closure
A trim sample confirms appearance and basic operation. It does not prove that the component will remain attached to the production fabric or behave correctly after finishing.
Approval should include the installed assembly and finished garment.
Adding Reinforcement Without Testing Its Effect
Reinforcement can improve attachment strength, but excessive stiffness may distort drape or create a visible patch. The reinforcement must be large enough, correctly positioned, and compatible with the garment’s appearance and care process.
Treating Every Defect as an Operator Error
Operators influence quality, but recurring faults may come from an unrealistic specification, unstable pattern piece, unsuitable component, worn die, inconsistent fabric, or machine limitation. Blaming handling alone can leave the real cause unchanged.
Using Unapproved Mixed Components
Caps, sockets, studs, posts, buttons, and tacks that look compatible may differ in geometry or material. Mixed systems can appear secure immediately after setting but separate during use.
Complete component sets and tooling should remain traceable to the approved specification.
Relying Only on Final Pull Tests
Pull or attachment testing can be useful, particularly for higher-risk products, but it does not evaluate every concern. A closure may meet a holding-strength requirement while being misaligned, uncomfortable, too difficult to open, visually distorted, or incompatible with laundering.
Mechanical testing should sit within a broader functional and visual control system.
Important Technical Caveats
There is no single universal pass value for every button, zipper, hook, or snap used in apparel. Required performance depends on the garment category, component type, intended wearer, fabric, market, buyer protocol, and applicable regulation.
Test methods also measure specific properties. Zipper strength is not the same as zipper operability. Snap opening resistance is not the same as snap-to-fabric attachment strength. Button bridge strength does not establish the security of the sewing thread.
For children’s products, workwear, protective apparel, or other regulated categories, production teams should verify current market-specific requirements. Quality control practices described here support construction reliability, but they do not replace formal product compliance assessment.
Frequently Asked Questions
Why does a zipper become wavy after sewing?
A zipper usually becomes wavy because the fabric and zipper tape were fed or stretched differently during installation, the opening lacked suitable stabilization, or the two materials responded differently to pressing or laundering. Excessive thread tension and inconsistent seam allowance can contribute. Prevention requires a sewing trial using the actual fabric, controlled feeding, appropriate reinforcement, correct machine settings, and evaluation after the intended care process. Pressing alone may temporarily flatten the defect without correcting its cause.
How can a factory prevent zipper fabric catching?
The slider needs adequate clearance from garment fabric, seam allowances, lining, loose threads, and long surface fibers. Sewing too close to the element chain can narrow the slider path. Linings and facings should be secured so they cannot move into that path during wear. Operators should test the zipper through its complete travel after sewing. If fabric becomes caught, forcing the slider may increase damage; it should be moved back carefully while the obstruction is released.
Why do snaps pull out even when the hardware is strong?
The weakness may be in the fabric or attachment rather than the hardware. Thin, stretchy, loosely constructed, or damaged fabric may not provide enough support. Incorrect post length, mismatched components, misplaced reinforcement, incomplete prong engagement, or unsuitable setting pressure can also cause separation. The installed snap should be tested on the actual garment material and layer combination. Evaluating loose metal components alone cannot confirm compatibility with the fabric assembly.
How should buttonhole size be determined?
Buttonhole size should account for both button diameter and thickness because the complete button must pass through the opening. Fabric thickness, button shape, buttonhole type, and expected fraying or stretch also matter. The correct setting should be established using the approved production button on the actual garment layers. A hole that is too large may release the button, while one that is too small can be difficult to operate and may deteriorate quickly.
Can loose buttons be fixed by increasing stitch count?
Sometimes, but not always. A loose button may result from too few stitches, yet it can also be caused by unsuitable thread, incorrect tension, weak securing, poor stitch formation, excessive shank height, or abrasion from sharp button holes. The failure should be examined before changing the setting. Excessive stitching can create a bulky, rigid attachment or damage delicate material without addressing the real cause.
Should every snap or button be pull-tested?
Not necessarily under one identical formal test plan. Testing requirements depend on garment type, intended age group, buyer protocol, regulation, closure construction, and product risk. Higher-risk applications may require defined mechanical testing, while lower-risk products may use a combination of installation trials, in-line checks, and sample verification. When pull testing is used, the method, direction, applied force, duration, sample size, and acceptance criteria should be documented.
When should closure quality be inspected?
Closure quality should be checked at several stages: during pre-production trials, at the beginning of bulk production, periodically during sewing or setting, after finishing, and during final garment inspection. Early checks prevent a repeated machine, die, placement, or component problem from affecting a large quantity. Post-care inspection is essential when washing, pressing, garment dyeing, or dry cleaning could alter the closure or surrounding construction.
Conclusion
Garment closure defects are usually preventable when teams treat the fastening as a complete construction system. Zippers need stable, accurately aligned openings and sufficient slider clearance. Buttons depend on secure attachment and properly engineered buttonholes. Snaps and tack buttons require compatible components, tooling, reinforcement, and setting conditions. Hooks need precise alignment and stable stitching.
The most effective quality control begins before bulk production. Clear specifications, actual-fabric trials, approved installation samples, maintained tooling, in-line inspection, and post-care validation provide far more protection than relying on final inspection alone.
When a defect does appear, the visible symptom should be traced to its real failure point. That discipline helps factories correct the process rather than repeatedly repairing the same underlying problem.





Comments 0
Leave a CommentSend Comment
Anda harus Login terlebih dahulu untuk dapat memberikan komentar.