

Common Stitching Problems and How to Prevent Them
Quick Answer
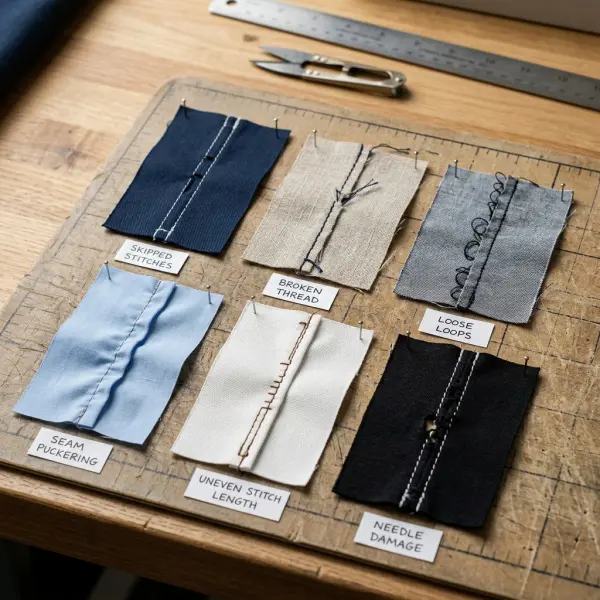
Common stitching problems include thread breakage, skipped stitches, loose or unbalanced loops, seam puckering, wavy knit seams, uneven stitch length, fabric damage, needle breakage, and unsecured seam ends. These defects rarely have a single universal cause. They usually result from an unsuitable combination of needle, thread, fabric, machine timing, tension, feeding, stitch settings, operator handling, or equipment condition.
The most effective troubleshooting method is to change one variable at a time. Begin with simple checks: confirm that the machine is threaded correctly, replace a damaged or unsuitable needle, inspect the thread path, verify the bobbin or looper setup, and test the construction on the actual production material. Only then should technicians alter hook timing, feed mechanisms, looper clearances, or other machine adjustments.
For fashion businesses, prevention is more valuable than repairing visible defects at final inspection. Approved seam specifications, regular machine maintenance, correct needle-and-thread selection, first-piece approval, and in-line quality checks can reduce rework, production interruptions, rejected garments, and inconsistent product appearance.
A stitching defect should be treated as evidence of a system problem—not automatically as a tension problem.
What Is a Stitching Problem?
A stitching problem is an unintended defect in thread formation, fabric handling, seam appearance, or sewing performance that prevents a garment operation from meeting its approved construction or quality requirement.
Some problems appear immediately at the machine. The thread breaks, the needle snaps, or the machine fails to form a stitch. Others remain hidden until the garment is stretched, washed, pressed, inspected under better lighting, or worn by a customer.
Common symptoms include:
- Missing stitches along a seam
- Thread breaking repeatedly
- Loose loops on one surface
- Tight, puckered, or gathered seams
- Wavy hems on knitwear
- Inconsistent stitch length
- Fabric yarns being cut or pulled
- Seams shifting out of alignment
- Frayed thread at needle penetrations
- Unsecured thread tails
- Overlock edges rolling or failing to cover the fabric
- Coverstitch hems tunneling or unraveling
The visible symptom is not necessarily the root cause. Loose thread underneath a lockstitch seam, for example, may appear to be a bobbin problem but can result from incorrect upper threading, failure to engage the tension discs, an improperly installed needle, or insufficient upper-thread tension.
This distinction is central to efficient troubleshooting. A technician should diagnose the sewing system rather than react only to the side of the garment where the defect appears.
Why Do Stitching Problems Occur?
Stitching problems develop when one or more parts of the sewing system are incompatible or unstable.
That system includes:
- The fabric and number of material layers
- The sewing thread
- The needle system, size, point, and condition
- The machine’s hook, looper, feed, presser, and tension mechanisms
- The selected stitch type and seam construction
- Sewing speed
- Operator handling
- Previous processes such as cutting, fusing, coating, or washing
Coats identifies causes such as poor thread unwinding, excessive tension, damaged thread-contact surfaces, incorrect thread quality, hook or looper timing, needle damage, feeding variation, and material handling among common sources of sewing defects. Its technical guide emphasizes that similar symptoms can have several different causes.
JUKI’s industrial troubleshooting guidance follows the same logic. For thread breakage and skipped stitches, it recommends checking tension, needle installation, thread-control springs, contact-surface damage, needle-to-hook relationships, machine timing, and sewing speed rather than assuming one adjustment will solve every case.
Diagnose the Symptom Before Adjusting the Machine
Unstructured troubleshooting often creates a second defect while attempting to correct the first. An operator may increase tension to remove loose loops, shorten the stitch to improve control, and increase presser pressure to stop fabric shifting—all without confirming the original cause.
The result can be a seam that looks temporarily tighter but develops puckering, fabric damage, or thread breakage.
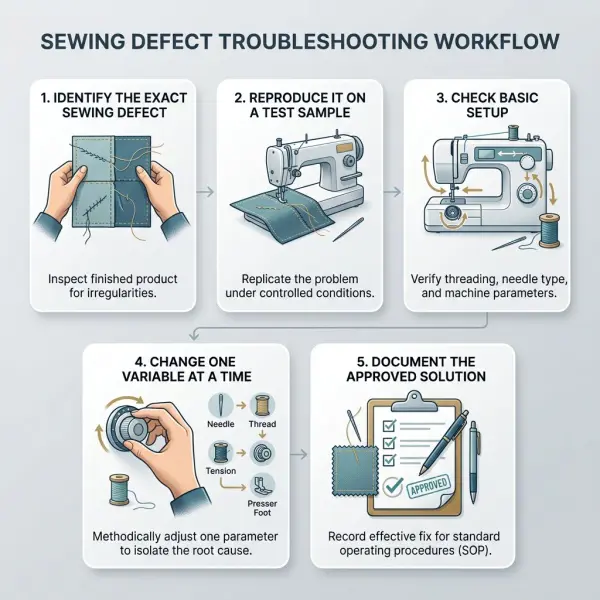
A better diagnostic sequence is:
1. Identify the Exact Defect
Record what is visible and where it occurs.
Does the problem happen:
- Continuously or intermittently?
- On the upper or lower surface?
- At the beginning, middle, or end of the operation?
- Only over thick seam intersections?
- Only when changing sewing direction?
- Only at higher speed?
- Only after washing?
- Only on one fabric color or production batch?
This information narrows the likely cause.
2. Confirm Whether the Problem Is Repeatable
Sew several test samples using the same material layers, thread, machine, operator, and speed.
An isolated defect may come from temporary handling. A repeated defect at the same point is more likely to indicate a construction, machine, material, or operation problem.

3. Check the Simplest Variables First
Before changing technical timing, inspect:
- Machine threading
- Needle condition and orientation
- Thread package and unwinding
- Bobbin insertion
- Looper threading
- Thread tails
- Dust and lint accumulation
- Fabric orientation
- Presser-foot installation
- Stitch and tension settings
4. Change One Variable at a Time
If the needle, thread, tension, presser pressure, and sewing speed are all changed together, the team will not know which adjustment solved the problem.
Controlled troubleshooting creates knowledge that can be transferred to other machines and future production orders.
5. Record the Successful Setting
Once the seam meets the approved standard, document the relevant combination of needle, thread, stitch density, tension range, presser setting, speed, attachment, and handling method.
Needle Thread Breakage
What Causes the Upper Thread to Break?
Needle thread breakage occurs when the upper thread ruptures before or during stitch formation. It may happen repeatedly at the needle, tension assembly, thread guide, hook area, or another contact point.
Common causes include:
- Excessive needle-thread tension
- Incorrect machine threading
- Thread catching below the package or around a guide
- Damaged tension discs or thread guides
- Burrs on the needle plate, hook, bobbin case, or presser foot
- A needle eye that is too small for the thread
- A damaged, bent, or overheated needle
- Poor-quality, uneven, or unsuitable thread
- Excessive sewing speed
- Incorrect needle-to-hook or looper relationship
- Dense or harsh fabric abrading the thread
- Adhesive or finishing residue accumulating on the needle
Thread being pinched at thick seam intersections
Both Coats and JUKI identify excessive tension, damaged thread-contact surfaces, poor thread handling, needle damage, and inappropriate machine settings as important causes of thread breakage.
Groz-Beckert also notes that thread quality, thread-package handling, the needle eye, machine settings, tension, and sewing speed influence thread-breakage risk.
How to Prevent Needle Thread Breakage
Start by rethreading the machine completely. Threading should be performed according to the machine manual, usually with the presser foot positioned so that the thread can enter the tension system correctly.
Then:
- Replace the needle with the correct system, size, and point
- Confirm that the thread moves freely from its package
- Reduce excessive tension gradually
- Inspect guides and metal contact surfaces for burrs
- Match the needle-eye size to the thread diameter
- Reduce speed when sewing dense or heat-sensitive constructions
- Use thread with appropriate strength, finish, uniformity, and abrasion resistance
- Clean adhesive, lint, and finishing residue from the needle and thread path
- Ask a technician to check hook or looper timing if basic corrections fail
The objective is not to make the thread as loose as possible. Tension must remain sufficient to form a balanced stitch while allowing the thread to pass through the machine without excessive friction.
Bobbin or Looper Thread Breakage
Lower-thread breakage may be caused by a damaged bobbin, incorrect winding, excessive lower-thread tension, a poorly fitted bobbin case, sharp edges, incorrect looper threading, or contact between moving components.
Overfilled or unevenly wound bobbins can interrupt thread delivery. A bobbin that continues rotating after the machine stops may also release excess thread and contribute to tangling or irregular stitch formation.
Coats recommends checking bobbin winding, bobbin-case fit, tension, overrun control, and sharp surfaces when lower thread repeatedly breaks.
For overlock, chainstitch, and coverstitch machines, each looper path must be checked in the correct sequence. Threading these machines out of sequence can prevent the loopers from forming or passing thread correctly even when each thread appears to follow a plausible route.
The practical prevention measures are straightforward:
- Use undamaged, correctly sized bobbins
- Wind bobbins evenly and consistently
- Insert bobbins in the correct direction
- Confirm bobbin-case and looper tensions
- Follow the prescribed looper-threading sequence
- Inspect looper eyes and guides for damage
- Clean lint from the bobbin and looper areas
- Avoid mixing components from incompatible machine systems
Skipped Stitches
What Is a Skipped Stitch?
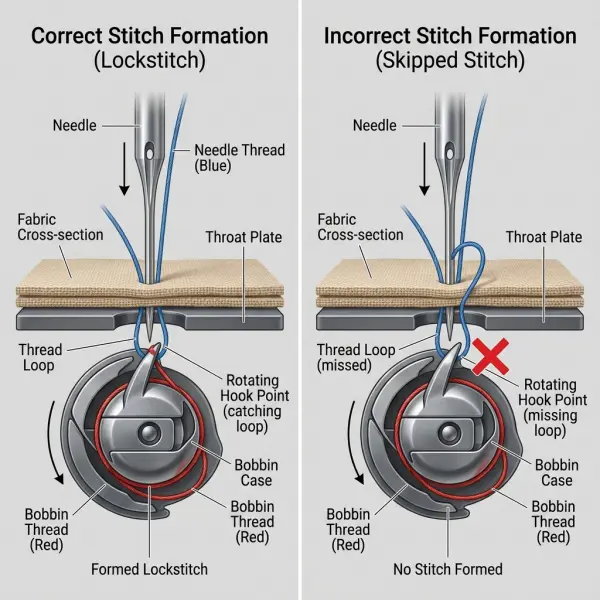
A skipped stitch occurs when the hook or looper fails to catch the thread loop created by the needle. The machine continues feeding the fabric, but one or more intended stitches are not formed.
The defect may appear as an isolated long gap or as repeated missing stitches. On stretch garments, skipped stitches can become structurally significant because the remaining stitches must carry more load.
Groz-Beckert explains that skipped stitches occur when the loop created by the needle thread is not picked up by the hook. Causes include hook positioning, inadequate loop formation, unsuitable needle geometry, bent needles, tension, and sewing speed.
Common Causes of Skipped Stitches
- Needle inserted incorrectly
- Needle not pushed fully into the needle bar
- Bent, blunt, or damaged needle
- Incorrect needle system
- Needle too fine and deflecting under load
- Needle too large or unsuitable for the fabric
- Wrong point style for a knit, woven, coated, or elastic material
- Needle and hook or looper timing incorrect
- Excessive gap between needle and hook
- Thread tension preventing a stable loop from forming
- Fabric flagging upward with the needle
- Presser-foot pressure insufficient
- Sewing speed too high for the construction
- Thick seam transitions deflecting the needle
- Incorrect threading
- Sticky material or residue disrupting thread movement
JUKI identifies incorrect needle installation, excessive needle-to-hook clearance, and inaccurate hook timing among the causes of repeated skipped stitches.
How to Prevent Skipped Stitches
Replace the needle first. This is inexpensive and removes one of the most common variables.
Next, confirm:
- Correct needle system
- Appropriate needle size
- Suitable point style
- Correct insertion direction
- Stable presser-foot control
- Appropriate thread tension
- Suitable sewing speed
- Secure fabric support around the needle
- Correct hook or looper timing
Thick cross-seams deserve special attention. When a needle is forced sideways while climbing a layer transition, the hook may no longer meet the thread loop in the intended position. Groz-Beckert identifies needle deflection at heavy cross-seams as a contributor to skipped stitches and needle breakage.
For product developers, the better solution may involve reducing bulk, grading seam allowances, changing the folding sequence, or adding an appropriate machine attachment rather than repeatedly adjusting the machine around an unnecessarily difficult construction.
Loose Loops and Unbalanced Lockstitch
Why Do Loops Appear Under the Fabric?
Large loops beneath a lockstitch seam commonly indicate that the upper thread is not being controlled correctly. Possible causes include incorrect upper threading, thread not seated inside the tension discs, insufficient upper tension, failure of the take-up mechanism, or a missed guide.
The loops appear underneath, but the problem may originate above the fabric.
Why Does the Bobbin Thread Show on Top?
When the lower thread is pulled visibly to the upper surface, upper tension may be too high, lower tension may be too weak, or the threads, needles, and fabric may be poorly matched.
A balanced lockstitch should normally interlock within the fabric layers. On very lightweight or transparent materials, however, the interlocking point may remain visible because there is little thickness in which to conceal it.
How to Correct Thread-Balance Problems
Use this sequence:
- Rethread the upper thread and bobbin.
- Confirm that the presser mechanism allows the thread to enter the tension system.
- Replace the needle.
- Verify that the bobbin is inserted and wound correctly.
- Return tension settings to an approved baseline where possible.
- Make small upper-tension adjustments.
- Alter bobbin tension only when necessary and by trained personnel.
- Inspect the take-up spring, tension discs, hook, and bobbin case if the problem continues.
Avoid using extreme tension to force the interlocking point into one side of the material. Excessive tension can contribute to puckering, thread damage, and reduced seam extensibility.
Birdnesting and Thread Tangling at the Start of Sewing
Birdnesting is a tangled accumulation of thread that forms underneath the fabric, often at the beginning of a seam.
It commonly results from:
- Upper thread not engaged in the tension system
- Thread tails that are too short
- Thread tails not controlled at startup
- Starting too close to an unsupported fabric edge
- Beginning with the take-up lever in an unsuitable position
- Incorrect bobbin installation
- Failure to lower the presser foot
- Improper threading
- Thread-trimming or wiper settings that leave insufficient thread
JUKI notes that short residual thread length and inappropriate take-up-spring movement can cause the needle thread to come out at the beginning of sewing.
On domestic machines, holding the upper and bobbin thread tails briefly during the first stitches may prevent them from being pulled into the hook area. In industrial production, automatic thread trimming, thread clamps, wipers, starting tack programs, and operator procedures should be adjusted to provide a repeatable start.
Birdnesting is not merely untidy. The tangled section can create bulk, interfere with later operations, or conceal an unsecured seam beginning.
Seam Puckering
What Is Seam Puckering?
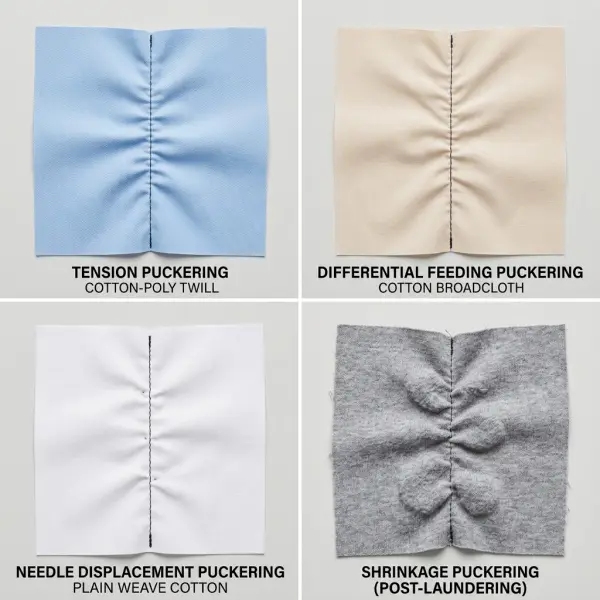
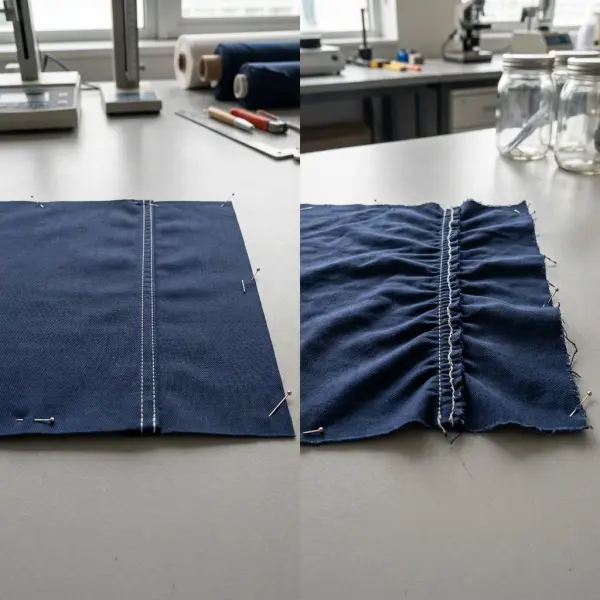
Seam puckering is an unwanted wrinkled, rippled, or gathered appearance along or beside a sewn seam. It may appear during sewing or become visible only after pressing, washing, garment dyeing, or drying.
Puckering is not one single defect. Several mechanisms can produce a similar appearance.
Tension Puckering
Excessive thread tension compresses the seam and prevents the fabric from lying flat. When both upper and lower threads are tightened unnecessarily, the stitch line may draw the material together.
Reducing tension can help, but the seam must still form securely.
Feeding Puckering
The upper and lower fabric layers may travel at different rates because of presser pressure, feed-dog action, operator handling, slippery surfaces, or difficult seam geometry.
The mismatch becomes trapped inside the seam and creates rippling or layer displacement.
Displacement Puckering
A needle that is too large can physically displace fabric yarns. In tightly constructed or very fine fabrics, those yarns have little room to move, so distortion accumulates along the stitch line.
Groz-Beckert notes that an excessively thick needle can contribute to material damage and seam puckering in fine woven and knitted fabrics. It also warns that a needle made too thin for the operation may lose stability and increase skipped stitches or breakage, so needle selection involves a trade-off.
Shrinkage Puckering
Thread, fabric, interlining, or another seam component may shrink at different rates during laundering or heat treatment. A seam that looked smooth in production can therefore become puckered later.
Structural Puckering
The seam construction itself may be too bulky, rigid, or dense for the material. Narrow seam allowances, heavy overlocking, multiple folded layers, and dense topstitching can all influence how the fabric settles.
How to Prevent Seam Puckering
- Use the smallest practical needle that remains stable
- Select a finer thread where strength requirements permit
- Reduce excessive thread tension
- Adjust presser-foot pressure to the fabric
- Confirm feed-dog height and differential feeding
- Avoid pushing or pulling the material
- Use compatible fabric, thread, interlining, and elastic
- Reduce unnecessary stitch density
- Test after the intended washing and pressing processes
- Review the seam construction if machine adjustments cannot remove the problem
JUKI lists excessive presser pressure, excessive thread balance, and inappropriate feed-dog height among possible causes of wrinkled seams.
Wavy Seams on Knitted Fabrics
A wavy seam occurs when knitted fabric stretches during sewing and does not fully recover after leaving the presser foot. It is common around T-shirt hems, necklines, shoulder seams, and lightweight jersey panel joins.
The fabric may be stretched by:
- Excessive presser-foot pressure
- Differential feeding that is not matched to the material
- Operator pulling
- A blunt or unsuitable needle
- High thread tension
- Dense stitching
- An unsuitable seam construction
- Fabric hanging from the worktable during sewing
- Excessive speed
- Elastic or binding being fed at the wrong rate
Overlock and coverstitch machines commonly include differential-feed mechanisms that allow the front and rear feed elements to move fabric at different rates. Correct adjustment can help compensate for fabric stretching or intentional gathering.
The operator should not attempt to flatten a wavy knit seam by stretching it further. Instead:
- Support the full garment weight
- Reduce unnecessary presser pressure
- Adjust differential feed
- Use the correct ballpoint or stretch-oriented needle where appropriate
- Test lower tension and a longer stitch
- Confirm that the seam can extend without being excessively dense
- Control elastic or binding feed separately
- Allow the fabric to recover before evaluation
- Use pressing only when permitted by the material
A steam press may temporarily improve a wavy seam, but it should not be used to disguise a construction that repeatedly distorts during production or returns after laundering.
Uneven or Variable Stitch Length
Variable stitch length can make a seam appear poorly controlled and may alter its strength or extensibility.
Possible causes include:
- Operator pushing or pulling the fabric
- Inadequate presser-foot pressure
- Excessive presser-foot pressure restricting movement
- Worn or contaminated feed dogs
- Incorrect feed-dog height
- Fabric slipping between layers
- Thick seam transitions
- Unstable attachments or folders
- Machine speed changes
- Mechanical wear
- Stitch-regulating or feed-system problems
- Uneven material thickness
- Fabric adhesive or coating interfering with feeding
On a compound-feed or walking-foot machine, the needle, presser components, and feed dog may work together to control difficult materials. On a basic drop-feed machine, slippery, bulky, or multi-layered constructions may shift more easily.
JUKI’s troubleshooting guidance associates misaligned seams and feeding problems with presser-foot pressure, feed-dog height, needle condition, and machine adjustment.
Prevention should focus on stable material transport:
- Let the feed system move the material
- Use suitable guides, folders, pullers, or compensating feet
- Grade abrupt thickness transitions
- Maintain feed dogs and presser components
- Support long or heavy garment sections
- Standardize sewing speed where appropriate
- Train operators to guide rather than force the fabric
Fabric Layers Shifting or Seams Failing to Align
Layer shifting occurs when the upper and lower plies do not enter or leave the sewing area at the same rate.
This is especially visible in:
- Plaids and stripes
- Long side seams
- Slippery linings
- Curved panels
- Collars and cuffs
- Waistband attachment
- Zipper installation
- Quilted or padded constructions
- Stretch fabric joined to stable components
The operator may start with aligned edges but finish with one layer extending beyond the other.
Preventive options include:
- Accurate notches and balance points
- Temporary basting where commercially justified
- Appropriate presser pressure
- Walking-foot or compound-feed equipment
- Differential feed
- Edge guides and folders
- Controlled handling at curves
- Additional notches on difficult long seams
- Reducing seam length through an alternative operation sequence
- Stabilizing selected areas with tape or interlining
Pattern accuracy also affects seam alignment. If corresponding pattern edges do not have compatible lengths, machine adjustment cannot permanently correct the mismatch. The relationship between pattern control and construction quality is discussed further in how accurate patterns improve garment fit and production quality.
Needle Breakage
Why Do Sewing Machine Needles Break?
Needle breakage commonly occurs when the needle is bent, deflected, improperly installed, unsuitable for the material, or forced into contact with another machine component.
Causes include:
- Needle too fine for thick or hard material
- Needle damaged before installation
- Needle inserted incorrectly
- Incorrect needle system
- Pulling the fabric sideways
- Needle striking a presser foot, needle plate, hook, or looper
- Machine timing or feed timing errors
- Sewing over thick intersections at excessive speed
- Loose needle-clamp screw
- Excessive thread tension
- Needle overheating or material buildup
- Operator sewing over pins or hard objects
Groz-Beckert identifies insufficient needle stability, high sewing speed, excessive tension, incorrect machine settings, and incompatible needle systems among needle-breakage causes.
JUKI similarly advises checking needle installation, needle straightness, and the relationship between needle and feed movement when needles break frequently.
Preventing Needle Breakage
- Use the correct needle system
- Select sufficient needle strength for the layer configuration
- Install the needle fully and in the correct direction
- Replace bent or damaged needles immediately
- Reduce speed over cross-seams
- Avoid pulling the material
- Grade bulky intersections during product development
- Check needle-plate and presser-foot clearance
- Tighten the needle clamp properly
- Schedule technical inspection when breakage repeats at the same point
Broken needle fragments can create a product-safety risk. Factories should have a controlled broken-needle procedure that accounts for fragments and isolates affected work until the needle has been fully reconciled.
Needle Cutting, Holes, and Fabric Damage
Needle damage may appear as visible holes, cut yarns, laddering in knitted fabric, pulled filaments, melting around punctures, or progressive tearing beside the seam.
Potential causes include:
- Needle too large
- Needle point unsuitable for the fabric
- Damaged or blunt needle
- Excessive sewing speed
- Needle heat
- Excessive stitch density
- Large thread requiring an oversized needle
- Coated or laminated material being punctured unnecessarily
- Fabric yarns being pushed beyond their available space
- Incorrect cutting-point orientation on leather or nonwoven material
SCHMETZ notes that worn needles can lead to untidy seams, skipped stitches, and fabric damage, which is why timely replacement is necessary even when the needle has not visibly broken.
Needle selection should consider four elements:
- The needle system required by the machine
- The smallest stable size suitable for the thread and material
- The correct point style for the fabric structure
- Whether a special-application needle is required
For knitted fabric, an appropriate rounded point may separate loops rather than cutting directly through them. The exact point must still be selected according to knit density, elasticity, yarn type, and finish. “Ballpoint” is not a single universal solution for every knitted material.
Frayed or Damaged Stitches
The seam may appear complete, yet the thread surface can be partially cut, abraded, melted, or weakened during sewing.
This damage may later develop into stitch breakage during washing or wear.
Common causes include:
- Needle eye too small
- Damaged needle eye or groove
- Burrs on guides, hook, looper, needle plate, or presser foot
- Thread repeatedly striking the fabric at an unsuitable angle
- Excessive thread tension
- High sewing speed and needle heat
- Incompatible needle and thread sizes
- Abrasive fabric
- Poorly finished or inconsistent thread
- Dense seam construction
A visual check should include magnification where appropriate. Thread that looks slightly fuzzy at the needle may already have lost part of its strength.
Coats identifies uniformity, abrasion resistance, surface smoothness, and consistent stitch formation as important performance characteristics of sewing thread.
The solution is to remove the source of abrasion rather than simply switching to stronger thread.
Overlock Stitching Problems
Raw Edge Not Fully Covered
The raw edge may extend outside the thread loops when:
- Stitch width is too narrow
- Knives are not trimming correctly
- Fabric is not guided against the cutting position
- Thread tension is unbalanced
- The seam allowance varies
- The fabric curls away from the stitch finger
- The wrong overedge configuration is used
The correction may involve knife position, stitch width, tension balance, differential feed, operator guidance, or a different seam allowance.
Edge Rolling or Tunneling
The edge may roll when the stitch is too narrow, the fabric curls naturally, thread balance pulls the edge inward, or differential feed is unsuitable.
For lightweight materials, a rolled edge may be intentional. For a structural seam, uncontrolled rolling can reduce coverage and alter the seam allowance.
Loose Looper Threads
Loose loops can result from incorrect threading, insufficient looper tension, thread not entering tension guides, incompatible thread, or incorrect looper timing.
Rethread the machine in the prescribed order before making large tension changes.
Overlock Seam Breaking During Stretch
The seam may lack sufficient extensibility because:
- Tension is too high
- Stitch length is too short
- Thread elongation is insufficient
- Seam width is unsuitable
- The selected stitch formation does not match the required extension
- One thread has been incorrectly threaded
- The fabric is being asked to extend beyond its intended use
The next step is not automatically to loosen every thread. The construction should be tested for both seam extension and recovery.
Coverstitch Problems
Skipped Stitches at Hem Intersections
Coverstitch machines may skip stitches when crossing bulky side seams because needle deflection changes the relationship between the needles and loopers.
Bulk reduction, controlled sewing speed, correct needles, appropriate presser-foot setup, and machine timing may be required.
Tunneling Between Needle Rows
Tunneling appears as a raised ridge between parallel needle lines.
Possible causes include:
- Needle tension too high
- Looper tension imbalance
- Fabric too light for the selected stitch width
- Excessive seam density
- Inadequate support under the fabric
- Thread too heavy
- Differential feeding problems
A narrower needle gauge or lighter thread may produce a more suitable finish on fine material.
Hem Edge Missing the Looper Coverage
The folded edge may drift outside the covering thread because the hem width varies, the operator cannot see the fold position, or no guide is used.
Consistent cutting, accurate folding, pressing, folders, and seam guides can improve repeatability.
Coverstitch Unravelling
Many covering and chain formations can unravel when thread ends are cut or pulled in a release direction. Seam ends should be secured according to the approved operation, particularly at open hems and alteration points.
Buttonhole and Bar-Tack Problems
Buttonholes and bar tacks concentrate many stitches into a small area. This makes them sensitive to material stability, needle condition, thread balance, density, and reinforcement.
Common buttonhole defects include:
- Unequal sides
- Inconsistent length
- Dense thread buildup
- Fabric cutting before stitching is secure
- Loose end bars
- Distortion around the opening
- Fraying after cutting
- Misalignment with buttons
Bar-tack problems include:
- Reinforcement placed too close to an edge
- Excessive density cutting the fabric
- Incomplete stitch cycles
- Loose thread tails
- Bar tacks failing to cover the intended stress point
- Inconsistent dimensions between garments
Interlining or backing may be necessary on lightweight materials. The reinforcement must stabilize the surrounding fabric rather than merely create a dense block of thread.
Problems That Appear Only After Washing
A garment can pass sewing inspection and still develop defects during care testing.
Post-wash problems may include:
- Seam puckering
- Thread shrinkage
- Color contrast between thread and fabric
- Seam twisting
- Loose chainstitch ends
- Elastic losing recovery
- Frayed raw edges escaping an overlock
- Needle holes becoming more visible
- Seams grinning after fabric relaxation
- Decorative thread losing surface quality
These problems indicate that sewing approval was performed too early.
Production-intent samples should be evaluated after the relevant wash, dry, press, garment-dye, enzyme, abrasion, or heat-setting process. The required test depends on the product and care instructions.
A smooth seam before washing does not prove that the thread, fabric, interlining, and construction will remain compatible throughout the intended product life.





Comments 0
Leave a CommentSend Comment
Anda harus Login terlebih dahulu untuk dapat memberikan komentar.