

How Digital Embroidery Files Turn Designs Into Stitched Motifs
Quick Answer
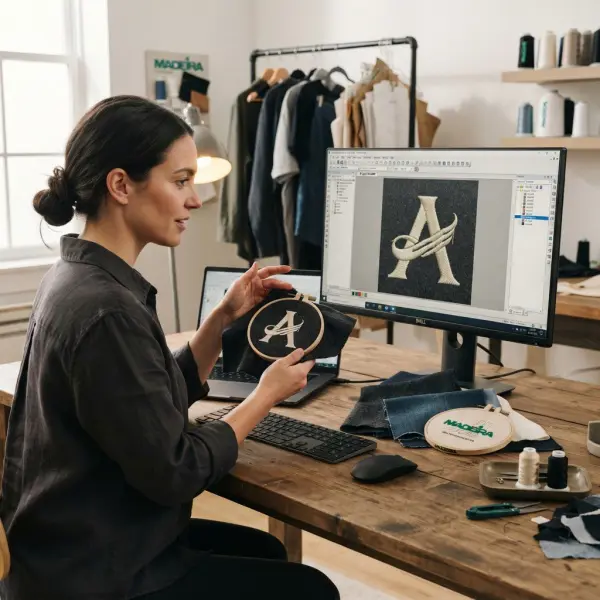
A digital embroidery file turns artwork into stitched motifs by translating visual shapes into instructions that an embroidery machine can execute. This process, known as embroidery digitizing, determines far more than where a needle should move. A professionally prepared design can contain information about stitch type, density, underlay, pull compensation, stitch direction, object sequence, color changes, jumps, trims, and entry or exit points.
This is why a JPG, PNG, PDF, or vector logo is not automatically a production-ready embroidery file. The artwork describes how a design should look; digitizing defines how that design should be constructed with thread on fabric.
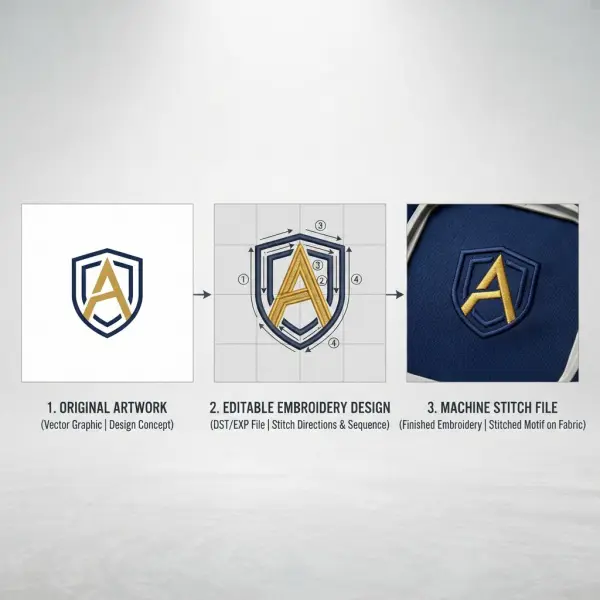
Embroidery software may preserve this information in an editable working file, while a separate machine-format file such as DST, PES, EXP, JEF, or VP3 is exported for a compatible embroidery machine. These machine files do not necessarily retain the same amount or type of design information. Hatch, for example, distinguishes its editable EMB working format from exported machine stitch formats and notes that machine files retain less information.
For apparel businesses, the quality of this digital translation directly affects appearance, stitchability, production time, consistency, and the amount of correction required before bulk production.
What Is a Digital Embroidery File?
A digital embroidery file is a file containing embroidery-specific information that software or an embroidery machine uses to construct a stitched design. Depending on the file format, that information may include editable embroidery objects, individual stitch movements, color-change commands, machine functions, or a combination of these elements.
The important distinction is that an embroidery file is not simply a picture of the motif.
A conventional graphics file tells software what the artwork looks like. A digital embroidery design must also describe, either directly or through object properties, how thread will build that artwork physically. Professional digitizing software therefore works with embroidery-specific properties including stitch type, stitch density, underlay, and pull compensation. Wilcom's current documentation confirms that these properties are stored with individual embroidery objects and can be adjusted independently. Wilcom embroidery object properties
That difference changes the entire production workflow. A clean logo supplied by a graphic designer may still need considerable interpretation before it can become clean embroidery.
For readers who need the wider technology context before focusing on files, computerized embroidery for fashion and apparel decoration explains how digitizing fits into the complete embroidery production system.
Artwork Files and Embroidery Files Are Not the Same Thing
A logo may arrive as an Adobe Illustrator file, SVG, EPS, PDF, PNG, JPEG, or another visual format. These files can be useful source artwork because they describe shapes, colors, typography, or pixels, but they usually do not contain the embroidery construction decisions needed for production.
Consider a simple fashion brand wordmark. The artwork may tell a computer that the letter is black and has a particular outline. It does not necessarily specify whether that letter should be stitched using satin stitches, a running structure, or another embroidery treatment. It also does not tell the embroidery machine how much underlay the fabric needs, where sewing should begin, when thread should be trimmed, or whether adjacent letters should be connected.
Digitizing fills that gap.
A useful way to distinguish the files is:
|
File category |
Main purpose |
Typical information |
Main user |
|
Artwork file |
Define visual design |
Shapes, curves, text, colors, pixels |
Designer / brand |
|
Editable embroidery working file |
Build and modify embroidery logic |
Objects, stitch properties, sequence, thread data, fabric-related settings |
Digitizer |
|
Machine embroidery file |
Send stitch instructions to compatible equipment |
Stitch movements and machine functions, depending on format |
Machine operator |
The categories can overlap, and capabilities vary among software and file formats. They should therefore be understood as workflow roles rather than rigid universal definitions.
What Does Embroidery Digitizing Actually Do?
Embroidery digitizing converts visual design intent into stitchable textile construction. It involves defining shapes as embroidery objects, selecting stitch structures, controlling stitch direction and spacing, planning underlay, determining sequence, and preparing the design for a particular material and production setup.
This is closer to engineering a stitched surface than simply converting one computer format into another.
Wilcom describes digitizing through outline and fill objects whose properties can be modified after creation. Digitizers may define boundaries, holes, stitch angles, start and end points, stitch effects, and other characteristics depending on the object being created. Wilcom digitizing methods
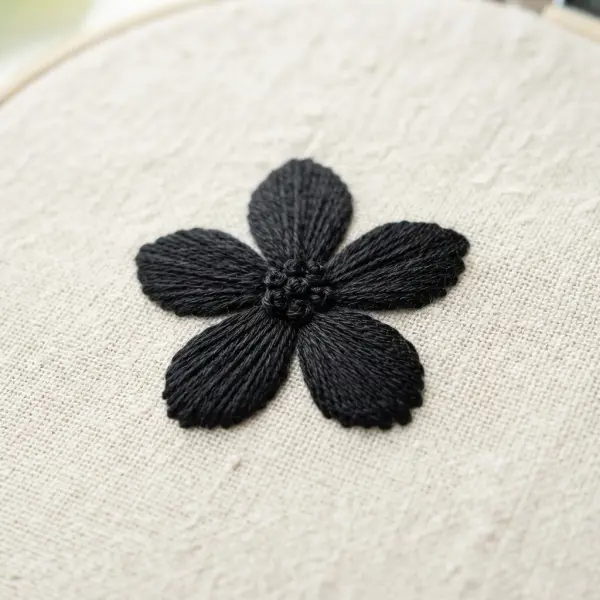
A digitizer working on an embroidered flower, for example, may treat the petals, stem, center, and lettering as separate objects. Each can require a different stitch structure and direction. The order in which those objects sew may also be changed to prevent unnecessary travel, preserve visual layering, or improve production efficiency.
This interpretation is why two embroidery files created from the same artwork can produce noticeably different stitched results.
One file may have clean lettering, controlled edges, and efficient sequencing. Another can technically resemble the same artwork on screen while producing gaps, excessive trims, fabric distortion, poor curves, or unnecessary stitch buildup.
From Shape to Stitch: How the Conversion Happens
A practical embroidery workflow usually begins by breaking artwork into manageable regions rather than attempting to reproduce the whole graphic as one undifferentiated object.
Imagine a brand emblem consisting of a filled circular icon, a narrow border, and a line of text underneath. The digitizer may construct that artwork using several embroidery objects:
- the central area may use fill stitching;
- the narrow border may use satin stitching;
- small line details may use running stitches;
- lettering may use satin or another structure suited to its scale;
- underlying support stitches may be generated beneath visible elements.
The digitizer also decides how stitches travel through those objects. Stitch angle matters because thread reflects light according to its orientation, so changing stitch direction can alter the visual separation between adjacent regions even when they use the same thread color.
At the same time, the digitizer has to consider whether the object is physically appropriate for embroidery. Very narrow details may collapse, while large satin areas can produce overly long stitches. Tiny enclosed spaces may not remain visually open after thread and fabric interact.
The task is therefore not to preserve every artwork detail at any cost. It is to preserve the recognizable design intent within the physical resolution of embroidery.

Embroidery Objects Carry Production Information
Professional embroidery software often works with objects rather than treating every stitch as an isolated point from the beginning. An object might represent a letter, filled shape, outline, border, or decorative area.
Each object can carry its own parameters.
Wilcom identifies properties including size, position, stitch type, density, underlay, and pull compensation, while its software can regenerate stitches when object properties are changed.
This object-based approach matters when a design has to be resized or adapted.
Suppose a chest logo originally measures 80 millimeters wide and later needs a somewhat larger version for the back of a jacket. If the digitizer still has a rich editable source file, objects and their stitch properties can potentially be revised and the stitch pattern regenerated.
A machine file containing mainly stitch instructions offers less design intelligence. Hatch describes EMB as its working file and recommends preserving it before exporting a machine format because machine formats retain less information.
This is one reason fashion brands working repeatedly with the same logo should ask embroidery vendors to preserve the editable embroidery master rather than keeping only the production file used for a particular machine.
Why Stitch Type Cannot Be Chosen Automatically From Appearance Alone
A visual shape does not have one inevitable embroidery interpretation.
A narrow curved element could potentially be represented by running stitches, satin stitching, or a more specialized construction depending on its width and desired appearance. Likewise, a broad filled object might use a tatami-style fill rather than satin because very long satin stitches can become unsuitable for wide areas.
Choosing the stitch type changes more than aesthetics. It changes stitch count, thread coverage, fabric loading, production time, texture, and how the design behaves during embroidery.
That means software automation can assist conversion, but a professional workflow still benefits from judgment.
Automatic digitizing tools can be useful for relatively clean artwork, preliminary conversion, or simple designs. They should not be assumed to understand every production condition as well as an experienced digitizer. Complicated overlaps, tiny lettering, uneven shapes, stretch fabrics, textured materials, and demanding brand logos can require manual intervention even when software creates the initial embroidery objects.
The correct question is therefore not simply, “Can this logo be auto-digitized?” It is, “Does the resulting stitch structure perform correctly on the intended product?”
Stitch Density Changes How a Design Behaves
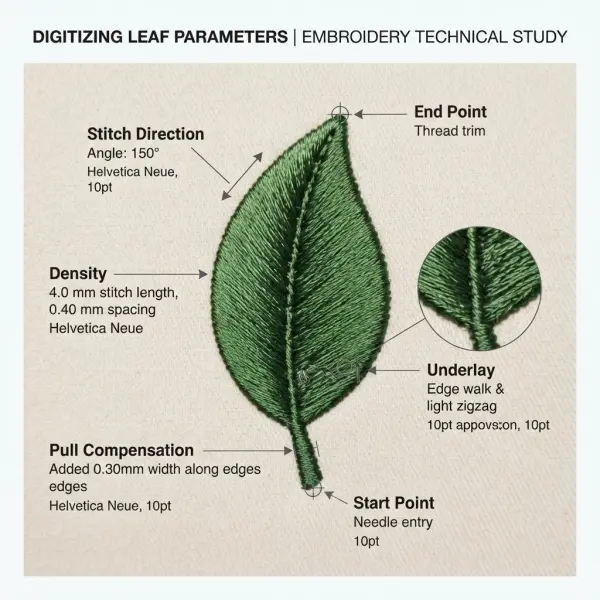
Stitch density determines how closely embroidery rows or stitches are positioned. It is an important digitizing variable because thread must provide enough surface coverage without placing unnecessary material and needle penetrations into the fabric.
Increasing density is not a universal way to improve embroidery quality.
Too much stitching can make an embroidered area rigid, increase thread use, lengthen machine time, and contribute to distortion or thread buildup. Too little coverage can allow the substrate to show through or weaken the intended visual effect.
Fabric also changes the correct balance. Wilcom's fabric settings adjust parameters such as density, underlay, pull compensation, stitch length, and other properties because textiles respond differently to needle penetration and thread tension. Stretch knit, piqué, fleece, denim, satin, and other materials do not necessarily need the same settings.
For digital file preparation, this means the file should not be evaluated independently of its intended substrate.
A design digitized for a stable cotton tote may require modification before it becomes an approved embroidery design for a soft knit sweatshirt.
Underlay Creates the Foundation for Visible Stitches
Many embroidery designs contain stitches that the customer is never meant to see.
These underlying structures, known as underlay, are stitched before the visible cover stitches and help provide support to the design. They can stabilize the fabric, improve edges, support top stitching, and reduce some forms of distortion.
Wilcom notes that correct stitch spacing, sufficient pull compensation, and suitable underlay need to work together according to the stitch type, object shape, and fabric.
The underlay can therefore be thought of as part of the engineered structure beneath the embroidery surface.
For example, embroidery on soft piqué or fleece may need enough foundation to prevent the visible stitches from sinking excessively into the textile texture. A delicate fabric, however, may not tolerate unnecessarily heavy underlay.
The digitizer has to balance support against bulk.
That balancing process is another reason a visually simple logo can require more technical preparation than its appearance suggests.
Pull Compensation Accounts for Fabric Movement
Thread does not sit on a perfectly rigid digital canvas. During embroidery, needle penetration and stitch tension can draw fabric inward.
Pull compensation is used to counter some of this effect by extending stitch coverage slightly beyond the nominal object boundary. Wilcom explains that this controlled overstitching helps compensate for fabric pulling and can reduce gaps or distorted outlines, particularly when used together with appropriate underlay and backing. Wilcom pull compensation guidance
The adjustment is subtle but important.
Without sufficient compensation, two adjoining color regions may appear to separate after stitching even though they align perfectly on screen. With excessive compensation, shapes can become visually swollen or overlap more than intended.
The correct amount therefore depends on the combination of design geometry, stitch structure, fabric, backing, and production conditions.
Stitch Direction Is Both Technical and Visual
Stitch direction determines the orientation in which a series of stitches fills a shape. This influences thread reflection, visual texture, edge behavior, and the way adjacent embroidered regions interact.
For fashion embroidery, stitch direction can be used deliberately.
Two petals in the same thread color can appear visually separated simply because their satin or fill stitches run at different angles. Lettering can gain cleaner structure when stitches follow an appropriate direction through each character. In dimensional motifs, stitch-angle changes can help create the impression of form without changing color.
Direction also affects how a shape handles mechanical stress. Abruptly changing angles or forcing complicated geometry into unsuitable stitch patterns may increase thread concentration around tight corners.
Digitizing therefore combines graphic interpretation with physical stitch planning.
The computer can calculate stitch positions, but the digitizer decides which stitch architecture gives the desired visual and production result.
Why Stitching Sequence Matters
An embroidery design is not stitched simultaneously. Its objects are completed in a specific order, known as the stitching sequence.
The order may initially follow the order in which objects were digitized, or software may calculate a sequence during conversion. It can then be adjusted manually. Wilcom explicitly recommends planning sequence in advance and allows digitizers to resequence designs for reasons such as reducing color changes or improving the stitch-out. Wilcom embroidery sequencing guidance
Sequence affects several things at once.
First, it establishes visual layering. If a border is meant to cover the edge of a fill, the underlying fill should usually exist before the covering detail.
Second, it affects movement across the design. Poor sequencing can make the machine travel repeatedly between distant objects.
Third, it affects thread changes. Grouping suitable elements of the same color can sometimes reduce unnecessary color-change events, although visual layering and construction logic should not be sacrificed solely to minimize changes.
Wilcom provides explicit sequencing tools for changing object order and grouping color blocks, which reinforces that stitch order is part of the production logic stored or generated within embroidery design workflows.
Jumps, Trims, and Connectors Explain How the Machine Travels
Not every movement between two embroidery objects should create a visible line of stitches.
A jump moves the embroidery frame from one position to another without forming normal needle penetrations along the path. The connecting thread may then need to be trimmed, depending on the design and machine settings.
A travel run, by contrast, uses stitches to move between areas. It can be useful when that connecting path will later be concealed underneath another object.
Wilcom distinguishes these approaches and notes that jumps generally need tie-off and trimming, while travel runs may remain in the design when they will be hidden by cover stitches. Wilcom connector types
Too many jumps and trims can create inefficient production and additional thread-management work. Poorly placed travel stitches, on the other hand, can remain visible.
Good digitizing therefore attempts to connect objects intelligently rather than treating every shape independently.
The shortest geometric route is not always the best embroidery route. A good path must also respect layering, color order, hidden areas, and the intended appearance of the garment.
Start and End Points Influence Production Efficiency
Every embroidery object needs a logical location where stitching begins and ends. These entry and exit points determine how the machine approaches the next object.
Poorly positioned points can create unnecessary travel, visible connectors, additional trims, or inefficient motion.
Wilcom specifically advises checking entry and exit points when objects are resequenced.
Consider two adjacent letters. If the first letter ends near the second letter's starting point, they may be connected cleanly with minimal travel. If the first ends on the opposite side, the machine may need to jump across the design or create another trim.
These are small decisions individually, but a complex embroidery file can contain hundreds of objects.
When multiplied across a large production run, unnecessary travel and trimming can affect throughput and operator intervention.
This is one reason file optimization matters commercially even when two designs appear nearly identical after stitching.
Color Changes Are Machine Instructions, Not Just Screen Colors
Embroidery color management has two layers: the visual color shown in design software and the machine instruction that tells production when a different thread should be used.
The distinction becomes especially clear with DST files.
Brother states that Tajima DST embroidery data does not contain pattern color information. Its machines may display default colors according to sewing order, meaning the on-screen colors can differ from the thread colors intended for production. Brother guidance on DST color information
That does not make DST defective. It illustrates why machine embroidery formats should not all be assumed to preserve identical information.
Production teams therefore need a reliable thread-color reference alongside the stitch file when the file format cannot communicate the intended colors precisely.
For fashion brands, a production handoff might include:
- the approved embroidery machine file;
- the editable master embroidery file where available;
- a thread-color specification or thread chart reference;
- finished embroidery dimensions;
- garment placement measurements;
- reference artwork;
- an approved physical stitch-out or photograph.
The file is essential, but it should not be the only source of production information.
Working Files and Machine Files Serve Different Purposes
One of the most useful concepts for apparel teams is the difference between a working embroidery file and a machine file.
An editable working file preserves richer design information so the digitizer can revise objects and regenerate stitching. A machine file is exported primarily so compatible embroidery equipment can execute the design.
Hatch's documentation describes EMB as its working-file format and lists exported machine formats including DST, EXP, PES, PEC, JEF, JPX, VP3, HUS, and several others. It also states that machine formats retain less information than the EMB working file and that some do not preserve color information.
The exact distinction varies among embroidery software ecosystems, but the operational lesson is broadly useful: do not treat the production file as the only master asset unless you know it contains everything required for future editing.
For a one-off event logo, that may not matter much.
For a fashion brand using the same emblem across shirts, jackets, caps, bags, uniforms, and seasonal collections, losing the editable master can create repeated digitizing work later.
Common Embroidery File Formats
Embroidery machines and software support many formats, and there is no single universal file extension for all equipment.
Common examples include:
- DST, associated with Tajima-format stitch data;
- PES and PEC, commonly associated with Brother/Baby Lock systems;
- EXP, used in several embroidery environments;
- JEF and JPX, associated with Janome-compatible workflows;
- VP3, VIP, HUS, and related formats, used within Husqvarna Viking/Pfaff ecosystems;
- EMB, used as an editable Wilcom/Hatch working format rather than simply as an exported stitch-out format.
Hatch currently lists these and additional supported formats in its file-format documentation. Hatch supported embroidery file formats
The practical issue is compatibility rather than memorizing extensions.
A brand sending embroidery to a supplier should confirm:
- which machine file format the supplier prefers;
- whether the supplier needs the editable source file;
- how thread colors should be communicated;
- whether design dimensions are embedded and verified;
- whether the supplier will make material-specific modifications before production.
A technically valid file is not automatically a production-approved file.
Why Simply Renaming or Converting the File Extension Is Not Enough
Embroidery formats are not interchangeable merely because software can save or convert between them.
Conversion can translate information from one format into another, but it cannot recreate design intelligence that was never present in the source.
For example, if an exported machine stitch file contains substantially less editable object data than the original working file, importing that machine file back into digitizing software does not necessarily restore the original object structure.
The stitches may still be editable at some level, but that is different from recovering the full original design logic.
This becomes important when brands store embroidery assets for years. Keeping only a production-format file can make future revisions more difficult, particularly if a logo needs to be enlarged substantially, adapted to a different fabric, or rearranged for a new garment placement.
Preserving the embroidery working file alongside the machine export is generally a more robust asset-management practice when ownership and vendor agreements allow it.
Can an Embroidery File Be Resized?
Yes, but the safe degree of resizing depends on the type of file, design construction, software, and amount of change required.
With an object-based editable design, software can often recalculate stitches after an object is resized because its stitch properties remain available. Wilcom describes embroidery object properties as information used when stitches are regenerated after reshaping, transformation, or scaling.
A stitch-based machine file offers less flexibility because its stitch coordinates may already represent the finished output.
Small adjustments can sometimes be handled successfully, but substantial scaling should trigger a design review rather than blind resizing.
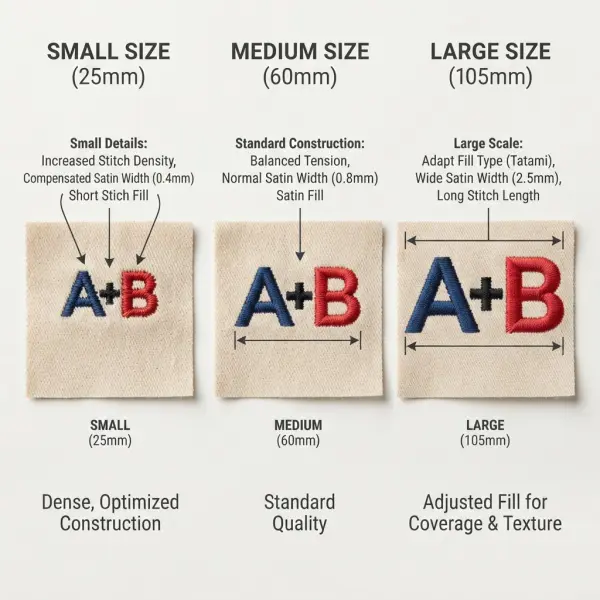
Consider a 60 mm embroidered logo enlarged to 120 mm. Simply doubling every stitch would change stitch lengths and spacing in ways that may no longer make sense. Areas originally suitable for satin stitching may become too wide, and small structures may need a different construction.
Reducing designs can be equally problematic. Lettering, gaps, stitch spacing, and small decorative areas may become physically too tight.
Professional resizing is therefore often closer to re-digitizing or recalculating parts of the design than simply dragging a corner handle.
Why Auto-Digitizing Does Not Remove the Need for Quality Control
Modern embroidery software can automate parts of the digitizing workflow. Artwork may be converted into embroidery objects, colors can be mapped, and software can generate initial stitch structures.
Automation is useful, particularly for straightforward graphics and repetitive production workflows.
It should not be confused with automatic production approval.
Software does not experience the completed garment in the same way a production team does. It cannot fully determine from artwork alone whether the intended fabric will stretch excessively, whether tiny lettering remains legible in thread, whether a backing feels uncomfortable behind a lightweight shirt, or whether an embroidered section becomes too stiff for the intended drape.
Even advanced parameter presets remain starting points. Wilcom's automatic fabric settings, for example, adjust embroidery properties according to substrate characteristics while still allowing object-level overrides.
The strongest workflow combines software automation with human review and physical sampling.
The Stitch-Out Is the Real Test of a Digital File
An embroidery preview can reveal obvious problems before production. Digitizers can inspect sequence, stitch direction, density, connectors, color changes, and machine functions without immediately sewing the design.
That saves time.
But the final validation still happens on fabric.
A stitch-out exposes interactions that a monitor cannot perfectly reproduce: fabric movement, thread tension, needle penetration, surface texture, backing performance, thread shine, physical bulk, and the appearance of edges after the material relaxes.
An effective sampling process should therefore ask:
- Are small letters readable?
- Are adjoining areas properly registered?
- Does fabric show through where it should not?
- Does the embroidery cause puckering?
- Are trims and jump threads acceptable?
- Are edges clean?
- Does the motif feel too stiff for the garment?
- Does the design maintain its intended dimensions?
- Are thread colors correct under real lighting?
- Does the backing suit the intended wearer and product?
The answers should feed back into the embroidery file before bulk approval.
How Fashion Brands Should Manage Embroidery Files
Embroidery files are production assets and should be managed with the same discipline as patterns, tech packs, graded specifications, print artwork, and approved color standards.
A fashion business that relies repeatedly on embroidery should establish a basic file-management system.
Start by keeping the original artwork separate from the embroidery master. The graphic source remains useful when branding changes or new applications are developed, while the embroidery master preserves the interpretation made specifically for stitching.
Next, record which embroidery version is approved for which product. A polo-shirt chest logo, cap version, heavyweight jacket version, and tote-bag version may share identical visual branding while requiring different embroidery constructions.
Version names should therefore communicate more than “final” and “final-new.”
A useful naming structure might include:
brand-logo_chest-polo_80mm_v03
rather than:
logo-final2-new
The accompanying specification should record the intended size, substrate, thread references, placement, approval status, and supplier or machine context.
For growing brands, this discipline becomes increasingly valuable as embroidery is repeated across seasons and suppliers.
Common Mistakes When Preparing Digital Embroidery Files
Sending only a JPG and assuming production is ready
A clean raster image can communicate appearance, but it does not necessarily contain embroidery construction data. When a brand sends only a JPG, the embroidery supplier may still need to digitize the artwork, creating additional cost, lead time, and interpretation risk. A better handoff distinguishes between artwork supplied for digitizing and a production-ready embroidery file.
Keeping only the exported machine file
Machine files are designed primarily for stitching, and they may preserve less information than editable working files. Hatch explicitly recommends retaining the EMB working file before exporting the required machine format. For repeat fashion programs, maintaining both files can make later modifications substantially easier.
Assuming DST stores the exact thread colors
DST files can carry stitch and sequence information without preserving the intended pattern colors. Brother specifically documents that DST data does not contain pattern color information and may therefore display automatic default colors on the machine. Thread specifications should be communicated separately whenever the production format does not reliably preserve them.
Resizing the file without rechecking stitch construction
Scaling can alter satin widths, stitch lengths, density relationships, registration, and the legibility of fine details. Editable object-based files provide more flexibility, but even then a substantial size change should be reviewed. The goal is not merely to make the motif mathematically larger or smaller; it is to make the embroidery construction appropriate at the new scale.
Optimizing only for the fewest color changes
Reducing color changes can improve efficiency, and embroidery software offers sequencing tools specifically for that purpose. However, sequence also determines layering, connectors, start and end positions, and visual construction. Rearranging objects purely to minimize machine stops can create other problems. Production efficiency should be optimized within the structural logic of the design.
How Fashion Businesses Can Improve the Artwork-to-Embroidery Handoff
For brands, the most effective approach is to make embroidery approval a controlled product-development step rather than a file-transfer task.
The process can begin with high-quality source artwork. Vector artwork is often convenient because clean curves and defined shapes make visual interpretation easier, although vector data still needs embroidery-specific digitizing.
The brand should then communicate the final application before digitizing begins. The digitizer needs more than the logo itself. Useful information includes the target dimensions, fabric type, garment construction, placement, expected order volume, required thread colors, and whether the application is being developed for a cap, flat panel, knit garment, finished jacket, or another product.
After digitizing, request a physical stitch-out on representative material.
Once approved, archive the relevant assets together:
- source artwork;
- editable embroidery master;
- approved machine-format export;
- thread-color references;
- finished embroidery measurements;
- placement specifications;
- stitch-out approval record;
- supplier or production notes.
This process creates continuity when production moves between teams or suppliers.
It also supports the broader commercial use of embroidery discussed in why embroidery technology supports custom and premium fashion products. Consistency becomes particularly important when embroidery is being used as a recognizable branded detail rather than occasional decoration.
What Brands Should Verify Before Releasing an Embroidery File
A file should be considered production-ready only when both its digital construction and physical stitch-out have been reviewed.
Before release, verify the following:
- correct finished dimensions;
- appropriate stitch structures for each design region;
- acceptable lettering at actual size;
- underlay suited to the material;
- appropriate density and pull compensation;
- logical object sequence;
- acceptable number and placement of jumps and trims;
- correct entry and exit points where relevant;
- accurate color-change sequence;
- machine-format compatibility;
- documented thread colors;
- acceptable physical stitch-out on representative fabric;
- correct garment placement;
- version control and file naming.
This checklist is deliberately broader than “Does the file open on the machine?”
Opening successfully confirms compatibility. It does not confirm that the design will produce the right garment.
Important Technical Caveats
Embroidery file behavior depends on the software, file format, embroidery machine, and workflow being used. Terms such as “object file,” “working file,” and “machine file” describe useful production concepts, but individual software platforms may structure or name their data differently.
File conversion also needs to be treated carefully. Exporting from a rich editable design into a machine format may discard information that is not supported by the destination format. Converting the resulting machine file back later does not necessarily reconstruct the original object intelligence.
Color handling is another format-dependent area. The documented limitation of DST color information should not be generalized to every embroidery format. Other formats may retain additional metadata, and machine behavior can vary.
Finally, even a technically sophisticated digital file cannot compensate completely for poor physical production conditions. Needle choice, thread condition, backing, hooping, tension, machine maintenance, garment construction, and operator practice still influence the final embroidery.
Digital accuracy and textile execution need to work together.
Frequently Asked Questions
What is the difference between digitizing and converting an embroidery file?
Digitizing builds the embroidery logic that determines how artwork will be stitched, while file conversion changes data from one supported embroidery format into another. Conversion does not necessarily redesign the stitch structure or improve its suitability for fabric. If the original design has poor density, inefficient sequencing, or inappropriate stitch types, merely converting the file extension does not correct those problems. True digitizing involves decisions about objects, stitch structures, direction, sequence, underlay, compensation, and production requirements.
Do I need vector artwork for embroidery digitizing?
No. Vector artwork can make clean shapes, outlines, and proportions easier to interpret, but embroidery can also be digitized from high-quality raster artwork and other references. The quality of the source matters because unclear edges, tiny details, or low-resolution graphics require more interpretation. Regardless of source format, the artwork still has to be translated into embroidery-specific objects and stitches. Vector artwork therefore improves the starting point in many cases but does not eliminate digitizing.
Is DST the best embroidery file format?
There is no universally best machine format because compatibility depends on the embroidery equipment and production workflow. DST is widely supported in commercial embroidery environments, but Brother documents that DST does not contain the intended pattern color information. Other formats can carry different information. The appropriate format is the one supported by the supplier's machine and workflow while preserving the information necessary for reliable production.
Why does my embroidery file look different after it is imported into another program?
Different software packages may interpret machine formats, thread palettes, stitch functions, or editable design information differently. Machine files can also retain less information than the original working file, so importing an exported stitch file is not the same as reopening its native editable master. Color display can be particularly misleading with formats such as DST. When appearance changes, compare actual stitch coordinates, dimensions, sequence, color-change stops, and production documentation rather than judging only the preview.
Can one embroidery master file be used for every garment?
It can serve as a master reference, but the exact production setup may need adaptation. Moving a logo from stable woven cotton to stretch knit, fleece, caps, or delicate fabric can require different density, underlay, compensation, stabilization, or even object construction. Wilcom's own fabric-specific settings change several of these embroidery parameters according to substrate behavior. Brands should therefore distinguish visual brand consistency from identical stitch settings.
Why does embroidery sometimes have gaps even when the digital objects touch perfectly?
Physical stitching can pull fabric inward and alter the relationship between adjacent shapes. This is one reason digitizers use pull compensation, overlap, underlay, and material-specific settings. Wilcom documents fabric pull as a cause of gaps and distortion and provides pull compensation specifically to counter this effect. The fix should be based on the actual cause rather than simply enlarging every object or increasing density.
Should fashion brands own their embroidery digitizing files?
When commercially and contractually possible, retaining the editable embroidery master can be valuable for brands that repeatedly use the same designs. It makes future resizing, substrate adaptation, supplier changes, and design updates easier than relying solely on an exported machine stitch file. Ownership arrangements vary among digitizers and embroidery vendors, so brands should clarify deliverables before commissioning work rather than assuming editable source files are automatically included.
Conclusion
A digital embroidery file is where visual design becomes manufacturing logic.
The artwork may define the logo, flower, monogram, graphic, or lettering that a fashion brand wants customers to see. Digitizing determines how thread will actually build that design: which stitch structures form each area, where the machine begins and ends, how objects overlap, how fabric movement is compensated, when colors change, and how the machine travels between design elements.
That translation is what separates a picture from an embroidery program.
For fashion businesses, the practical lesson is to manage embroidery files as production assets rather than incidental attachments. Preserve source artwork and editable embroidery masters, export the appropriate machine format, document thread colors and placement, and approve the result through an a




Comments 0
Leave a CommentSend Comment
Anda harus Login terlebih dahulu untuk dapat memberikan komentar.