

Common Dart Sewing Mistakes That Affect Garment Balance
A dart may occupy only a small section of a garment, yet an incorrectly constructed one can change how an entire blouse, dress, or pair of trousers fits. A few misplaced stitches can produce a noticeable point at the bust, unexpected wrinkles around the waist, or fabric that pulls toward one side.
These problems are not always caused by poor sewing technique. Some originate in the pattern, others develop during fabric marking or cutting, and still others become visible only after pressing or fitting.
For apparel manufacturers, this distinction matters. Correcting a sewing defect requires a different approach from adjusting an unsuitable dart position or changing the distribution of garment ease.
Understanding common dart sewing mistakes helps designers, sample makers, and production teams identify the actual source of fitting problems instead of repeatedly altering the wrong construction detail.
Quick Answer: What Are the Most Common Dart Sewing Mistakes?
Common dart sewing mistakes include incorrect dart placement, mismatched dart legs, inaccurate stitching, excessively long or short dart points, improper dart intake, bulky finishing, and unsuitable pressing techniques. These errors can create puckering, pointed fabric, uneven fullness, pulling, or visible distortion around the area being shaped.
Not every apparent dart defect begins at the sewing machine. A dart may be stitched perfectly but still produce an unsuitable fit if its location, length, or intake does not correspond to the intended body contour.
Garment balance is affected when shaping changes how the clothing hangs across the body. For example, incorrect bust shaping may contribute to diagonal drag lines or uneven front-to-back length distribution. Unequal waist dart intake can alter the waist circumference or create inconsistent shaping between garment panels.
The most reliable way to diagnose these problems is to separate pattern-related issues from stitching and pressing defects. A fit sample should be evaluated for grain alignment, horizontal balance, garment ease, dart position, and surface appearance.
For fashion businesses, effective dart quality control begins with accurate pattern specifications and continues through marking, sewing, pressing, and sample approval. Fixing the underlying cause is more useful than simply making an imperfect dart look smoother.
What Does Garment Balance Mean in Dart Construction?
Garment balance describes how clothing hangs and distributes its length, width, and shaping around the body in relation to the intended design.
A balanced garment generally maintains the planned relationship between front and back lengths, side seams, grainlines, and horizontal reference lines when worn by its target fit model.
Darts influence this relationship because they control fabric intake in specific areas. If that intake is inappropriate, the garment may develop excess fullness or tension even when its overall circumference appears correct.
For example, a woven blouse may have sufficient total bust circumference but inadequate bust shaping. The fabric can still pull diagonally from the bust toward the side seam because the available volume is not distributed where the body requires it.
Conversely, excessive bust dart intake can produce a loose or hollow-looking area around the bust and change how the center front hangs.
The Threads guide to evaluating bust shaping and pattern adjustments explains how incorrect dart intake can affect garment fullness and horizontal balance lines.
The Difference Between a Sewing Defect and a Fit Problem
A sewing defect occurs when a construction operation does not match the approved pattern or sewing specification.
Examples include a dart stitched beyond its marked endpoint, unevenly matched dart legs, or a visible lump caused by excessive backstitching.
A fit problem occurs when the pattern's shaping, dimensions, or proportions do not adequately correspond to the intended wearer.
A correctly stitched dart can therefore contribute to poor fit if its location or intake is unsuitable.
This distinction determines the appropriate corrective action.
A stitching defect may be resolved by correcting machine settings, marking procedures, or sewing technique. A fitting defect may require pattern adjustments, revised measurements, and another sample evaluation.
Why Wrinkles Do Not Always Identify the Cause
Wrinkles and drag lines provide useful clues, but they are not definitive diagnoses.
A diagonal line near the bust might indicate inadequate shaping, but it could also relate to an incorrect armhole, shoulder slope, fabric distortion, or insufficient ease.
Similarly, horizontal wrinkles around the waist may originate from excess garment length rather than faulty waist darts.
Before altering a dart, patternmakers should examine the garment's grain alignment, seam positions, ease, and overall length distribution.
Treating every wrinkle as a dart problem can introduce unnecessary changes and make the original fitting issue more difficult to identify.
Mistake 1: Placing the Dart in the Wrong Position
Incorrect dart placement is one of the most significant causes of shaping problems.
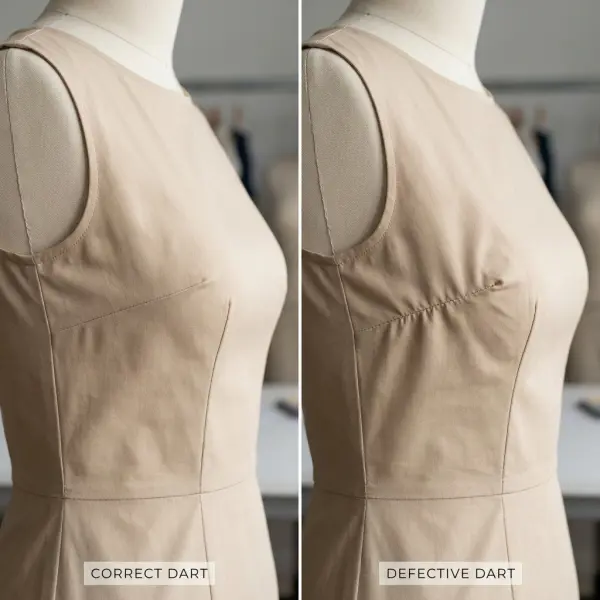
A dart must correspond to the body contour that the pattern is intended to accommodate. When its position is too high, too low, or incorrectly angled, the fabric may be shaped in the wrong area.
In a fitted blouse, for example, a side bust dart should generally point toward the bust apex while ending before the fullest projection. If its direction does not correspond to the intended bust position, fullness may accumulate above or below the required area.
The result can include diagonal pulling, uneven fabric distribution, or an unnatural-looking contour.
Why Dart Placement Errors Happen
Placement errors may originate from an unsuitable base pattern, inaccurate measurement data, or an unverified grading adjustment.
They can also arise during production when marking points are transferred incorrectly from the pattern to the fabric.
The Closet Core Patterns guide to adjusting dart position demonstrates how a dart can be repositioned or redirected to better align with the intended body contour.
For manufacturing teams, the important question is whether the location error exists in the approved pattern or was introduced during cutting and sewing.
If every sampled garment has the same problem, the pattern should be investigated. If only individual units are affected, marking and stitching consistency become more likely sources.
How to Correct an Incorrectly Positioned Dart
The correction begins by identifying the intended body reference point on a fit model or an appropriate dress form.
The actual dart position should then be compared with the approved pattern.
If the pattern is incorrect, the dart can be repositioned using a suitable patternmaking method. Its legs, endpoint, and affected seamline should be redrawn and trued before another sample is produced.
If the pattern is correct but the sewn garment differs, production teams should review marking methods, alignment procedures, and operator instructions.
Changing the stitching alone will not solve an incorrectly drafted dart.

Mistake 2: Sewing a Dart That Is Too Long or Too Short
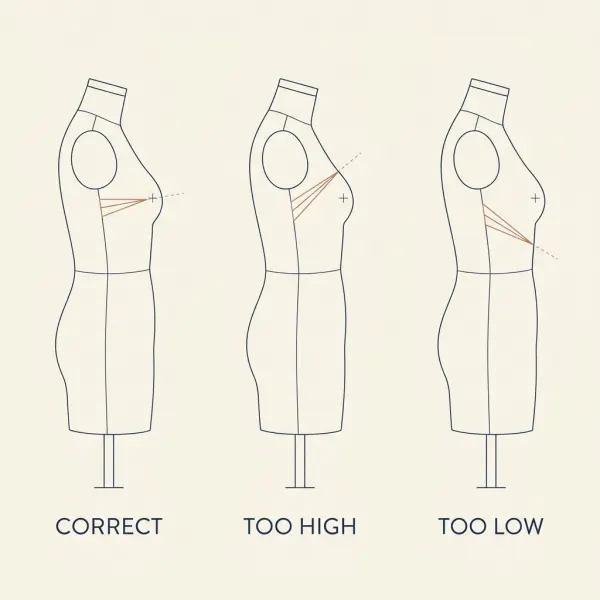
Dart length determines where the stitched intake ends and how gradually the fabric transitions into the surrounding fullness.
A dart that is too long may extend too close to the fullest part of the body, creating an unwanted pointed appearance or distorting the intended contour.
A dart that is too short may release fullness before the fabric reaches the area where shaping is needed.
Both conditions can affect the appearance of the garment, but their precise symptoms depend on the pattern, fabric, and body proportions.
Dart Points That Extend Too Close to the Bust Apex
A bust dart that ends too close to the bust apex can create an excessively pointed silhouette.
The sewn fold continues into an area where the garment should transition smoothly over the bust.
This problem may become particularly visible in structured woven fabrics that retain the shape created by stitching and pressing.
However, not every pointed dart results from excessive length. Abrupt stitching near the tip or bulky thread finishing can produce a similar surface defect.
The diagnostic process must distinguish between the position of the endpoint and the quality of its construction.
Dart Points That End Too Far Away
A dart that ends too far from the required contour may leave fullness in an inappropriate location.
In a fitted bodice, this can produce excess fabric below or beside the bust rather than allowing the fabric to follow the intended shape.
The correction may involve extending the dart, changing its angle, or revising the wider pattern geometry.
However, extending a dart without examining its intake can change how the garment fits.
The appropriate endpoint should be determined through fitting rather than relying on a universal distance from the bust apex.
The Threads discussion of bust dart point placement explains why bust shape and projection affect where the dart should finish.
Mistake 3: Using Incorrect Dart Intake
Dart intake is the amount of fabric taken in by a dart at a specified position.
It affects the relationship between the garment's effective dimensions and the three-dimensional space available around the body.
When dart intake is incorrect, the garment may appear too tight in one region and too loose in another, even if the original flat pattern measurements seem reasonable.
Excessive Dart Intake
Excessive intake can remove more fabric than the pattern requires.
In a fitted bodice, this may create an unnatural contour, distort nearby seams, or produce excess fullness in another area because the shaping no longer corresponds to the body's proportions.
A waist dart with too much intake may also reduce the effective waist circumference beyond the intended measurement.
If the garment becomes uncomfortable or pulls around adjacent areas, the problem should not automatically be corrected by adding more ease elsewhere.
The first step is to verify whether the dart intake itself matches the approved pattern and fitting requirements.
Insufficient Dart Intake
Insufficient intake leaves more fabric outside the sewn dart than the pattern may require for its intended shape.
However, this does not always translate into simple looseness. In a bust-fitting context, inadequate dart shaping can leave too little three-dimensional accommodation for projection and contribute to diagonal drag lines.
The garment may contain enough total fabric, yet that fabric is distributed incorrectly.
This explains why reducing or increasing overall circumference is not always an effective alternative to adjusting darts.
For production teams, intake problems should be assessed through finished garment measurements, pattern comparisons, and fit testing rather than by appearance alone.
Mistake 4: Failing to Match the Dart Legs Accurately
A conventional dart is sewn by bringing its two marked legs together along the intended fold.
If the legs are not aligned accurately, the actual stitched intake may differ from the design.
This is especially relevant when the fabric shifts during handling or when markings are incomplete.
The resulting dart may become twisted, asymmetrical, or unevenly tapered.
How Misalignment Affects Garment Appearance
An incorrectly folded dart can change the angle of the seam and alter how fabric is distributed around its point.
In a blouse, this may produce a diagonal crease or an irregular transition between the dart and the surrounding panel.
In a skirt, inconsistent waist dart alignment can affect the waistline or create unequal shaping between the front and back panels.
The severity depends on how far the sewn position deviates from the specification and on the fabric's ability to absorb or reveal the error.
In stable woven cotton, the defect may appear as a visible change in the dart line. In slippery fabric, the panels may shift more easily during handling and create additional irregularities.
Preventing Dart Alignment Errors
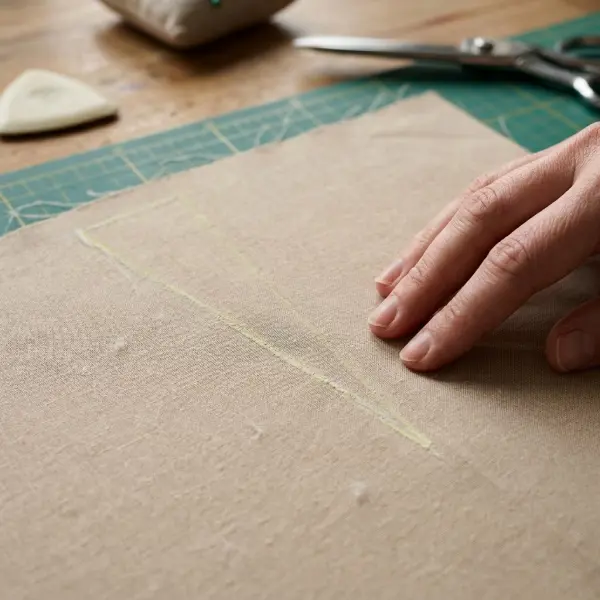
Marking accuracy should be established before sewing begins.
The garment panel must be folded along the correct centerline, and the dart legs should meet at the intended stitching positions.
For difficult materials, temporary basting or suitable holding methods may improve control.
The Tilly and the Buttons tutorial on stitching darts demonstrates the importance of aligning both dart legs before sewing.
In commercial production, a clear sewing operation standard and an approved reference sample can help operators reproduce the intended result.
Mistake 5: Creating Puckering or a Bulky Dart Point
Puckering is a visible gathering or distortion of fabric along or near a stitched line.
In dart construction, puckering may occur because of inaccurate stitching, inappropriate machine settings, fabric feeding irregularities, or excess tension.
A separate but related problem is the small bump that can form at the dart endpoint.
These defects may look similar at first glance, but they do not always share the same cause.
Abruptly Changing the Stitching Direction
A dart should generally taper smoothly into the fabric fold.
When the operator approaches the endpoint and suddenly changes the stitching angle, the fabric can develop a small dimple or pointed bump.
The Threads guide to stitching smooth dart points discusses how abrupt changes near the endpoint can contribute to visible imperfections.
A better approach is to follow a controlled stitching path that tapers progressively toward the fold.
Different sewing methods may be suitable for different fabrics, but the intended result is a smooth transition rather than a sudden change in contour.
Excessive Backstitching at the Dart Tip
Backstitching directly at a conventional dart point can create unnecessary thread bulk.
The additional stitches may distort the delicate endpoint, especially in lightweight fabrics.
Common alternatives include sewing off the folded edge and securing the thread tails or using a suitable short-stitch method.
For a double-pointed dart, stitching commonly begins near the wider center section and proceeds toward each endpoint separately.
The selected finishing method should follow the approved construction requirements and be tested on the actual garment fabric.
Incorrect Machine Tension or Fabric Feeding
Not every puckered dart is caused by poor operator control.
Machine-thread tension, needle selection, thread characteristics, stitch length, and differential fabric feeding can influence how the fabric behaves along the stitching line.
The Threads explanation of puckered stitches describes how thread tension and related sewing variables can contribute to seam puckering.
When diagnosing a machine-related problem, teams should test one variable at a time using representative fabric samples.
Pressing may reduce the visibility of some puckering, but it should not be used to conceal an unstable or unsuitable sewing operation.
Mistake 6: Pressing Darts Incorrectly
Pressing is an integral part of dart construction because it helps the stitched fabric settle into the intended three-dimensional form.
A properly sewn dart can still look poor if pressing creates a sharp crease beyond its endpoint or flattens the surrounding body contour.
The result may be a visible ridge, a distorted surface, or an unnatural angular shape.
Pressing a Shaped Dart Completely Flat
Darts are intended to create three-dimensional shaping.
Pressing the entire area aggressively against a flat surface may reduce the natural curvature or create unwanted creases.
A tailor's ham or another suitable curved pressing surface can help support the garment's intended contour.
This is especially useful for bust darts and other shaping areas where fabric must curve smoothly.
The Threads guide to constructing and pressing garment darts explains the use of curved pressing surfaces and methods for reducing visible dart allowance impressions.
Pressing the Dart in the Wrong Direction
Dart allowances are generally pressed in a direction specified by the pattern or garment construction instructions.
For example, conventional side bust darts are often pressed downward, while some vertical waist darts are pressed toward the garment center.
These are common practices rather than rules that apply to every design.
The appropriate pressing direction depends on garment construction, fabric weight, intersecting seams, and the desired finished appearance.
In production, inconsistent pressing can make otherwise identical garments appear different.
Excessive Heat and Pressure
Different fabrics respond differently to heat, steam, and pressure.
Some synthetic materials can develop unwanted shine or permanent distortion, while certain delicate fabrics may be affected by water spotting or excessive moisture.
Thick materials may require controlled pressure and allowance management to avoid show-through.
A pressing test should therefore be conducted on the actual fabric before the procedure is standardized.
A smoother-looking dart is not necessarily an acceptable result if the pressing process has damaged the textile.
Mistake 7: Ignoring Dart Bulk in Thick Fabrics
Thick fabrics introduce another challenge: the folded dart allowance can create a noticeable ridge beneath the garment surface.
This is not necessarily a sewing accuracy problem. It can be a predictable consequence of concentrating several fabric layers within a small shaping area.
In medium-weight and heavy woven garments, the allowance may become visible from the outside, particularly when pressed in one direction.
Why Bulky Darts Affect Appearance
A dart's folded allowance adds thickness to one side of the stitched shaping line.
If the material is bulky or the intake is substantial, that thickness may create an uneven surface or alter the intended garment contour.
This can be particularly noticeable in fitted dresses, structured jackets, and garments made from relatively heavy fabrics.
Depending on the material and construction, possible solutions include distributing intake between smaller darts, incorporating shaping into panel seams, or using an approved allowance-management technique.
Why Cutting the Dart Allowance Requires Caution
Trimming or cutting a dart allowance may reduce bulk, but it also changes how the fabric is supported and finished.
The approach must be appropriate for the textile, stitch construction, and intended garment use.
An uncontrolled cut near the endpoint can damage the dart and create a structural weakness.
For commercial production, allowance modifications should be incorporated into the approved construction specification rather than improvised during sewing.
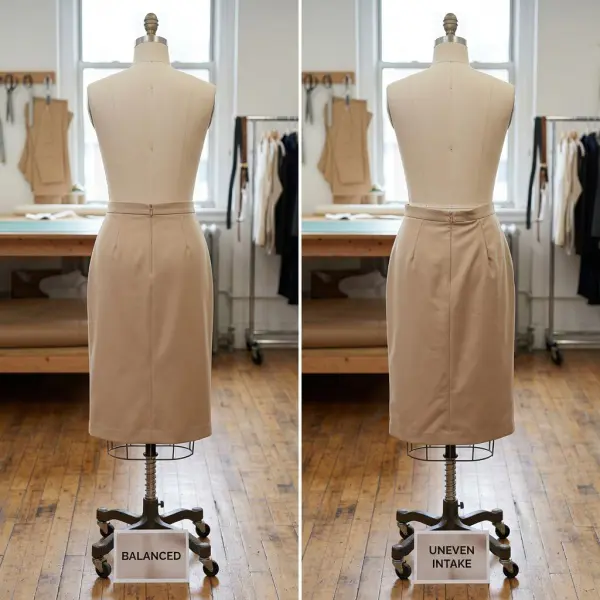
Mistake 8: Sewing Unequal Darts on Symmetrical Garments
Many garments are designed with corresponding darts on the left and right sides.
When these darts differ unintentionally in length, position, or intake, the garment may appear uneven.
For example, one waist dart may remove more fabric than its counterpart, changing the effective dimensions of the two panels.
A bust dart may also finish higher on one side than on the other, creating a noticeable difference in the garment's appearance.
How Unequal Darts Affect Balance
Unintended asymmetry can influence how a garment sits against the body.
The side seams may appear displaced, the waistline may look uneven, or one side may contain more fullness than the other.
However, not every asymmetric appearance originates from the darts.
Differences in cutting accuracy, seam allowances, pressing, or the wearer's body proportions can also contribute.
Quality control should therefore compare the darts with the approved pattern before concluding that they caused the imbalance.
When Symmetry Is Not the Correct Standard
Not every garment is designed to be symmetrical.
Asymmetric fashion designs may deliberately position shaping differently on each side.
Made-to-measure garments may also account for differences between the wearer's left and right body contours.
The correct quality standard is adherence to the approved design and fitting specification, not automatic visual symmetry in every case.
How to Identify the Actual Cause of Dart Problems
The most effective troubleshooting process begins with visible symptoms but does not stop there.
A dart defect should be evaluated through the relationship between its appearance, sewn measurements, pattern information, and garment fit.
The following framework can help sewing and quality-control teams determine which area requires investigation.
|
Visible symptom |
Possible cause |
What to verify first |
|
Pointed appearance near bust |
Dart too long, abrupt stitching, or inappropriate pressing |
Dart endpoint, stitch taper, and bust position |
|
Small pucker at dart tip |
Abrupt taper, thread bulk, or sewing tension |
Final stitches and finishing method |
|
Diagonal drag lines near bust |
Inadequate shaping, insufficient ease, or other pattern imbalance |
Bust volume, dart intake, overall pattern fit |
|
Excess fullness beside dart |
Incorrect dart position, length, or intake |
Pattern reference points and sewn measurements |
|
Uneven waist shaping |
Different dart intakes or positions |
Left/right dart dimensions and waist measurements |
|
Visible ridge along dart |
Bulky allowance or pressing show-through |
Fabric thickness and pressing method |
|
Dart twisting or irregular angle |
Incorrect folding, markings, or fabric handling |
Dart leg alignment and fabric grain |
|
Uneven hem or displaced seams |
Garment balance issue, potentially involving dart shaping |
Horizontal balance lines, grainlines, front/back length, and overall ease |
These symptoms are diagnostic clues, not definitive proof of a particular defect.
For example, a garment with diagonal drag lines may require a pattern adjustment rather than a sewing correction. Changing stitch tension will not solve a problem caused by insufficient bust volume.
Similarly, an uneven hemline should not be attributed to waist darts until other causes, including pattern length, cutting, and garment alignment, have been examined.
A Practical Workflow for Correcting Dart Sewing Problems
A structured correction process helps apparel teams avoid repeated trial-and-error alterations.
The objective is to identify the point where the result begins to differ from the approved construction or intended fit.
Step 1: Inspect the Garment Before Altering It
Begin with the garment in its current condition.
Examine the right and wrong sides, the dart stitching, and the surrounding fabric.
If the problem concerns fit, place the garment on an appropriate fit model or dress form and assess the overall balance.
Document the defect before making changes. Photographs, measurements, and location notes make it easier to determine whether the correction produces a meaningful improvement.
Step 2: Compare the Sewn Dart With the Pattern
Check the dart's location, length, endpoint, intake, and orientation against the approved pattern.
If the sewn dimensions differ, the issue may lie in marking, folding, stitching, or fabric handling.
If the dimensions match but the fit remains unsuitable, the underlying pattern may require review.
This distinction helps prevent production teams from modifying sewing instructions when the actual problem belongs to pattern development.
Step 3: Check the Stitching and Machine Conditions
If the pattern is correct, investigate how the dart was sewn.
Examine whether the legs were aligned, whether the stitching tapered smoothly, and whether the thread finish introduced bulk.
For puckering, review the needle, thread, stitch settings, and feeding behavior using the same fabric as the production garment.
An adjustment that works on a stable test cotton may not produce the same result on lightweight viscose or a dense synthetic fabric.
Step 4: Evaluate Pressing and Fabric Behavior
Inspect the dart before and after pressing whenever possible.
Determine whether the surface defect is caused by stitching or becomes visible during the pressing process.
Test an appropriate curved pressing surface, temperature, and pressure where the fabric permits.
If the dart allowance creates a ridge, consider whether the approved construction needs modification rather than applying additional heat.
Step 5: Correct, Resample, and Update the Specification
After identifying the likely cause, make a targeted correction.
Avoid changing the dart position, intake, stitching method, and pressing procedure simultaneously unless a coordinated pattern revision requires it.
A controlled sample allows the team to determine whether the correction resolved the original problem.
Once approved, the updated pattern, technical specifications, reference sample, and quality-control criteria should reflect the change.
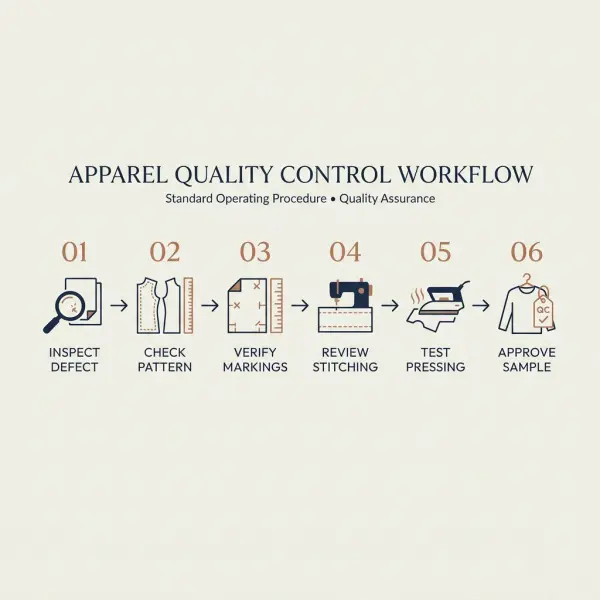
How Different Fabrics Influence Dart Sewing Defects
Fabric properties can make the same construction error more or less visible.
An accurately sewn dart may look smooth in one material and develop surface irregularities in another because of differences in thickness, stability, drape, or finish.
This is why production approval should be based on the actual fabric rather than an unrelated testing material.
Lightweight and Sheer Fabrics
Lightweight fabrics can reveal small sewing irregularities, especially around the dart point.
Puckering may become visible because the material offers little thickness to conceal uneven tension or abrupt stitching.
Sheer materials create an additional challenge because the folded allowance and thread finishing can be seen through the fabric.
Suitable needle and thread selection, careful handling, and discreet finishing become particularly important.
The sewing method should be tested for both appearance and durability before bulk production begins.
Slippery or Softly Draping Fabrics
Some viscose, satin, and other softly draping materials can shift during folding or stitching.
If the fabric layers move relative to one another, dart alignment may change even when the original markings were accurate.
Temporary stabilization, careful handling, and suitable machine settings can help control movement.
However, the selected method must not damage the fabric or leave unwanted marks.
For delicate materials, the production process should be established through controlled sampling rather than relying on extensive correction after sewing.
Medium-Weight Structured Wovens
Stable woven fabrics may be easier to mark and handle, but their structure can make shaping errors visible.
A bust dart ending too close to the apex may create a noticeable point, while an incorrect pressing direction may produce a persistent ridge.
Structured fabrics can also reveal differences between the left and right sides of a garment.
Careful dart geometry and appropriate pressing are therefore as important as sewing accuracy.
Thick and Bulky Fabrics
Heavy materials may produce excessive thickness where dart allowances overlap.
This can affect the garment's surface appearance and complicate pressing, particularly when a dart intersects another seam.
A different distribution of shaping, seam construction, or allowance finish may be appropriate.
The best approach depends on whether the design prioritizes a smooth tailored surface, structural stability, or a particular visual effect.
Practical Quality-Control Measures for Apparel Manufacturers
For fashion businesses, dart defects become more expensive when they are discovered late in production.
A small pattern error can be repeated across an entire cutting order. A sewing technique problem may appear only after a change in operator, fabric batch, or machine setting.
A dependable quality-control approach should therefore address dart construction at several stages of production.
Pattern and Sample Approval
The approved sample establishes the intended garment shape, but its construction details must also be captured in the pattern and technical documentation.
Pattern teams should confirm that dart locations and dimensions correspond to the target size and fit requirements.
Sample fitting should consider garment balance, ease, seam positions, and movement.
When the sample requires a dart adjustment, that change should be transferred to the master pattern before production authorization.
Otherwise, the factory may repeatedly reproduce a problem that was corrected only on the physical sample.
Cutting and Marking Control
Cutting accuracy affects whether the approved dart can be sewn as designed.
Incorrect notches, incomplete markings, or fabric distortion may change the position of the finished dart.
The cutting team should use an approved marking method suitable for the fabric and production workflow.
Quality checks can compare selected cut panels with the pattern before sewing begins.
This can be especially useful for styles containing multiple darts or materials that are difficult to handle.
Sewing Operation Standards
A sewing specification should define how the dart is aligned, stitched, secured, and prepared for pressing.
Operator training can use approved garment samples to demonstrate the expected endpoint appearance and finished contour.
Where appropriate, production teams can establish a first-piece inspection before continuing a larger sewing batch.
If defects appear repeatedly, the investigation should include machine conditions and fabric handling rather than assuming that the problem is caused only by operator skill.
Pressing and Final Inspection
Final inspection should examine the garment after its approved pressing procedure.
The inspector should look for visible bumps, unwanted creases, puckering, allowance show-through, and deviations from the expected shape.
Fit-related defects should be evaluated against the approved size specifications and relevant reference samples.
A garment may pass basic stitching inspection but still exhibit poor balance if the pattern or shaping distribution is incorrect.
For this reason, appearance inspection and dimensional or fitting verification serve different but complementary purposes.
What Fashion Brands Should Verify Before Approving Dart Corrections
A dart correction should solve a defined problem without creating new ones elsewhere in the garment.
This requires more than comparing the appearance of the dart before and after alteration.
Brands should verify that the corrected garment still meets the intended fit, dimensions, silhouette, and manufacturing requirements.
Several considerations deserve particular attention.
Do not confuse construction accuracy with correct fit. A perfectly stitched dart can still produce an unsuitable shape when the underlying pattern does not correspond to the intended body proportions.
Do not assume all wrinkles originate from darts. Shoulder slope, overall garment length, insufficient ease, fabric grain, and seam alignment can produce similar visible symptoms.
Do not change dart intake without checking finished dimensions. Increasing or reducing intake changes the relationship between the dart and adjacent garment areas. The revised pattern should be measured and fitted again.
Do not treat pressing as a substitute for correction. Pressing can improve the appearance of a properly sewn dart, but it cannot reliably repair incorrect dart geometry or fundamentally unsuitable shaping.
Do not assume one sample validates every size. Dart placement and intake may require review across a size range, particularly when grading changes the relevant body proportions.
Finally, correction methods must be compatible with the material and commercial production process. A delicate manual technique may be suitable for a tailored sample but difficult to reproduce consistently in high-volume manufacturing.
The aim is to achieve a repeatable construction that meets the approved garment standard.
Frequently Asked Questions About Dart Sewing Problems
1. Why does my dart have a pointed or cone-shaped appearance?
A pointed dart can result from an endpoint that extends too close to the fullest body contour, an abrupt stitching taper, or bulky thread finishing near the tip.
The first step is to compare the finished dart with the approved pattern and intended body reference point. If the endpoint is incorrectly positioned, the pattern may require adjustment. If the position is correct, the sewing technique and pressing process should be examined.
A smooth dart generally tapers gradually and transitions into the surrounding fabric without creating a sharp projection.
The correction depends on identifying whether the cause is pattern geometry or construction.
2. Why is the fabric puckering around a sewn dart?
Puckering around a dart can occur when stitching tension, fabric feeding, needle selection, or dart alignment causes the material to gather unevenly.
An abrupt change in stitching direction near the endpoint can also create a localized pucker.
To diagnose the problem, examine whether the distortion follows the entire stitching line or appears only near the tip. A continuous ripple may indicate a machine or material-handling issue, while a small endpoint dimple may suggest an unsuitable taper or finishing method.
Test adjustments on the same fabric used for production and change one sewing variable at a time where practical.
3. How can I tell whether a bust dart is too long or too short?
A bust dart that extends too close to the bust apex may create an unwanted pointed contour, while a dart ending too far away can leave excess fullness in an inappropriate area.
However, these symptoms are not exclusive to dart length. Incorrect intake, dart direction, or overall garment dimensions can produce similar problems.
The most useful assessment is to mark the bust apex on a fit sample and compare it with the sewn dart endpoint.
Adjust the endpoint while maintaining appropriate shaping, then evaluate the revised garment. There is no single endpoint distance that works for every bust shape and pattern.
4. Can incorrect waist darts make a skirt look uneven?
Yes. Incorrect waist dart intake or placement can alter how a skirt fits around the waist and upper hips.
If corresponding darts remove different amounts of fabric unintentionally, the waistband or nearby panels may appear uneven.
However, skirt imbalance can also result from inaccurate cutting, side-seam construction, differences in hip shape, or incorrect garment length.
Before changing the darts, compare their sewn dimensions with the approved pattern and check the finished waist and hip measurements.





Comments 0
Leave a CommentSend Comment
Anda harus Login terlebih dahulu untuk dapat memberikan komentar.