

Collar and Neckline Construction Explained for Better Garments
A collar may occupy only a small part of a garment, but construction errors there are unusually visible. A collar that twists, a neckline that stretches during sewing, an edge that rolls outward, or a collar point that refuses to lie flat can make an otherwise well-made shirt, dress, jacket, or blouse look poorly engineered.
The reason is simple: the neck area combines curved pattern geometry, relatively small seam tolerances, multiple fabric layers, and direct contact with the wearer. Adding a collar introduces another component that must match the neckline accurately while still producing the intended stand, roll, spread, or flat shape.
Good collar and neckline construction therefore starts well before the final stitching operation. Pattern shape, fabric behavior, interfacing, seam allowance management, stabilization, attachment sequence, and pressing all contribute to the result.
Quick Answer: What Is Collar and Neckline Construction?
Collar and neckline construction is the process of shaping, stabilizing, assembling, attaching, and finishing the neck area of a garment so that it achieves the intended fit, silhouette, comfort, and structural stability.
The neckline is the shaped opening around the neck. It may be finished independently with a facing, binding, band, lining, or other method, or it may serve as the attachment point for a collar. A collar is a garment component that surrounds or frames the neckline and may lie flat, stand away from the body, roll over, or combine several structural behaviors.
Successful construction depends on more than sewing the collar to the garment. The collar pattern and neckline seamline must correspond correctly; curved or bias-cut edges may require stabilization; interfacing must provide suitable support without overpowering the shell fabric; and seam allowances often need trimming, grading, clipping, or careful pressing.
For fashion businesses, these details affect sample approval, production repeatability, appearance after laundering, wearer comfort, alteration risk, and ultimately the perceived quality of the finished garment.
What Are the Neckline and Collar in Garment Construction?
A neckline is the garment edge or opening positioned around the wearer's neck. Its exact shape is determined by the pattern: it may sit close to the neck, open widely across the shoulders, drop at the front or back, or form part of a more complex garment structure.
A collar is an additional structural or decorative component associated with that neckline. Government vocational training material from Bharat Skills describes a collar as a component attached at the neckline and notes that collars may sit close to the neck, away from it, or rise above the neckline. Bharat Skills garment-construction guidance on collars
This distinction matters because a neckline does not necessarily require a collar. A collarless blouse may use a facing. A T-shirt commonly uses a stretch band or binding. A lined dress may have its neckline enclosed by the lining. Conversely, a tailored shirt may combine a bodice neckline, collar stand, collar leaf, interfacing, and multiple enclosed seam allowances.
The construction method therefore has to follow the product architecture rather than the visual shape alone.

Why Does Collar and Neckline Construction Matter So Much?
The neck area sits close to the face and is one of the first garment details a customer notices. Small inconsistencies are therefore difficult to hide. On a button-up shirt, for example, a difference between left and right collar points may be apparent immediately. On a simple woven dress, a neckline that has stretched by only a modest amount during handling can begin to gape away from the body.
There is also a functional reason. The neckline has to accommodate the body without feeling abrasive, restrictive, unstable, or excessively loose. A standing collar must retain enough structure to support its design while still allowing movement. A soft blouse collar may need almost the opposite balance: sufficient control around the neckline without creating an unnaturally rigid edge.
New Mexico State University's collar-construction guidance emphasizes that a finished collar should lie smoothly around the neckline without pulls, ripples, or wrinkles. New Mexico State University collar construction guide
For commercial apparel production, that translates into several practical concerns: reliable pattern matching, repeatable sewing operations, appropriate machinery and folders where relevant, achievable tolerances, sensible pressing procedures, and quality-control criteria that operators can evaluate consistently.
The Neckline Is a Curved Edge—and Curved Edges Can Move
One of the easiest collar problems to misdiagnose is a collar that appears to be the wrong size when the actual problem is distortion of the neckline.
Parts of a curved neckline are frequently cut partly across the fabric grain rather than entirely along the most stable grain direction. Depending on fabric construction, this can make the cut edge more vulnerable to stretching during cutting, bundling, sewing, pressing, or repeated handling.
Staystitching is one traditional way of limiting that movement. Sewing and Craft Alliance guidance defines staystitching as directional stitching applied before construction to stabilize edges that may otherwise pull out of shape. Its guidance specifically identifies necklines among areas where stabilization may be useful, particularly with unstable fabrics. Sewing and Craft Alliance guidance on staystitching
That does not mean every industrial neckline needs an identical staystitching operation. Fabric stability, production method, lining construction, fusible support, knit recovery, seam type, and handling sequence can change the requirement.
The larger production principle is more useful:
Control the neckline geometry before attaching anything that depends on it.
If the neckline has already been stretched out of specification, attaching a perfectly cut collar will not automatically correct the problem.
Collar Construction Is a Small System, Not a Single Pattern Piece
Although collar designs differ considerably, several structural concepts appear repeatedly in garment construction.
A traditional collar may involve an upper collar visible from the outside and an undercollar positioned underneath it. Some designs include a separate collar stand, while others incorporate standing and rolling behavior into a single collar pattern.
Important collar terminology also includes the neckline seam, stand, roll line, and fall. Educational material archived through ERIC describes the stand as the rise from the neckline toward the roll line, the roll line as the area where the collar turns, and the fall as the depth extending from the roll toward the outer collar edge.
These relationships explain why two collars with similar outer silhouettes can behave differently when worn.
A collar is not defined only by what its edge looks like on a flat pattern.
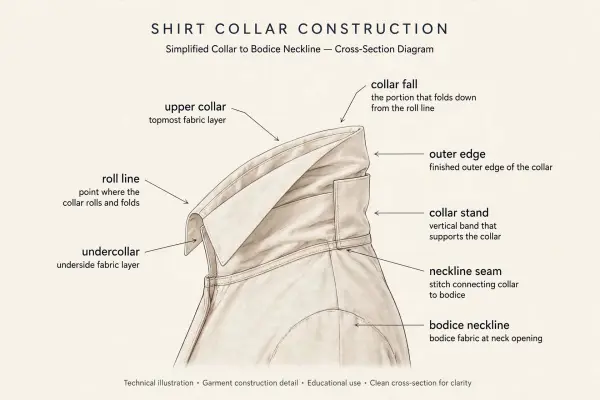
A useful way to think about the system is:
|
Construction element |
Primary function |
Typical problem if poorly controlled |
|
Neckline seamline |
Establishes the attachment geometry |
Gaping, distortion, mismatched collar |
|
Upper collar |
Creates the principal visible surface |
Ripples, asymmetry, poor edge appearance |
|
Undercollar |
Supports the underside and turning behavior |
Undercollar showing at outer edge |
|
Collar stand, where used |
Connects collar to neck and controls elevation |
Twisting, uncomfortable fit, uneven collar height |
|
Interfacing |
Adds selected stability and body |
Collar too limp, too stiff, bubbled, or distorted |
|
Seam allowances |
Permit assembly and turning |
Excess bulk or uneven edges |
|
Notches and balance marks |
Control alignment during assembly |
Off-center collar or uneven attachment |
|
Pressing |
Shapes and sets the construction |
Flat, crushed, twisted, or inconsistent collar |
The construction method changes with collar style, but the principle remains: every layer contributes to the final three-dimensional form.
Pattern Accuracy Comes Before Sewing Quality
Sewing operators can compensate for minor material variation, but they should not be expected to correct fundamentally incompatible pattern pieces.
For product developers and technical teams, one important check is whether the collar attachment seamline corresponds to the intended neckline seamline, including any deliberate design allowance or shaping. This comparison should be made at the stitching line rather than simply comparing raw cut-edge lengths, because seam allowances on curves can create misleading measurements.
Balance points matter as well. Centre back, shoulder positions, collar ends, break points, and other style-specific notches allow the operator to distribute the component correctly rather than forcing one section to absorb an accumulated mismatch.
A collar that technically “fits” the total circumference can still sit incorrectly if the balance is wrong.
For example, shifting excess length toward the front of a shirt collar may change how the collar ends meet the placket. Shifting it toward the back can alter how the collar sits against the neck. This is why sample evaluation should consider placement and symmetry, not only whether the seam can be closed.
The neckline should be checked before collar attachment
If a woven neckline is particularly unstable, the production sequence should minimize unnecessary handling between cutting and stabilization. After stabilization, pattern or measurement checks can help determine whether the shape has changed.
The Sewing and Craft Alliance specifically recommends checking a staystitched piece against its pattern shape where distortion is suspected.
In a production environment, the equivalent may be a template, measurement specification, workstation guide, or inline quality checkpoint rather than the original paper pattern.
Interfacing Changes How a Collar Behaves
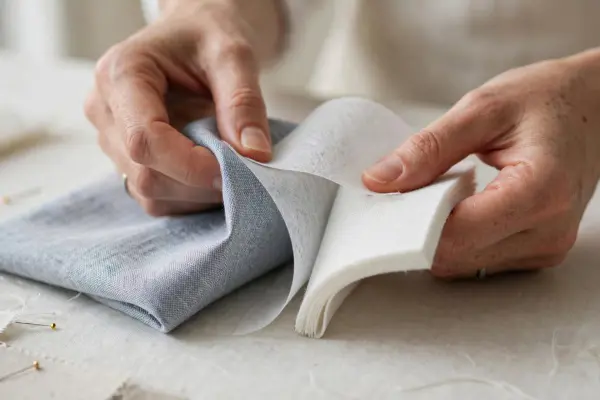
Interfacing is not simply added to make a collar “stiff.” Its more useful function is to create controlled support appropriate to the design and shell fabric.
A soft viscose blouse collar, crisp cotton poplin shirt collar, heavy wool coat collar, and stretch jersey collar should not automatically use the same support construction.
Commercial interfacing may be woven, nonwoven, knitted, fusible, or sew-in. Suppliers design different constructions for different levels of stability, stretch, handfeel, care requirements, and garment applications. Pellon, for example, specifies interfacing products intended for collars and cuffs ranging from lightweight support to firmer shirt-collar stabilization. Pellon apparel interfacing guidance
Fusible interfacing introduces another variable: the bond itself becomes part of the construction system.
Industrial interlining supplier Chargeurs PCC identifies time, temperature, and pressure as key fusing parameters. Its technical guidance also notes that the required conditions depend on the specific interfacing and adhesive system. Chargeurs PCC technical guide to fusible interfacing
This is why copying a press setting from one material combination to another is risky. A suitable production trial should consider the actual shell fabric, interfacing, press, garment care method, desired hand, and appearance after testing.
Readers who need a deeper comparison of reinforcement systems can also review fusible vs sew-in interlining.
More support is not automatically better
Over-interfacing can be just as undesirable as insufficient support.
A collar may technically become more stable but lose the soft roll intended by the designer. A lightweight outer fabric may begin to look board-like. Excessive thickness around enclosed seams can also make edges more difficult to turn and press cleanly.
The target is not maximum rigidity.
The target is repeatable structural behavior that matches the garment specification.
How Does Collar and Neckline Construction Work in Practice?
There is no single sewing sequence for every collar. A shirt collar with a separate stand is constructed differently from a flat collar, shawl collar, rib-knit neckband, or fully lined collarless neckline.
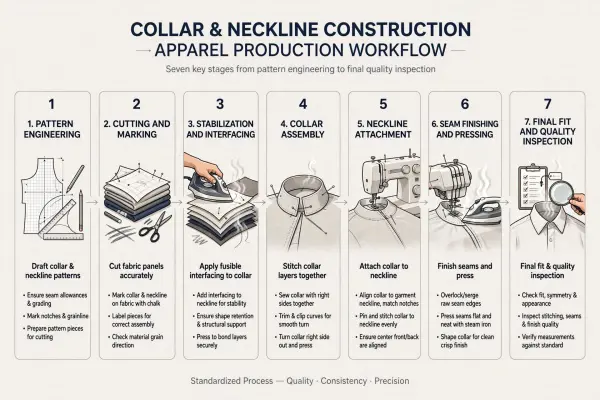
Still, most development workflows move through several common stages.
1. Engineer the neckline and collar together
Pattern development establishes the neckline shape, collar seamline, balance points, seam allowances, interfacing components, and any stand, roll, or overlap requirements.
This is also where garment opening and closure architecture matters. A centre-front button placket, back-neck closure, zipper, lapel, or continuous neckline changes how collar ends and seam allowances have to be managed.
2. Cut and mark accurately
Collar pieces are comparatively small, which makes inconsistencies easy to notice. Grain direction, paired-piece symmetry, notches, centre marks, collar points, and interfacing orientation therefore require controlled cutting and marking.
This becomes particularly important with stripes, checks, visible directional textures, or fabrics with nap.
3. Stabilize where required
Neckline edges may be staystitched, taped, fused, reinforced through another component, or controlled by an alternative production method depending on fabric and garment construction.
Interfacing may also be applied to one or more collar components at this stage.
4. Build the collar component
Where an upper and undercollar are enclosed together, the outer seam is sewn and the seam allowances are managed so the finished edge can turn cleanly.
At sharp collar points, unnecessary seam allowance bulk is commonly removed before turning. Sewing and Craft Alliance technical guidance recommends trimming enclosed corners so the finished point can lie smoothly rather than forming a bulky lump.
Some collar constructions deliberately manipulate upper- and undercollar dimensions or positioning so that the underside stays hidden when the collar turns. The exact method depends on collar design, fabric thickness, tailoring method, and production specification.
5. Attach the collar to the neckline
Attachment requires the neckline, collar, centre points, shoulders, collar ends, and any other balance marks to align according to the pattern.
The operation should not rely on stretching one component aggressively until it happens to reach the next notch.
That may solve the immediate sewing problem while creating a three-dimensional fit problem later.
6. Finish the neckline seam
Depending on the garment, the collar attachment may be enclosed by a collar stand, facing, binding, lining, interior yoke, or another construction.
Seam allowances may require trimming or grading to reduce bulk. Concave curves often need clipping so the seam allowance can spread when turned. The amount of clipping should remain controlled so that the seam itself is not weakened.
7. Press and shape
Pressing is an active construction operation, not merely cosmetic cleanup.
Curves, collar edges, seam junctions, and roll lines often need to be pressed in the shape they are intended to occupy. Flattening every collar indiscriminately can work against the design—particularly where a natural roll or stand is required.
8. Inspect the finished neck area
Quality control should assess the garment three-dimensionally, preferably on the intended body size, mannequin, or approved form rather than only flat on a table.
A collar can look symmetrical when flat and still twist when worn.
Woven and Knit Necklines Need Different Thinking
One of the most common construction errors is transferring a woven-garment solution directly to a knit garment—or the reverse.
A woven shirt collar typically depends heavily on pattern shape, seam control, interfacing, and pressing. A knit crew neckline may instead depend on the relationship between the neckline opening and a rib or self-fabric band that must stretch during assembly and recover afterward.
There is no universal percentage by which a knit neckband should be shorter than the neckline. The correct relationship depends on fabric stretch, recovery, rib structure, band width, neckline shape, and the desired appearance.
The stitch system matters as well. Coats' technical guidance notes that conventional 301 lockstitch produces a relatively low-elongation seam, while various chainstitch and coverseam constructions provide greater seam extensibility. Its recommendations for stretch garments emphasize matching seam requirements to fabric and expected elongation. Coats technical guide to basic stitch types
|
Factor |
Typical woven construction concern |
Typical knit construction concern |
|
Edge stability |
Preventing curved neckline distortion |
Controlling stretch while retaining recovery |
|
Support |
Facing, interfacing, collar structure |
Band structure, reinforcement only where needed |
|
Stitching |
Accurate non-distorted seam formation |
Adequate seam extensibility |
|
Pressing |
Shape, edge definition, roll control |
Avoiding stretching or flattening elastic recovery |
|
Fit failure |
Gaping, pulling, twisted collar |
Wavy edge, stretched neckline, neckband standing away |
|
Testing |
Shape and symmetry |
Stretch, recovery, head opening and appearance |
Neither system is inherently easier. Knit construction simply shifts more of the engineering problem toward stretch and recovery behavior.
How Neckline Finishing Fits Into the Construction System
A neckline without a collar still needs a controlled finished edge. Common solutions include facings, bindings, bands, linings, folded finishes, and garment-specific combinations.
The choice influences visible appearance, interior cleanliness, flexibility, thickness, comfort against the skin, and production complexity.
For example, a facing can create a clean outer neckline without visible edge stitching, but the facing itself has to remain controlled inside the garment. Understitching is one method used in relevant constructions to help prevent a facing from rolling outward. Sewing terminology guidance describes understitching as stitching along the facing or undercollar side to help keep it from rolling to the outside.
A binding behaves differently. It wraps or finishes the edge and may intentionally remain visible. A knit neckband adds both finishing and elastic control.
Because these choices deserve deeper treatment, how neckline finishing affects comfort, shape, and garment quality examines finishing methods separately rather than treating them as interchangeable details.
What Collar Construction Means for Fashion Businesses
Collar engineering may appear to belong exclusively to patternmakers and factories, but decisions made at the neck area have consequences across product development.
Product development
A design team should establish the intended collar behavior early: crisp or soft, upright or relaxed, sharply pointed or rounded, close-fitting or open.
A reference image alone may not communicate this sufficiently. Technical packs can benefit from construction diagrams, approved collar measurements, interfacing instructions, edge-stitching details, and sample photographs showing the intended roll and placement.
Sourcing
The shell fabric cannot be evaluated independently from the support materials.
If a supplier changes the fabric weight, finishing, stretch, shrinkage, or surface characteristics, an interfacing previously approved for the style may behave differently. For fusible systems, the production team should verify that the bonding process remains appropriate for the new material combination.
Manufacturing
Factories need an operation sequence that prevents one workstation from creating problems for the next.
For example, if necklines are allowed to stretch before collar attachment, the collar operator may be forced to manipulate distorted components. That can increase rework even when the collar operator is sewing accurately.
Quality control
“Collar looks good” is too vague for scalable production.
Depending on style, inspection criteria may include:
- left-right symmetry;
- collar point consistency;
- correct collar and neckline alignment;
- absence of puckering, twisting, bubbling, or exposed seam allowance;
- correct position at centre front and centre back;
- clean edge turning;
- intended roll, stand, or flatness;
- comfortable neck circumference;
- acceptable appearance after specified care testing.
The correct tolerance values should come from the brand's approved specification and production capability rather than from a universal number.
Cost engineering
A highly structured collar can increase the number of pattern pieces, interfacing components, fusing steps, sewing operations, trimming operations, pressing steps, and QC points.
That does not mean the design should be simplified automatically. It means the cost should be understood before the style is committed to production.
For a price-sensitive product, a technically elegant but labor-intensive collar may conflict with the target manufacturing cost. For a premium tailored product, eliminating those operations may undermine the intended product value.
Common Collar and Neckline Construction Mistakes
Most failures are not caused by one dramatic error. They usually emerge from several small deviations that compound during assembly.
Treating the cut edge as the only measurement that matters
A collar and neckline may appear to have different raw-edge lengths even when their stitching lines are engineered correctly because curved seam allowances behave differently.
Consequence: unnecessary stretching or easing during assembly.
Better approach: validate the intended seamline geometry and balance points during pattern development.
Allowing the neckline to distort before assembly
Unstable edges can change shape through handling before the collar is attached.
Consequence: gaping necklines, mismatched notches, collar twisting, or unexpected fullness.
Better approach: identify unstable fabrics during sampling and define an appropriate stabilization and handling method.
Choosing interfacing only by stiffness
A rigid interfacing may initially produce a crisp collar but can alter drape, edge thickness, roll, surface appearance, or care performance.
Consequence: a collar that looks disconnected from the rest of the garment or performs poorly after laundering.
Better approach: evaluate shell fabric and interfacing as a combined material system.
Ignoring bulk inside collar edges and points
Multiple seam allowances concentrated in a small enclosed area can produce visible ridges or blunt corners.
Consequence: uneven edges and poor collar-point definition.
Better approach: use appropriate trimming, grading, corner management, and pressing for the specific material thickness.
Trying to solve construction problems with pressing alone
Pressing can shape a well-constructed collar, but it cannot reliably correct incorrect pattern geometry or badly mismatched components.
Consequence: the sample may appear acceptable immediately after pressing but revert after wear or laundering.
Better approach: identify whether the source is pattern, fabric behavior, stitching, interfacing, or pressing before changing the process.
Evaluating the collar only when the garment is flat
A collar interacts with the neck, shoulders, front opening, and garment balance.
Consequence: twisting or poor roll becomes visible only during fitting.
Better approach: include three-dimensional fit assessment in sample approval.
What Brands Should Verify Before Approving a Collar or Neckline
A successful first sample does not automatically guarantee production stability. Before approval, the construction should be considered under realistic manufacturing and care conditions.
Key questions include:
- Does the neckline retain its intended measurement and shape after handling?
- Are collar and neckline balance points consistently aligned?
- Does the interfacing produce the intended hand rather than simply maximum firmness?
- Can the factory reproduce the collar points, curves, and roll consistently?
- Is the neck comfortable through normal movement?
- For pull-on garments, can the neckline pass comfortably over the head without overstressing the seam?
- Does the seam type accommodate any required stretch?
- Does fusible support remain visually acceptable after the intended washing or cleaning process?
- Does the finished collar sit correctly when the garment is worn rather than only when laid flat?
- Are appearance tolerances defined clearly enough for inline and final inspection?
This is especially important when changing mills, fabric lots, interfacing suppliers, factories, machinery, or garment-care requirements.
Important Technical Caveats
Collar construction contains many techniques that are useful but not universal.
Staystitching may be valuable for a vulnerable woven neckline, but another construction may receive sufficient stabilization through interfacing, tape, lining, or the production process itself.
Clipping and grading can reduce bulk and allow curves to turn, but excessive trimming may weaken the seam or reduce the allowance available for repair.
Interfacing can improve structure, but the required weight, construction, adhesive, and application parameters vary with the shell material and intended result.
Stretch necklines need enough extensibility for wear, but maximizing stretch is not always desirable; the edge also needs sufficient recovery and dimensional control.
Pressing improves shape, yet heat, steam, pressure, and dwell time must suit the textile and support materials being used.
In other words, construction techniques should be selected as a coordinated system rather than accumulated as a checklist.
A Practical Development Framework for Fashion Teams
For brands developing a new collar or neckline style, the most efficient process is usually to resolve structural decisions during sampling rather than passing ambiguity downstream to bulk production.
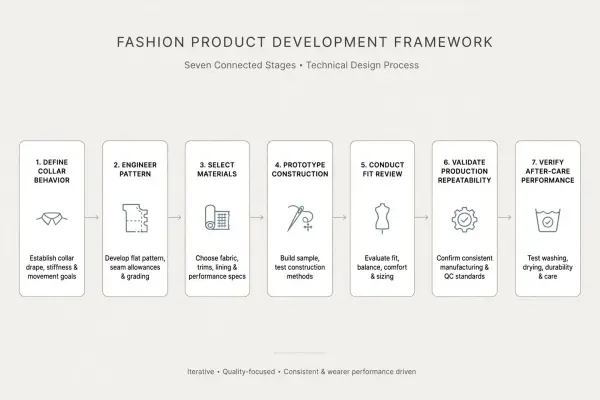
A practical sequence is:
Define the visual behavior. Decide how the neckline should frame the body and whether the collar should stand, roll, spread, drape, or lie flat.
Engineer the pattern. Confirm neckline geometry, collar seamline, balance marks, opening, seam allowances, and any stand or facing architecture.
Match the materials. Evaluate shell fabric, interfacing, lining, binding, rib, thread, and other support materials together.
Prototype the construction. Make the actual collar using production-relevant materials rather than evaluating only the paper pattern.
Fit it three-dimensionally. Inspect comfort, symmetry, roll, opening, neckline position, and interaction with the shoulder and front closure.
Test production repeatability. Determine whether the sewing and pressing operations are realistic at the intended factory and price point.
Validate after care. Where applicable, review the finished neck area after the intended washing, drying, pressing, or dry-cleaning process.
This approach treats collar construction as product engineering rather than a decorative sewing detail.
Collar Type Changes the Construction Problem
A flat collar, standing collar, shirt collar, roll collar, and shawl-style construction do not ask the fabric to behave in the same way.
Some depend primarily on accurate neckline matching. Others need a carefully controlled stand and roll. Tailored collars may interact with lapels and jacket canvassing, while soft fashion collars may intentionally rely on drape.
For that reason, collar names are useful only when connected to construction behavior and garment purpose.
The deeper distinction between collar families, their silhouettes, and where each works best is covered in common collar types and where they work best.
Frequently Asked Questions
What is the difference between a collar and a neckline?
A neckline is the shape and finished opening of a garment around the neck. A collar is an additional garment component associated with that opening and may stand, roll, fold, or lie flat around it.
A garment can therefore have a neckline without having a collar. Crew-neck T-shirts, many dresses, camisoles, and collarless blouses are obvious examples.
From a construction perspective, the distinction matters because the neckline still requires dimensional control and finishing even when no collar is attached. Depending on the design, that finish may use a facing, binding, lining, stretch band, or another method.
Why does a collar sometimes twist after sewing?
A collar can twist because of several possible causes rather than one universal defect. Common possibilities include distorted neckline geometry, inaccurate pattern matching, uneven seam allowances, misplaced balance points, fabric grain behavior, uneven interfacing application, asymmetric sewing, or pressing that does not match the intended collar shape.
The fastest way to troubleshoot is to compare the approved pattern, cut components, neckline dimensions, attachment notches, and finished garment systematically. Re-pressing may temporarily improve appearance, but it will not reliably solve an underlying pattern or assembly problem.
Does every collar need interfacing?
No. The required support depends on collar design, fabric characteristics, intended handfeel, and manufacturing method.
Many structured shirt and tailored collars use interfacing because the shell fabric alone may not provide the desired shape. Other soft collars may use very lightweight support or none at all. Some constructions rely on alternative internal materials.
The relevant question is therefore not “Does a collar need interfacing?” but “What level and type of support is required to produce the intended collar behavior?”
Sampling should answer that before bulk production.
Why are collar seam allowances trimmed or graded?
Enclosed collar seams can contain several layers of fabric and interfacing. If all seam allowances remain at full width, those layers may accumulate near the edge and become difficult to turn cleanly.
Trimming reduces unnecessary allowance, while grading can stagger layer widths so that a single bulky ridge is less visible from the outside.
The amount should suit the fabric and construction. Very aggressive trimming can weaken an edge or leave insufficient allowance, so lightweight and heavyweight materials should not automatically use identical specifications.
Why does a neckline become wavy after sewing?
A wavy neckline often indicates that the edge has been stretched or that the seam construction does not balance correctly with the fabric's stretch and recovery.
On knits, possible causes include an incorrect neckband relationship, excessive feed during sewing, unsuitable tension, inappropriate stitch construction, or insufficient recovery in the band material. On wovens, handling a curved or bias-oriented neckline can also distort the edge.
Diagnosis should therefore consider fabric behavior, pattern dimensions, feeding, stitch formation, stabilization, and pressing rather than assuming the sewing machine tension alone is responsible.
How should a brand check collar quality before bulk production?
Start with the approved sample on the body or a suitable fit form, then translate the expected result into measurable and observable criteria.
Check neckline dimensions, collar symmetry, point shape, stand height where relevant, alignment at centre front and centre back, clean attachment, puckering, roll, edge appearance, and wearer comfort.
For styles using fusible interfacing, evaluate the fused appearance after the required care process as well. For stretch garments, verify both opening comfort and recovery.
The goal is to make quality expectations reproducible for the factory rather than relying on subjective instructions such as “make collar cleaner.”
Is a more structured collar a sign of higher garment quality?
Not necessarily.
Structure is a design and engineering choice, not a universal quality ranking. A formal cotton shirt may intentionally use a crisp collar, while a silk blouse may require a much softer construction. Making the blouse collar more rigid could reduce rather than improve its quality because it would no longer support the intended silhouette and material behavior.
Quality is better judged by whether the collar performs consistently according to its specification: appropriate shape, symmetry, clean construction, correct interaction with the fabric, wearer comfort, and acceptable durability.
Conclusion
Collar and neckline construction works best when it is treated as an integrated piece of garment engineering.
The neckline provides the foundation. Its geometry and stability determine whether the next component can be attached accurately. The collar then adds another set of variables—upper and lower layers, stand, roll, interfacing, seam allowances, attachment balance, and pressing. Finishing determines whether that construction remains clean and comfortable against the wearer.
For fashion businesses, the biggest opportunity is not finding one “best” collar technique. It is building a repeatable development process in which pattern, fabric, support material, stitching, pressing, fit, care performance, and factory capability are evaluated together.
That is what separates a collar that merely looks correct on a sample table from one that performs reliably as part of a finished garment.





Comments 0
Leave a CommentSend Comment
Anda harus Login terlebih dahulu untuk dapat memberikan komentar.