

Common Waistband Problems and How to Prevent Them
Waistband problems are rarely isolated sewing defects. A waistband that gaps, twists, digs into the body, ripples, rolls, or loses its shape may be revealing an issue in the pattern, fabric behavior, elastic specification, interfacing, sewing sequence, pressing, or the relationship between the waistband and the rest of the garment.
That distinction matters in apparel development. Correcting every visible defect at the sewing machine can hide the real cause rather than solve it. A waistband that does not match the garment waist, for example, should not automatically be stretched into place. Likewise, tightening an elastic waistband may stop trousers from slipping but create excessive pressure and reduce comfort.
The most reliable approach is therefore diagnostic: identify the symptom, determine whether the problem originates in fit, material, construction, or finishing, and correct the source before bulk production. This is particularly important because the waistband sits at the intersection of the waist, hip, rise, closure, pockets, belt loops, and garment weight.
Quick Answer: What Causes Most Waistband Problems?
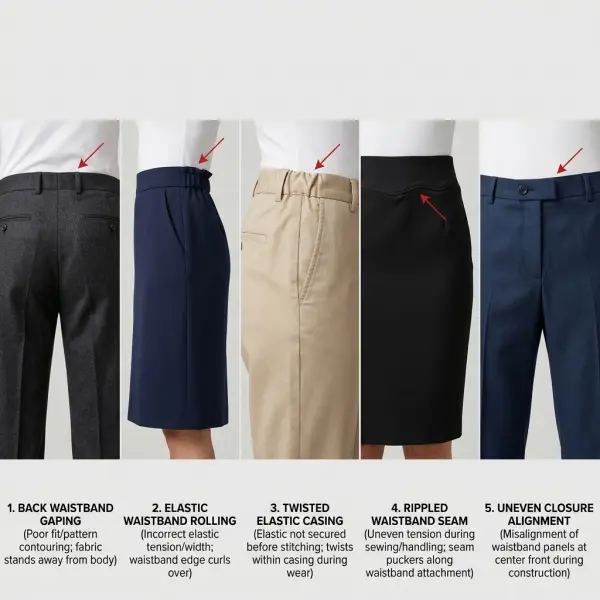
Most waistband problems come from one or more of five areas: incorrect pattern shape or dimensions, unsuitable material behavior, mismatched elastic or interfacing, construction distortion, and poor finishing or quality control.
A gaping waistband may require more contouring rather than simply a smaller circumference. An elastic waistband that twists may have too much room inside its casing or use an elastic type that does not resist rolling. Rippling can result from stretched fabric edges, incompatible interfacing, incorrect feeding during sewing, or pressing distortion. A waistband that feels tight may actually be exposing a rise or upper-hip fit problem rather than an incorrect waist measurement alone.
For fashion brands, prevention begins before production. Waistband construction should be tested using production-intent materials, evaluated while the wearer sits and moves, and checked against measurable standards rather than visual appearance alone.
Why Waistband Defects Are Often Misdiagnosed
The waistband is one of the easiest garment areas to blame because discomfort or visual distortion is immediately noticeable there. Yet the visible problem may originate somewhere else.
Consider trousers that gape at the center back. The waistband itself may be too straight for the wearer's body contour, but the underlying trouser pattern can also contribute. Back waist shaping, darts, yoke geometry, upper-hip dimensions, and rise balance all influence how the waistband approaches the body. Closet Core's pants fitting guidance, for example, distinguishes a waistband that gaps at the top from gaping occurring below the waistband, because the pattern corrections are not necessarily the same. pants fitting adjustments for waistband gaping
The same principle applies to elastic waists. A customer may describe the waistband as “too tight,” but the elastic could actually be compensating for trousers that are too heavy, an insufficient hip opening, or an unstable construction that requires excessive tension to keep the garment in position.
Production teams should therefore distinguish symptom from root cause. Corrective sewing can be useful, but only after the pattern and material system have been checked.
Problem 1: The Waistband Gapes Away From the Body
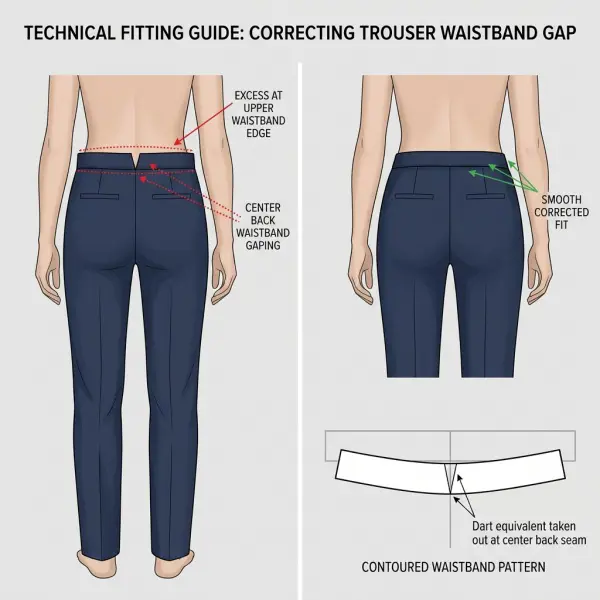
Waistband gaping occurs when the upper edge or part of the waistband does not sit close enough to the body. It is especially visible at the center back of trousers and skirts, although it can occur at the sides or front depending on the fit.
A common cause is insufficient contouring. The lower edge of a waistband may need to accommodate a larger circumference around the upper hip while the upper edge sits at a smaller circumference. If a relatively straight band is used where the body requires greater shaping, the top edge can stand away from the body.
This does not mean every gaping waistband should simply be shortened. A pattern may also have excess width through the upper back, incorrect dart shaping, or a mismatch between the waistband and the garment body. Closet Core's fitting guidance recommends distinguishing gaping confined to the waistband from excess occurring below it; a gaping top edge may require more waistband curvature, while excess in the trouser body can require adjustments elsewhere in the pattern.
How to Prevent Waistband Gaping
The best time to prevent gaping is during fit development, before final waistband construction. Baste or temporarily attach the waistband to a sample and evaluate whether the upper and lower edges follow the intended body position without forcing the garment into place.
If excess appears only along the top edge, the waistband may need greater contouring rather than an equal reduction across its full depth. If both waistband and garment body stand away from the wearer, evaluate the upper-back, waist, dart, yoke, or rise pattern before redrafting the band.
A fitting sample should also use fabric with behavior reasonably close to the production fabric. Stretch can conceal a shaping problem during fitting and then produce a different result when the final material has different recovery.
Problem 2: The Waistband Feels Too Tight or Digs Into the Body
A waistband can match the technical waist measurement and still feel too tight. Comfort depends not only on circumference but also on waistband height, stiffness, body contour, rise, seam bulk, elastic tension, and the position where the garment sits.
For fixed waistbands, excessive restriction may come from insufficient ease, a waistband that is too straight for the body, overly rigid interfacing, or a trouser rise that pulls the waistband into the body when the wearer sits. In this situation, simply adding circumference at the waistband can create gaping while leaving the underlying fit problem unresolved.
Elastic waistbands introduce a different mechanism: tension. Elastic must contract enough to support the garment, but excessive contraction creates pressure. Narrow elastic can concentrate that pressure over a smaller area, while very firm elastic can feel restrictive even when it technically stretches far enough.
Different elastic constructions also behave differently. Sewing & Craft Alliance guidance distinguishes softer elastic intended for lightweight garments from firmer no-roll waistband elastic and other constructions with different recovery and structural characteristics. elastic types, characteristics, and uses
How to Prevent Excessive Waistband Pressure
Fit should be tested while the wearer stands, sits, bends, and moves rather than only during a static fitting. If discomfort appears mainly while sitting, evaluate rise length, upper-hip fit, waistband position, and abdominal accommodation before changing the waist measurement alone.
For elastic systems, test the actual elastic at the production length rather than relying only on an unstretched specification. Elastic that feels appropriate in the hand can create very different tension once installed around an entire garment.
Product teams should also evaluate the finished waistband after sewing because rows of stitching, casing friction, garment weight, and layer buildup can change how the elastic behaves.

Problem 3: The Waistband Is Too Loose or the Garment Slides Down
A loose waistband is not always the opposite of a tight waistband. The garment may have excessive waist circumference, insufficient elastic recovery, incorrect waistband contour, or too little support for the garment's weight.
This becomes particularly noticeable in heavy trousers, cargo garments, or products with large pockets. A waistband may fit correctly while the garment is empty but begin to slide once a phone, wallet, tools, or other objects increase the load.
Elastic products can also become loose because the elastic stretches beyond its useful working range or fails to recover adequately after repeated extension. Stretch and recovery are separate performance characteristics: the ability to become longer does not guarantee that the material will return consistently toward its original dimension.
Prevention therefore requires testing the finished garment under realistic use conditions. For utility garments, this may include loading the pockets. For pull-on trousers, repeated dressing cycles can reveal whether elastic performance changes after being stretched over the hips multiple times.
Problem 4: Elastic Twists Inside the Waistband
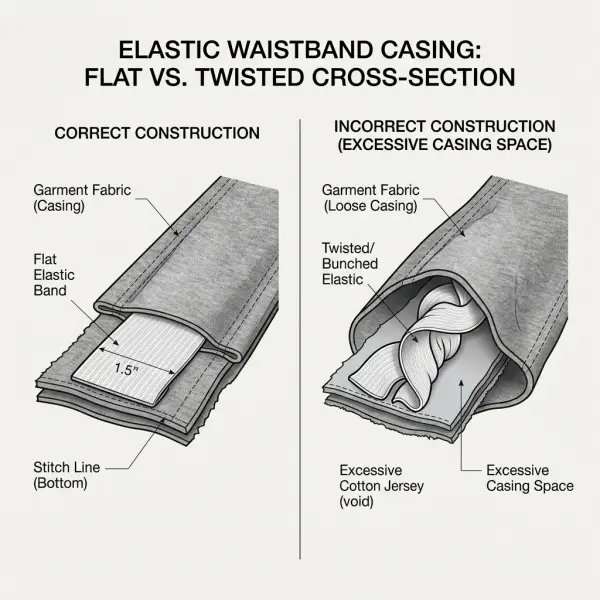
Twisted elastic is one of the most recognizable problems in casing-based waistbands. Instead of remaining flat around the body, the elastic rotates inside the fabric tunnel and forms a narrow or folded section that can feel uncomfortable and create uneven gathering.
The relationship between casing width and elastic width is a major factor. Sewing & Craft Alliance guidance recommends enough clearance for elastic to move through the casing while warning that an excessively loose casing can make twisting easier. waistband casing construction guidance
Elastic selection matters as well. Some waistband elastics are specifically reinforced to resist rolling and twisting, while lighter braided constructions are designed primarily for casing applications but can behave differently under load.
How to Prevent Twisted Elastic
Start with a casing dimension that matches the intended elastic rather than designing the tunnel independently. The elastic should pass through without binding but should not have enough excess vertical space to rotate freely.
For products where twisting would be particularly disruptive, designers can also consider no-roll elastic or controlled attachment methods. Some constructions secure elastic at side seams or stitch through the casing and elastic strategically so rotation is limited. Threads, for example, documents elastic waistband methods where stitching is used to keep the elastic flat rather than leaving it completely free inside the casing. flat elastic waistband construction
The correct method depends on the elastic itself. Not every elastic is intended to be repeatedly pierced with stitching, so the elastic supplier's specification should be considered before sewing directly through it.
Problem 5: The Elastic Waistband Rolls or Folds Over
Rolling occurs when the waistband turns over along its width rather than remaining vertically stable. The elastic itself may curl, or the entire waistband structure may fold under body movement.
This problem is influenced by waistband width, elastic firmness, body contour, garment weight, casing construction, and how strongly the elastic resists compression across its width. Very wide but soft elastic is not automatically more stable than a narrower, appropriately engineered waistband.
No-roll elastic exists specifically to resist this behavior. Sewing & Craft Alliance describes no-roll elastic as an extra-firm waistband elastic reinforced to prevent rolling and twisting. However, substituting very firm elastic into every product is not an ideal universal fix because additional stiffness can reduce comfort or conflict with a lightweight garment.
Another solution is construction-based. Multiple rows of stitching through suitable elastic can help stabilize a wide waistband and control folding, provided the elastic type is designed to tolerate direct stitching.
Problem 6: Gathering Is Uneven Around an Elastic Waist
Uneven gathering makes one part of an elastic waistband appear fuller than another. It can occur during production when fabric fullness is not distributed consistently before the elastic is secured.
A free-moving casing may allow fullness to redistribute during wear, but relying on movement to correct an obviously uneven waistband is risky. Some fabrics create more friction against the elastic than others, while side seams, pocket bags, and other internal layers can restrict movement.
The garment pattern also influences gather density. If the shell circumference is substantially larger than the elastic circumference, more fabric must be compressed into the waistband. Thick or stiff materials will produce visually larger folds than lightweight fabric under the same dimensional ratio.
During assembly, operators can divide both elastic and garment into corresponding reference points before joining or securing them. This distributes extension more consistently and helps prevent large concentrations of fullness in one area.
Problem 7: The Waistband Seam Ripples or Puckers
Rippling along the waistband seam may look like a stitching problem, but several mechanisms can produce a similar appearance.
The garment waist can stretch during handling before the waistband is attached. Curved or partially bias-oriented waist edges are particularly vulnerable because their grain direction changes around the garment. Sewing & Craft Alliance guidance describes staystitching as directional stitching used to prevent curved or unstable edges from stretching during construction and specifically includes curved waistlines among common applications. staystitching unstable garment edges
Rippling can also occur if the waistband and garment seam lengths do not match, one layer is stretched while sewing, differential feeding occurs between layers, seam allowances are bulky, or the fabric reacts poorly to pressing.
Stretching the shorter component until two mismatched pieces meet may produce a garment that appears assembled but contains built-in tension. Once released from the machine or exposed to steam, the seam may contract unevenly and reveal the discrepancy.
How to Prevent Waist Seam Rippling
Check seam-line measurements at the pattern stage, including darts, pleats, closures, and seam allowances where relevant. Notches should correspond logically so operators can identify whether mismatch is occurring locally or across the entire waist.
Unstable waist edges should be handled carefully after cutting. Where appropriate for the fabric and construction, stabilization such as staystitching can help preserve the intended dimensions before the waistband is attached.
During sewing, avoid forcing one layer through the machine faster than another unless deliberate easing is part of the specification. After sewing, pressing should shape the seam rather than attempt to compensate for severe dimensional mismatch.
Problem 8: The Waistband Stretches Out During Construction
A waistband or garment waist can become longer than the original pattern even before the garment is worn.
This is particularly relevant to curved waistlines, loosely woven fabrics, stretch materials, and sections that include bias grain. Handling, fitting, sewing, and pressing all introduce forces that can distort an unsupported edge.
The problem can become difficult to detect because each operation may add only a small amount of deformation. By the time the waistband is attached, operators may conclude that the pattern pieces were cut incorrectly when the real cause was progressive stretching during production.
Early stabilization is therefore valuable where the material needs it. Staystitching is intended to control exactly this type of distortion and is normally performed soon after cutting, before extensive handling occurs.
Manufacturers should also avoid hanging unstable cut components unnecessarily before key dimensions have been secured and should maintain consistent handling practices between sampling and bulk production.
Problem 9: Interfacing Creates Bubbling or an Uneven Surface
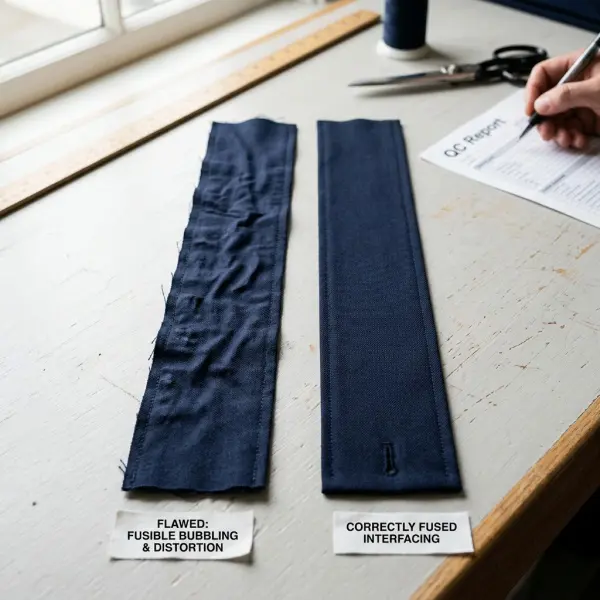
Interfacing can make a fixed waistband cleaner and more stable, but incompatible or poorly applied fusible interfacing can create bubbling, rippling, stiffness, or visible adhesive patterns.
Several variables interact: shell fabric, interfacing construction, adhesive, temperature, pressure, moisture, application time, cooling, and potential shrinkage. A fusing process that works on one fabric cannot automatically be transferred to another.
Sewing & Craft Alliance recommends testing interfacing with the outer fabric before committing to the final garment and following the manufacturer's specific fusing instructions. Its interfacing guidance also warns that shrinkage can result in rippling or bubbling and notes that some fabrics are unsuitable for fusible interfacing because the heat and pressure required can damage them. interfacing selection and application guidance
How to Prevent Interfacing Problems
Develop the waistband using the actual shell-and-interfacing combination whenever possible. Test adhesion, handfeel, visible texture, and dimensional stability rather than evaluating the interfacing separately.
The fused component should also be allowed to cool before being handled aggressively. Sewing & Craft Alliance specifically advises allowing fused pieces to cool thoroughly before movement.
For delicate, napped, coated, metallic, or otherwise heat-sensitive materials, a sew-in or alternative stabilization system may be more suitable than standard fusible interfacing. The appropriate solution depends on the fabric and performance requirements rather than on a universal waistband recipe.
Problem 10: The Waistband Becomes Too Stiff
A waistband can technically be stable yet still be poorly engineered. Excessive stiffness may make it stand away from the body, create pressure when sitting, resist natural movement, or appear disconnected from the drape of the garment below.
This often happens when interfacing is chosen according to a generic “structured waistband” assumption rather than tested with the shell fabric. Fusible interfacing itself can add body, and a heavy stabilizer combined with several fabric layers may create much more rigidity than expected.
A more useful objective is appropriate stability. Tailored trousers may require a defined upper edge and reliable support for closures and belt loops, while a fluid skirt may need only enough control to prevent stretching.
Readers who need the underlying material logic can refer to interlining and fusible materials.
Problem 11: The Waistband Ends or Closure Do Not Align
A fixed waistband often terminates around a zipper, fly, button, hook, or extension. Small inaccuracies can become highly visible because the two sides must meet cleanly when the garment closes.
Misalignment can begin at several earlier operations. Fly construction may be asymmetric, waistband seam allowances may differ, one side may stretch during attachment, or the waistband ends may be turned at different finished lengths.
Bulk is another frequent complication. The end of a waistband can contain shell fabric, facing, interfacing, seam allowances, zipper tape, fly components, and closure reinforcement within a small area. If those layers are not graded or controlled, one side may become visibly thicker or harder to turn accurately.
Prevention depends on reference points. Closure positions, center-front lines, waistband extensions, seam allowances, and finished end dimensions should be clearly specified and checked before the waistband is permanently secured.
Problem 12: The Waistband Looks Bulky at Belt Loops, Pockets, or Side Seams
Layer buildup is often underestimated during design because a flat technical drawing does not show material thickness.
At a side seam, a waistband may already contain an outer layer, facing, interfacing, and seam allowances. Add a side-seam pocket, pocket bag, belt loop, lining, or topstitching turnback and the local thickness increases further.
The problem is especially visible in heavy denim, twill, workwear fabrics, and multilayer constructions. Bulky intersections can become difficult to stitch consistently, create uneven topstitching, resist pressing, or produce uncomfortable hard points.
Product development should therefore map where layers converge rather than reviewing each component independently. A lighter inner waistband, reduced seam allowance, graded layers, repositioned belt-loop ends, or alternative pocket construction may solve the issue more effectively than stronger pressing.
This is where waistband development intersects directly with pocket construction and functional details.
Problem 13: Pressing Creates Shine, Imprints, or Distortion
Pressing is necessary for clean waistband construction, but excessive heat, pressure, or movement can create new defects.
Sewing & Craft Alliance guidance for pressing pants recommends selecting temperature according to the fabric and testing an inconspicuous area when necessary. It also warns that over-pressing can create shine and imprint underlying components such as pocket bags and zippers. pressing guidance for trousers
Dragging an iron across unstable material can also distort grain or stretch an area that was previously accurate. A lifting-and-pressing action is often preferable where dimensional control matters.
Pressing should therefore refine construction rather than forcibly flattening it. If excessive pressure is needed to make a waistband look acceptable, the team should check whether bulk, seam mismatch, interfacing, or pattern shape is causing the underlying problem.
Problem 14: Elastic Loses Recovery After Wear or Care
A waistband that performs correctly during sampling may loosen after repeated wearing or laundering.
The cause can be material fatigue, excessive extension during dressing, unsuitable elastic for the application, heat exposure, chemical exposure, or a care process that the component was not designed to withstand. Sewing and construction can also affect performance: some elastic structures tolerate needle penetration better than others. Sewing & Craft Alliance notes, for example, that braided elastic can lose shape retention when pierced, while knitted and woven elastics are more suitable for some direct-application methods.
For brands, this is a reason to test more than initial fit. Waistband validation should reflect the expected care regime and repeated use of the garment.
Supplier specifications are particularly important for commercial production because elastics that look nearly identical can differ substantially in composition, extension, recovery, heat resistance, and durability.
Problem 15: The Waistband Looks Correct Flat but Fails During Movement
Flat measurements are necessary for quality control, but they cannot reproduce body movement.
A waistband can appear level and symmetrical on a table while becoming uncomfortable when the wearer sits, lifting at the back when bending, or collapsing during walking. Pants are particularly sensitive because the waistband interacts with the entire rise and crotch geometry.
Closet Core's jeans fitting guidance emphasizes evaluating comfort and movement alongside visual fit, including the ability to sit and bend comfortably. jeans fitting and movement assessment
This reinforces an important quality principle: measurement compliance is not the same as functional fit.
For product categories where movement matters, the approved sample should be evaluated through basic movements representative of actual use rather than assessed only on a static mannequin.
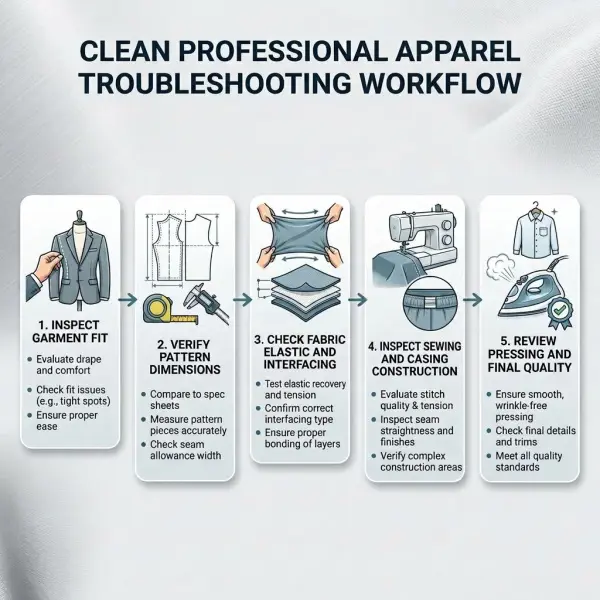
A Better Way to Diagnose Waistband Problems
When a defect appears, making the first visible correction is tempting. A better process works from the garment outward.
First determine whether the garment body fits correctly before evaluating the waistband independently. Check waist, upper hip, rise, darts, yokes, closure position, and pocket influence.
Next evaluate material behavior. Ask whether the shell has stretched, whether elastic is appropriate for its casing or attachment method, and whether interfacing has changed the handfeel or dimensions.
Only then examine sewing variables such as feed, seam alignment, elastic distribution, casing dimensions, topstitching, and closure finishing. Pressing and final finishing should be reviewed last because they can either reveal or conceal earlier construction problems.
Prevention Starts at the Pattern Stage
Many waistband defects become expensive because they are discovered after the garment has already accumulated sewing operations.
A poorly shaped waistband may not reveal itself until the garment is fitted. By then, the product may already contain pockets, zipper construction, darts, lining, interfacing, and topstitching.
Fit samples should therefore establish the waistband architecture before decorative finishing becomes difficult to reverse. This includes confirming finished height, waist position, straight versus contoured shape, extension length, closure placement, and the relationship between the waistband and garment body.
For fixed waistbands, the upper and lower waistband edges deserve separate attention because they may require different circumferences. For elastic constructions, pattern teams should confirm both the relaxed garment waist and the opening required to pass comfortably over the hips.
The foundation for these decisions is explained in Waistband Construction Explained for Pants, Skirts, and Shorts.
Material Testing Prevents Problems That Sewing Cannot Fix
The waistband combines several materials in a concentrated area: shell fabric, elastic or interfacing, facing, lining, thread, closures, and sometimes belt-loop or pocket layers.
Each material may behave acceptably by itself while becoming problematic in combination. A fusible interfacing can bond well but produce a handfeel that is too stiff. An elastic can recover well but generate excessive pressure in the final width. A soft shell can drape beautifully but distort badly along its cut waist edge.
Testing therefore needs to reflect the assembled system.
For elastic versus structured systems, Elastic vs Fixed Waistbands: Function, Comfort, and Fit provides a deeper comparison of tension, recovery, fit tolerance, structure, and garment applications.
Production Control: Preventing Small Variations From Becoming Visible Defects
Once the pattern and materials have been approved, repeatability becomes the next challenge.
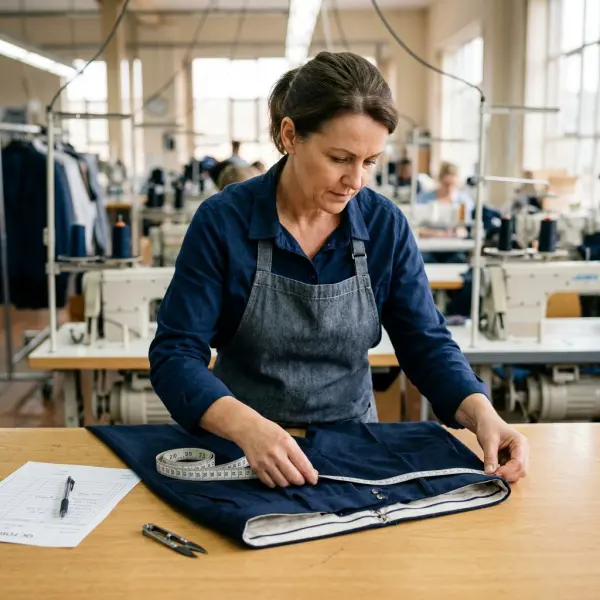
Waistbands contain several operations where a few millimeters of variation can accumulate. A slightly stretched waist edge, inconsistent seam allowance, uneven elastic distribution, inaccurate extension, and closure placement error may each be small individually but obvious when combined.
Production specifications should therefore identify the dimensions and reference points most strongly connected to final appearance. Operators also need a clear approved sample because not every acceptable curve, firmness level, or finished handfeel can be communicated through measurements alone.
A practical waistband quality check should confirm:
- finished waist circumference and waistband height;
- top and bottom edge smoothness;
- symmetry and side-seam alignment;
- waistband-to-body seam matching;
- closure and extension alignment;
- elastic distribution, recovery, and absence of twisting where applicable;
- facing position and internal finishing;
- belt-loop placement and local bulk;
- absence of interfacing bubbling or visible adhesive texture;
- acceptable pressing without shine or construction imprints;
- comfort and waistband stability during representative movement.
A production team does not necessarily need to test every characteristic on every garment. Inspection levels should reflect product risk, customer requirements, manufacturing consistency, and the defect history of the style.
Common Mistakes in Waistband Troubleshooting
Correcting Every Problem by Taking In the Waist
Reducing circumference can help when excess width is genuinely the cause, but it does not correct every type of gaping or instability. If the issue comes from waistband contour, rise balance, upper-hip shape, or the garment body below the waist, taking in the entire band may create new pressure points while leaving the original pattern imbalance intact.
Stretching Components Until They Match
When waistband and garment waist measurements differ unintentionally, stretching one component during sewing can disguise the mismatch temporarily. The built-in tension often reappears as rippling, distortion, uneven seam lines, or closure misalignment. Measurements and pattern pieces should be checked before forcing the seam together.
Using Firmer Elastic to Solve Every Elastic-Waist Problem
A more rigid or shorter elastic may reduce slipping or rolling, but it can also increase compression and discomfort. Elastic selection should address the actual problem—recovery, roll resistance, garment weight, casing dimensions, or attachment method—rather than simply increasing tension.
Using Heavier Interfacing to Make the Waistband Look “Premium”
Rigidity is not synonymous with quality. Excessive stabilization can make the waistband stand away from the body, create visible ridges, and conflict with the shell fabric's drape. The desired structure should be defined by the garment rather than by a generic assumption that more stiffness produces a better product.
Relying on Pressing to Hide Construction Errors
Pressing can refine shape and smooth properly constructed seams, but it should not be used to force incompatible dimensions into alignment. Heavy pressure may temporarily flatten puckering while creating shine, imprints, or permanent distortion. Repeated pressing problems are often a signal that an earlier operation needs correction.
Important Technical Caveats
A visible waistband defect does not always have one universal cause. Gaping, for example, can come from waistband shape, garment-body fit, or material stretch. Rippling can originate from pattern mismatch, unstable fabric, feeding during sewing, interfacing, or pressing.
Body shape also varies significantly. A waistband solution developed for one fit model may not produce the same result across a full size range. Brands should therefore validate critical waistband behavior in more than the base size when the product depends strongly on contouring, elastic tension, or a close fit.
Elastic performance is supplier- and construction-specific. Terms such as knitted, woven, braided, or no-roll describe useful categories, but two products within the same category can still differ in tension and recovery. Supplier technical information and physical testing remain necessary.
Similarly, fusing temperatures, pressure, dwell time, and moisture requirements vary among interfacing products. Generic pressing settings should not replace the manufacturer's application instructions.
A Practical Waistband Prevention Workflow for Fashion Businesses
Reliable waistband development starts with defining the intended wearing position and garment function. A high-rise tailored trouser requires a different fit and stability strategy from relaxed pull-on shorts.
From there, the pattern should be developed together with the waist treatment rather than treating the waistband as a late finishing component. The sample should use representative shell, interfacing, elastic, closure, and pocket materials so that thickness and stretch behavior are realistic.
Fit approval should include both static and movement assessment. Once the shape is correct, construction trials can determine seam sequence, elastic dimensions, casing clearance, stabilization, pressing, and finishing.
The approved result should then be converted into production controls: pattern references, bill of materials, measurable waistband dimensions, construction details, closure placement, and visual quality standards.
Finally, early production should be inspected closely enough to identify whether operator variation or material inconsistency is changing the waistband from the approved sample. Detecting a small dimensional drift at this stage is less expensive than troubleshooting a completed production run.
Frequently Asked Questions About Waistband Problems
Why does the back of a waistband gape even when the waist measurement is correct?
Because circumference is only one part of waistband fit. The upper edge may require more contouring than the lower edge, especially where the waistband follows a pronounced transition from waist to upper hip. Gaping can also originate in the garment body below the band, including back waist shaping, darts, yokes, or rise geometry. Determine whether the excess is confined to the waistband or continues into the garment before reducing dimensions. A fitting sample is usually more informative than comparing flat measurements alone.
Why does my elastic waistband keep rolling?
Rolling usually indicates that the waistband system lacks enough stability across its width for the forces acting on it. Elastic firmness, waistband width, casing size, body curvature, garment weight, and construction method can all contribute. A no-roll elastic may help in suitable products, but simply choosing a firmer elastic can increase discomfort. Wide waistbands can also be stabilized through appropriate stitching methods when the elastic is designed for direct needle penetration. The solution should preserve both stability and the intended comfort level.
How can a brand prevent elastic from twisting inside a casing?
Control the relationship between the casing and the elastic first. The casing needs enough clearance for the elastic to move, but excessive space can permit rotation. Selecting elastic intended for waistband use, securing it at strategic seams, or using suitable through-stitching can further control twisting. The specific method should match the elastic construction because some elastic types tolerate stitching through the material better than others. Testing the waistband through repeated dressing and laundering is useful before bulk approval.
Why does a waistband ripple after it has been attached?
Rippling may indicate that either the garment waist or waistband changed length before or during assembly. Unstable curved edges can stretch through handling, while differential feeding at the machine can cause one layer to advance differently from another. Pattern mismatch, interfacing shrinkage, and pressing can produce similar symptoms. Check seam-line measurements first, then evaluate whether the cut edges remained dimensionally stable. For susceptible fabrics, early stabilization can help prevent distortion before waistband attachment.
Can interfacing cause waistband bubbling?
Yes. Bubbling can occur when a fusible interfacing and shell fabric are incompatible, when the interfacing shrinks, or when the fusing process does not provide the correct heat, pressure, moisture, or cooling conditions. The problem can appear immediately or become more visible after care. Testing a representative fabric-and-interfacing sample before cutting production pieces is therefore important. Follow the interfacing manufacturer's fusing instructions rather than transferring settings automatically from another material combination.
Why can a fixed waistband feel tight only when sitting?
Sitting changes the geometry of the abdomen, hip, and trouser rise. A waistband that feels acceptable while standing may become restrictive if the rise, upper-hip volume, waistband shape, or fabric give does not accommodate that change in posture. Increasing waist circumference is not always the correct solution because it may create gaping while standing. Evaluate the full trouser fit, including rise and hip behavior, during movement before modifying the waistband alone.
Should waistband defects be corrected during sewing or at the pattern stage?
Correct them as close to the root cause as possible. A true pattern-shape or measurement problem belongs at the pattern stage, while an assembly variation such as uneven elastic distribution belongs in sewing. Material-related problems may require different elastic or interfacing, and pressing defects require process control. Repeatedly correcting a pattern problem at the sewing machine increases operator dependence and makes production less consistent. A stable production method should minimize discretionary correction during assembly.
Conclusion
Common waistband problems are useful signals. Gaping can reveal inadequate shaping, twisting can expose a casing or elastic mismatch, rippling can indicate dimensional instability, and excessive stiffness can show that the stabilization system does not suit the garment.
The critical step is to avoid treating every visible problem as a local defect. The waistband functions as part of a larger garment system involving the waist and hip pattern, rise, pockets, closures, shell fabric, elastic or interfacing, sewing operations, and pressing.
For fashion businesses, prevention is usually more reliable than correction. Validate the waistband shape during fitting, test the real material combination, preserve unstable edges during construction, control elastic and interfacing specifications, and inspect the finished garment during movement as well as on the measurement table.
A good waistband should not require production teams to repeatedly manipulate it into compliance. Once pattern, materials, and processes are correctly aligned, the waistband becomes a predictable construction component rather than a recurring source of fit complaints and finishing defects.




Comments 0
Leave a CommentSend Comment
Anda harus Login terlebih dahulu untuk dapat memberikan komentar.