

How to Turn Clothing Photos into Product Videos with Seedance 2.5
With Seedance 2.5, clothing sellers can plan a short fashion video around three views: the full outfit, one construction detail, and a close view of the fabric. Start with accurate product photographs and use movement to guide attention. Generated footage is a presentation asset, not proof of real-world fit or fabric performance.
The safest approach is to treat the photograph as a visual reference, not as permission to redesign the garment. Decide what must remain unchanged before planning any movement. That usually includes the silhouette, color, pattern placement, neckline, sleeve length, fasteners, pockets, hems, and visible accessories.
Start with a photograph that can support motion
Use the clearest product image available. A full outfit should be visible without hands, props, or furniture covering important areas. The subject should be large enough to inspect, while leaving some space around the body for camera movement. Even lighting is useful because heavy shadows can hide seams and fabric texture.
If the product has an important feature that is not readable in the main image, prepare a second close-up rather than expecting the model to infer it. A separate photograph of embroidery, buttons, stitching, or texture can help you plan a detail shot. Check that all reference photographs show the same product version. Mixing two similar jackets with different pocket shapes creates an avoidable conflict.
Plan three views with different jobs
A practical clothing video can be built around three views:
1. Full-outfit view: Establish the overall silhouette and styling. Use restrained body movement or a slow camera move so the viewer can read the complete look.
2. Close-up view: Bring attention to one selling detail, such as a collar, cuff, fastening, or pocket. Keep the featured area visible long enough to inspect.
3. Fabric-detail view: Show texture or controlled movement, such as a sleeve moving slightly or the hem responding to a gentle turn. Avoid extreme motion that makes the material appear different from the real garment.
These views do not need to imitate a runway show. They need to make the product easier to understand. A smooth push-in, a modest side move, or a small change in pose is often more useful than a dramatic orbit.

Write instructions around what must stay true
When using Seedance 2.5, describe the clothing first, then the action, setting, camera behavior, and ending frame. Use plain visual language. Mention the features that must remain fixed and avoid asking for several complicated actions at once.
For this hypothetical example, use photographs of the same navy linen overshirt worn with cream trousers. Keep its four buttons, two chest pockets, color, and sleeve length fixed. Use a separate close-up for details the full-outfit image does not show clearly.
Shot 1 — Full outfit: Use the full-body reference. The model makes a slow quarter-turn in a light-gray studio while the camera stays steady. Shot 2 — Construction detail: Use the matching chest-level reference and make a small push toward the buttons and left pocket. Shot 3 — Fabric: Use the sleeve close-up and request restrained movement without changing the visible texture. Keep the lighting neutral across all three shots.
These are example directions, not tested outputs. Generate the shots separately when that gives clearer control, then arrange them in an editor. A brief return to the full-outfit shot can close the sequence without asking one generation to perform every transition.
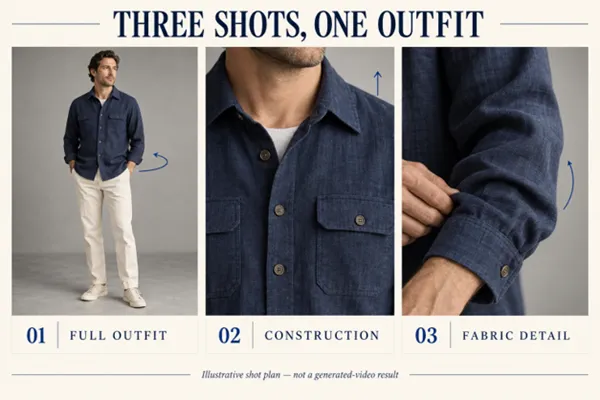
Illustrative three-shot plan: full outfit, construction detail and fabric close-up.
Review garment details frame by frame
Do not approve a clothing clip based only on its overall mood. Pause it at the beginning, during each transition, and at the final frame. Compare those moments with the original product photographs.
Check the following details:
- Does the garment keep the same color under changing angles?
- Are the number and position of buttons, pockets, seams, and straps stable?
- Does a print or logo drift, stretch, or disappear?
- Do sleeves and hems keep their original length and shape?
- Does the fabric move in a believable way for its actual weight?
- Are hands or accessories covering the feature the clip is meant to show?
- Does the full outfit remain readable after the close-up sequence?
A small background artifact may be removable during editing. A changed neckline, missing pocket, or invented pattern is more serious because it misrepresents the item. In that case, simplify the action, strengthen the fixed product details in the prompt, and generate a new version.
Present the result honestly
Generated fashion footage works best as a presentation asset rather than proof of exact real-world fit or fabric behavior. Pair it with accurate still photographs, measurements, material information, and normal product descriptions. If the video makes the fabric look glossier, heavier, or more fluid than it is, do not use that version simply because it looks attractive.
The strongest fashion product video is not the busiest one. It is the one that guides attention from the full outfit to the details a buyer cares about while preserving the product's actual design.




Comments 0
Leave a CommentSend Comment
Anda harus Login terlebih dahulu untuk dapat memberikan komentar.